Quotes Book Using Handmade Paper
Hello, everyone!
It's Nancy Nickel here today. I'm very happy to be sharing my first Design Team project with you!
I love to use handmade paper to create books. I just love the way they feel in my hands. Sometimes I even like them to serve a purpose. Such is the case with the project I'm sharing today. This is my Quote Book:


-To decorate the cover, I adhered a piece of silver velum to another piece of matching handmade paper. I die-cut it with a decorative label die. I die-cut the letters for "QUOTES" and adhered them in place on the label. Finally, I adhered the label in position on the front of the book, ensuring it was above the ribbon. The silver velum works beautifully with the Iridescent Flakes.


It's Nancy Nickel here today. I'm very happy to be sharing my first Design Team project with you!
I love to use handmade paper to create books. I just love the way they feel in my hands. Sometimes I even like them to serve a purpose. Such is the case with the project I'm sharing today. This is my Quote Book:

Materials Used:
Blender,
Dies: Tim Holtz - Alphaneumeric, Spellbinders - Romantic Rectangles Two;
Small piece of Silver Velum;
Glue Stick;
Double-sided Tape;
1 yard Sheer Ribbon.
How I did it:
I followed all the directions in the PAPERMILL Papermaking Kit to make my paper. I recycled a newsletter, and it created this beautiful color of handmade paper. I created several plain sheets, and I added Iridescent Flakes to one sheet. I knew that would be for the cover of my book. Before using it for a book cover, you want to ensure that it is as smooth and flat as it can be. Since these papers measured 5 1/2" x 8 1/2" they were the perfect size to run through my Big Shot. I opened up some brand new cutting pads, added a shim to make it nice and snug, and ran the papers through the machine. This did a beautiful job of flattening them down and smoothing them out. All ready to become a book!

The Original Zig-Zag Book Kit comes with two pieces of chipboard that measure 4 1/2" x 5 3/4", as well as the acordian fold insert.

-I trimmed my cover paper down just a bit on one end. I usually like to have about a 1/2" overhang all around the chipboard. Lay the cover page face down on the table. Use the glue stick to apply adhesive all over one side of the chipboard. Lay it sticky side down, on the center of my cover paper. Apply even pressure all over, turn it over and burnish it well.
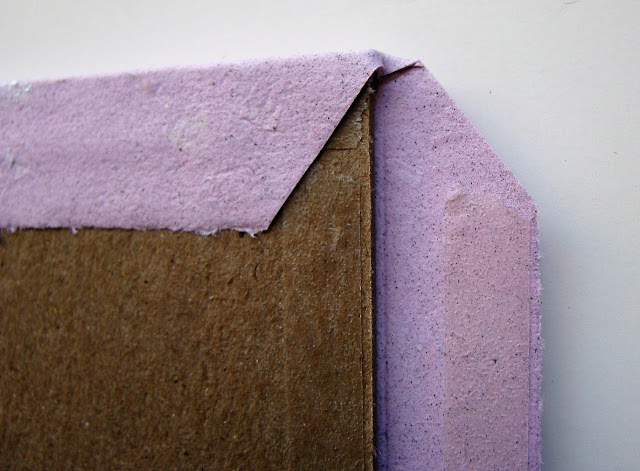
-Turn it back over and trim the corners, as shown in the photo. Don't trim right up to the chipboard but leave a space as shown. Apply double-sided tape as shown in the photo. Now use a bone folder, or score tool, and score the handmade paper all along the edges of the chipboard. This makes it easier to wrap around the chipboard.

-Remove the tape backing. You can do this all at once, or just a section at a time. Tightly wrap just the top and bottom of the paper around the chipboard.

-Here's a close-up of the corner. Get in there with your bone folder and snug up the corner as shown. This will ensure a nice clean corner on your book.

-Now wrap the other two sides tightly and securely. Burnish well to ensure good adhesion.

-Here's your finished front cover:

-Repeat this process for the back cover. Now you have your finished covers.
(Please excuse the shadow on my photo)

-Now is the time to decide if you want to add a ribbon, or other closure.
-Apply double sided tape to the middle left side of the inside of the back cover. Fold one yard of ribbon, with the bottom part being slightly longer than the top part. Position on tape, as shown in photo. I also added some tape inside the fold.

-There is no photo, but all that was left was to adhere the insert into the covers.
-Apply double sided tape to the outside page of the insert, center it in place over your cover. Repeat for the other side, ensuring that your orientation of the insert is correct.

- Since this is going to be used as a quote book, I wanted pockets inside the front and back covers. I simply cut angled pockets from another handmade paper, and adhered them in place. I also cut a tag to insert in one pocket.


Here's the front:

Here's the back:

Isn't it pretty? Not only that but it feels great to hold! :o)

Thanks so much for stopping by today! I hope you've enjoyed my first project share!
I have some more photos and thoughts about my Quote book over at my blog HERE.
See you again soon!
Nancy Nickel


Love your Quote book, it's so pretty!
ReplyDeleteThanks so much, Sandee
DeleteLOVELY! Be still my heart! I collect quotes......thousands of them! I better get busy and make a couple of dozen of these books to put some of them in.....smile.
ReplyDeleteThanks very much, Michele! I do too! lol That's one reason I always add the pockets...for all the little snippets and scraps that I've scribbled the quotes on as I've heard them! ;o) I'll definitely be making more of these fun books!
DeleteThis is a lovely idea!
ReplyDeleteThank you very much, Jean!
DeleteMy first notice of your site, and I love love love this booklet! I can think of so many personalized pages, using quotes our mother always said is one. Thank you!
ReplyDelete