Posts

Showing posts with the label dried flowers

Paperweight

Image
The other day I was organizing the part of my craft room when I store all the stuff that I've accumulated thinking that someday I'd include it in a project. I have an assortment of frames, boxes—some wooden with glass tops, some chipboard—coasters, glass panels, and other oddities that I know someday will be just the perfect thing. In among the accumulation was this beautiful solid glass domed paperweight. I knew as soon as I saw it again, that it would be perfect for showcasing one of the flowers that I'd dried with Arnold Grummer's Garden Press . I carefully peeled away the original velvet paper backing so I could reuse it, and removed the stock photo that was is the paperweight. I cut a circle of my handmade paper, made using basic papermaking techniques. I secured the dried pansy with a tiny droplet of quick dry adhesive, and let the glue dry completely before reassembling the paperweight. I inserted the handmade paper circle with the dried pansy, and reattache...

Square Zig-Zag Book™

Image
Hello, it is me, Ann, from the Arnold Grummer Design Team and the blog at http://www.annmakes.blogspot.com.  Today I want to share with you a really fun and easier than it looks project that you can make for yourself or for someone else.  This is also a great project to do in a group setting as the supplies come in a convenient kit to make 12 books! Here is one that I put together using many different techniques I have acquired while on the AG team. First I cut strips of handmade paper I  had made using the Arnold Grummer technique ( video link ).  The strips are slightly longer than the 4 1/2" covers and the widths vary.  I wove the strips of paper and glued them down to one cover with some Elmers clear paper glue.  For the other cover i used equal size squares which I also glued down. I painted the covers with some acrylic paint in an Antique White.  Once the paint was dry I painted on a coat of Crackling Medium.  After the medium...

Flower Fairy

Image
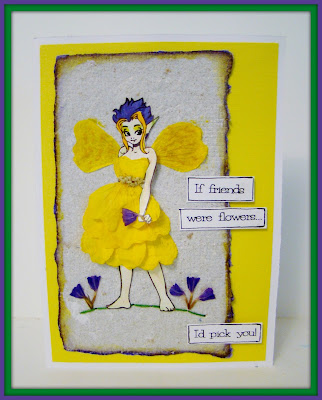
Hi everyone, ready to have some fabulous summer fun? Well, grab your Arnold Grummer products and fun is right within your reach! I really had a great time creating this Flower Fairy out of my Sundrops and  Sea Foam Flowers . I don't know what the flower is called that I used around her waist, so if you do let me know! First I began with a  Sin City  Rubber Stamp, you can use any form that doesn't have too much detail to it and is easily cut out. Keep in mind that some flowers are transparent and you can see the stamped lines through the petals so you want to remove as much of that as you can before assembling the flowers. For the skirt, I cut a piece of yellow cardstock out and glued the petals to it. For the bodice, I took a white Signo pen and marked out the lines. Because I cut out the arm, so it could lay over the top of her dress and hold a Sea Foam flower in her hand I used some Helmar Liquid Scrap Dots to give it some strength and keep it prop...

Creating Handmade Striped Paper

Image
There are many ways that you can create a design in paper.  I have shown you how add a heart into the center of a newly made sheet in my Love Notes tutorial.  I shared how to create an open area for a design in my Say I Love You with Handmade Paper post.  Today I would like to share with you how to make a striped sheet of handmade paper and how easy it is to do.  This Zig Zag book is covered with a piece of striped paper to give it a splash of color.   Create several colors of paper pulp to make the striped sheet and one addition sheet to cover the back of the book.  You can choose if you want it to be striped or a solid sheet.   Now you will need something to make a barrier in the deckle of your Papermill Pro .  I taped 2 of the templates together to use.  I held the template as I ladled the first color of pulp into the first section.     Then, I gently ladled some pulp onto the opposite side of the template....

Floral Greeting Card

Image
We're had several 80° days here, so I think it's safe to say that spring is leaving us and summer is here!! Our flowers are just beginning to bloom, and so is the greeting card that I made using my own handmade papers and dried botanicals. The paper was made following the basic instructions for making handmade papers. I used tissue tints  and red angel wing dried botanicals  to achieve the coloring in the pink mat. Before adding the angel wings to the pulp, I crumbled two petals into very fine pieces—almost dust. I dry embossed the paper for added texture. Next, I used a die to cut white blossoms and green stems from scraps of handmade paper that I had left from other projects. I never toss even the tiniest scrap of handmade paper. Even if the piece is too small to use in a project, it can always be recycled into paper pulp. Then, I die cut a flower from a dried leaf to layer on top of paper die cut flower. This is the darker flower. The lighter flowers are dried blosso...

Victorian Style Cone

Image
Hello, it's Ann here today with a sweet project to share with you.  Since wedding and shower season is coming I was inspired to make something with some handmade paper that I would have appreciated myself at my own wedding shower, many many years ago!  By the way I had a lovely lovely shower. Following the Arnold Grummer Paper Making method I made several different types of sheets of paper and stashed them away for whenever I am inspired to work on a project.  I had made this lovely shade of pink with the dried flowers after the Christmas holidays.  I had some used red tissue and white tissue paper and shredded them and made this paper.  I also added the dried flowers (available through the Arnold Grummer store ). To make a cone similar to this one all you need is a sheet of handmade paper and some glue.  I formed the cone shape and found that using my hot glue gun was the easiest method to get the cone to stay together with our unrolling.  Make...

Spring Tag

Image
Our days are slowing getting warmer, and there is the promise of spring and summer in the air. I'm eager for the flowers to bloom!! But, while I wait for them, I created this spring tag. I included fern fronds and flower buds that I dried last summer using Arnold Grummer's Garden Press.  (Can't wait to press flowers and leaves again this summer!!) I started with a wooden tag that I painted white. The next step was to napkin collage the flower motifs at the bottom and upper right corner. the fern fronds and flower buds were decoupaged in place using PPA.  When the tag was dry I added ribbons and the little bird in the upper left corner, which I die cut from my own handmade paper.  Carole

Memory Keeper Photo Frames

Image
I love sharing pictures of family, and decided to make these special by presenting them in frames covered with handmade paper. I used the Arnold Grummer's photo frame set . Everything you need to construct the frames comes in the kit, except the paper you use for covering. I followed the easy directions that are included in the kit. I selected handmade paper to cover the frames. I used a liquid glue to adhere the paper to the frame. I used small binder clips to hold the glued edges in place while the glue dried. Since handmade paper tends to be a bit softer that regular paper or cardstock, I protected the front of the frame with waste paper where I clipped the glued edges in place so the clips wouldn't dent the paper. I embellished one frame with rolled roses made from the scraps of the paper I used to cover the frame. For the other frame I embellished with leaves that I dried using the Arnold Grummer's garden press . Here are the finished frames, ready to...

Thinking of You This Summer

Image
    It's hard to believe that summer is almost in full swing now and we are half way through the year.  This time of year is often very busy for all of us and it's when I like to make a special effort to keep in touch with my friends and let them know I'm thinking of them.  This card was created with just that in mind.    I used one of the Papermill Kits to create the white cardbase and the green sheet of paper.  I added some of the Tissue Tints to get the green color in the white paper pulp.   I had a leftover flower and leaf when I had dried some for a previous project so I decided to use it, too.  The flower was dried using a Microfleur Press .   It's great to be able to dry several flowers and keep them on hand to use for those special projects.  There's nothing more fun than using a sheet of handmade paper and then adding a hand dried flower onto it.    Enjoy creating some special cards...

"F" is for Flowers and Family

Image
  It's hard to believe it's June already and the flowers are in bloom.  Well, in most places.  The flowers where I live have just started to bloom for the first time this year.  I am anxious for the small flowers to bloom because I have found another great hobby from Arnold Grummer's....flower drying.  I purchased these flowers shown on this plaque since mine weren't blooming in time for me to do this project that now sits in our kitchen which is our family gathering spot.    The background for this is a handmade sheet of paper using one of the Papermill Kits .  It was cut to 8" x 8" and adhered to one of the Paper Quilt Squares .  The word "family" was cut with a die cut machine and attached to the paper.  Family is important to us so this was the perfect word to include with these beautifully dried flowers.    I purchased a bouquet of flowers and dried a few of them using a Microfleur Press .  I dr...

Mica Necklace with Handmade Paper and Dried Botanicals

Image
If you follow my projects, then you know that I gravitate to jewelry items. Today, I've combined mica, handmade paper and dried botanicals to make this gorgeous OOAK piece. One of a kind because each leaf, each piece of mica and each piece of handmade paper has its own characteristics. I dried the leaves using Arnold Grummer's Garden Press . The paper I made by adding tissue tints and dried rosebuds to the paper pulp. I started with mica tiles from USArtQuest. Mica is a rock that is composed of several layers. After selecting a piece for my necklace, I easily delaminated the layers by gently slipping a fingernail between the layers. Next, I arranged the leaves and paper on top of the bottom piece of mica. I tore the paper so it would have feathered, irregular edges. You can see that the leaves extend beyond the edges of the mica. I used small pieces of Cut-Bond-Create , a double sided adhesive, to bond the two pieces of mica. You can see the blue grid backing on th...

Journal with Handmade Papers

Image
By: Carole Lassak Recently, I needed a quick, but impressive, gift. So, I turned to my growing collection of handmade papers. I made this gorgeous journal in just over one hour!! So easy. This comes as a complete photo album kit from Arnold Grummer's, but I made a few personalizations :) I'll share the basic assembly instructions, and you can use chipboard and papers to your own dimensions. You will need chipboard, cover paper, liner paper, paper for filler pages, your choice of embellishments. Note: Just so you don't think that you teleported to another blog, the pictures showing assembly feature different papers than the finished journal. Chipboard cover and end boards with cover and liner papers. Completely cover the chipboard pieces with adhesive. I used Elmer's Craft Bond glue stick. Lay the cover and end boards on the reverse side of your cover paper, leaving a 3/16" space between the boards. This allows the finished book to open easily. My ...