Posts

Showing posts from 2013

Start the New Year Off Right

Image
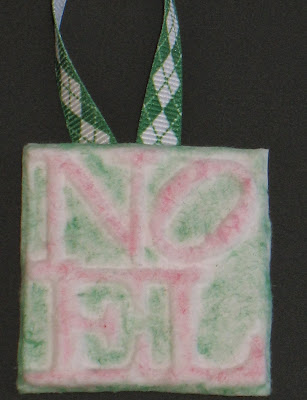
It's hard to believe another year has gone by and that this will be my last post for 2013.  I know many have been through difficult times this year, my family included, so I'm glad in a way to see this year end, but just because it's ending doesn't mean there's not fun in store for 2014.  I'm looking forward to seeing what the upcoming fun will be. The start of a new year is the time for resolutions.  Make one of your resolutions be to start a new hobby such as making your own handmade paper.  It's a great way to have fun and create some wonderful handmade items including all of the gifts you will need next year.  You know you'll need one sooner than you want to think about it so now is the time to get started! This New Year's banner was created using handmade paper.  The "bow" started out to be three bells, but when I dried the paper using an iron I had laid them on top of each other and suddenly my eyes saw a bow and that's how

Christmas Angel from Handmade Paper

Image
Are you still decorating for the holidays? I am—and probably will be until the wee hours on Christmas Eve. (But, then, I guess that would be the very early hours of Christmas Day!!) Anyway, you get what I'm saying: I'm going to be decorating until the last possible moment. Many of my decorations include handmade paper, and today I'm sharing one of my favorites. It is a 3D angel. She's so easy to make!! I'm sharing the pattern in PDF , MTC (Make-the-Cut) , and SVG formats. Here you can see the angel cut out from a light blue handmade paper. I colored the paper pulp with a pale blue tinting tissue and added botanical inclusions. I following these basic instructions when making the paper, but for this piece I processed longer so the inclusions would be blended into smaller pieces. Next step was to embellish the cutout. I chose a silver metallic chenille stem for her halo and Dew Drops along the hemline. You could also use glitter glues, rhinestones, or othe

Designing with Paper!

Image
I love working with paper and am  really excited to say that I will be joining the Arnold Grummer's design team  in January!    Making dresses with handmade paper is so much fun. Cut the paper, get it damp and it is easy to work with, almost like delicate fabric. If you have a dress form to work with it makes it easier to form the wet paper when creating the dress. Before the paper is  wet run a thread about every 1/2 inch through the top of the skirt to help hold the gathers in place. After the paper is wet gently (VERY GENTLY) pull the thread to make the gathers.  Pictured is the damp paper dress tied with ribbon on the form ready to dry overnight. When making a project like this allow plenty of drying time.  NO cheating... the paper must be totally dry before removing it from the dress form. The dried pieces are able to free stand.  To make the dress I free cut the a skirt, three parts for the bodice and the sleeves. The size will depend on the dress for

Jolly Old Elf Handmade Paper Rosette

Image
I love making rosettes and this time of year I always seem to make as many as I can.  This rosette is extra special because it's made using handmade paper.  The image is one of my favorites that I've had for a while now.  It came from one of the collage sheets from Altered Pages.  I've been in a vintage creating mood lately so chose to make this rosette have a vintage look to it.  For the rosette, I made 2 sheets of paper using the Papermill Pro Envelope & Stationary Kit .  I used some scraps of white paper that I had been collecting and followed the basic instructions for making paper.  When I added the water according to the directions, I added a 1:1 ratio of water to tea to dye the paper.  I laid the paper flat and allowed it to dry for a day. Here's a little hint, if you don't want to use an iron or heat gun to dry it quickly, you can lay it a little ways away from a heat vent and as the furnace turns on and off it helps to dry the paper.  Be sure to

Snowflake Christmas Card

Image
There's always a flurry of activities between Thanksgiving and Christmas—shopping, parties, gift wrapping, Christmas cards. But this year I'm ahead of the game, if only on one item on that list—my Christmas cards. I've been thinking about the design for quite a while. Since this summer, actually. I live in Ohio where we have brisk autumns that move into cold  winters. I like to do my handmade paper making outside, so I try to make lots of paper during the spring and summer fair-weather months. I made the papers for this snowflake Christmas card way back in May or June using these basic papermaking instructions . Since I knew I'd be using these papers for Christmas, I was sure to include plenty of metallics and sparkles along with botanicals . I had the pastel color palette in mind when I selected my tissue tint s to color the papers. I used a variety of Sizzix snowflake dies to cut the individual snowflakes, then layered the four snowflakes on the card base. Las

Taking A Minute

Image
Santa is taking a minute to check his list.  He's looking to see what you've asked for from Arnold Grummer's Papermaking this year.   Have you made your list yet?  Be sure to get it done or you will miss out on the chance to save 20% on your order.  Santa was made using the cotton linter casting squares that I placed in an old cookie mold that I had. I followed the directions on the squares and pressed them into the mold and then removed it.   After that I let it dry for several days.  After it was completely dry, I used some chalk pastels to add color to him and then finished some of the details using Stickles and Liquid Pearls.  Don't have any molds of your own?  That's ok.  Arnold Grummer's has a huge selection to choose from so be sure to add them to your list.  While Santa was drying, I used one of the paper making kits and followed the basic paper making instructions to create a sheet of paper.  I had the idea of making a two toned paper which t

Handmade Paper Treat Bag and Placecard

Image
I love elegant parties and showers!! And what could spell elegance better than handmade paper. I made the paper following these  basic papermaking instructions . This treat bag and place card are from one sheet of 8.5" x 11" paper.  I used this pattern for the treat bag, and a 5" x 3.5" piece of the handmade paper, folded in half for a finished size of 2.5" x 3.5". I printed the place card text on vellum. The finished size of the vellum is 2.75" x 1.5". I glued it to the folded paper with a couple tiny dots of liquid adhesive. After stuffing the treat bag, I tied the top closed with a length of tulle. Now I'm all ready for a party!! I can think of several ways to use these darling bags at parties and receptions. They could hold mints at every place setting. They could hold grains and bird seed to shower a new bride and groom. What about a take-home gift for shower guests? Maybe a small bundle of empty bags tied with a ribbon for a stoc

Molded Handmade Ornaments

Image
It's time to decorate those trees for holidays.  Did you know that the molds from Arnold Grummer's make the perfect handmade ornaments?  I've been having so much fun molding paper recently.  I even have my next project that I will be sharing with you created and just needing the final touches.  I am so excited share the great news, too!  The holiday molds are on sale right now.  Isn't that great?  Just in time for you to start creating your ornaments to decorate the tree or give as gifts.  Who doesn't love receiving something handmade as a gift?  I know I do.  For this ornament, I used some cotton linters and followed the directions that come with them and had this ornament in just minutes.  Once it was dry, I used some chalk pastels on a dry paint brush to add the color and a ribbon to finish it off.  It's that easy!  Still not sure about it?  Check out these great paper casting instructions .   See.  It really is that easy. Just think of all the happ

Maple Leaf Paper Casting

Image
I've really enjoyed paper casting using Arnold Grummer's molds. There are basic paper casting directions on the Arnold Grummer's website. These are a few of the favorites I've been using lately. #711 Gingko Leaf #717 Maple Leaf I found the perfect frame for the maple leaf mold at one of my most-frequented thrift stores. I made several different paper castings of the maple leaf, with and without inclusions. This is the casting that I chose for my frame. And here it is in the frame. Wasn't I right? Isn't this the perfect frame for this maple leaf paper casting? You can enjoy making your own handmade paper and papercasting with this month's 20% discount. Arnold Grummer's November sale!!  Just enter the promo code Nov20 for 20% off your entire order. You can see more projects on my Create & Craft blog . Carole

We are looking for a Design Team

Image
Arnold Grummer is looking for a few awesome Mixed Media Artists to showcase Arnold Grummer's papermaking kits and new (!) bookmaking products!! If you LOVE paper crafts and find the idea of making your own papers to use on layouts, cards & projects inspiring, show us what you can do!! We're looking for talented artists and designers who know how to inspire others to create. For those that also seek opportunities to have their papercraft work prominently featured, Arnold Grummer's Design Team is a great fit! What’s expected of an Arnold Grummer Design Team Member? * Ability to create compelling projects that showcase Arnold Grummer products * Experience taking good photos or scans of projects * Active interaction with members of Arnold Grummer's facebook and blog as they discover YOUR WONDERFUL DESIGNS!! What are the responsibilities of an Arnold Grummer Design Team Member? * The Arnold Grummer Design Team is a 6 month hitch, from Jan 1, 2014 – June 30,
Image
Arnold Grummer is looking for a few awesome Mixed Media Artists to showcase Arnold Grummer's papermaking kits and new (!) bookmaking products!! If you LOVE paper crafts and find the idea of making your own papers to use on layouts, cards & projects inspiring, show us what you can do!! We're looking for talented artists and designers who know how to inspire others to create. For those that also seek opportunities to have their papercraft work prominently featured, Arnold Grummer's Design Team is a great fit! What’s expected of an Arnold Grummer Design Team Member? * Ability to create compelling projects that showcase Arnold Grummer products * Experience taking good photos or scans of projects * Active interaction with members of Arnold Grummer's facebook and blog as they discover YOUR WONDERFUL DESIGNS!! What are the responsibilities of an Arnold Grummer Design Team Member? * The Arnold Grummer Design Team is a 6 month hitch, from Jan 1, 2014 – June 31,

Christmas is Around the Corner

Image
Yes, today is Halloween and you are seeing right.  It's no trick, but rather a treat.  This is a Christmas card.  It's coming quickly and now is the time to start thinking about making all of the cards that you need to send out this year.  I just couldn't manage to do another Halloween project after all of them that I've already done so I started thinking about the next upcoming holidays.  Christmas is my next favorite for several reasons, one of which I will explain later in this post so be sure to read to the end.   I created all of the paper for this card using one of the Arnold Grummer Papermill Kits  and the basic papermaking instructions .   I used some scraps of green paper that I had left over from other projects to create a half sheet with the Deckle Divider since I didn't need a big sheet of it just to run through my die cut machine.  I did the same for the white paper since I, also, didn't need a lot of it.  The red sheet which ended up being

Journal with Handmade Papers

Image
By: Carole Lassak Recently, I needed a quick, but impressive, gift. So, I turned to my growing collection of handmade papers. I made this gorgeous journal in just over one hour!! So easy. This comes as a complete photo album kit from Arnold Grummer's, but I made a few personalizations :) I'll share the basic assembly instructions, and you can use chipboard and papers to your own dimensions. You will need chipboard, cover paper, liner paper, paper for filler pages, your choice of embellishments. Note: Just so you don't think that you teleported to another blog, the pictures showing assembly feature different papers than the finished journal. Chipboard cover and end boards with cover and liner papers. Completely cover the chipboard pieces with adhesive. I used Elmer's Craft Bond glue stick. Lay the cover and end boards on the reverse side of your cover paper, leaving a 3/16" space between the boards. This allows the finished book to open easily. My

Celebrate by Candlelight

Image
This easy to make lampshade using products from Arnold Grummer's will add a little shine to any holiday.  A green one would be perfect for a Thanksgiving table.  How about one in each window of your house for Christmas?  The shade was created using one of the  Papermill Kits and the basic paper making method .  Since Halloween is coming up quickly, I chose to use the grey cotton rag & wool pulp  which I mixed in with white paper to give it a greyish tone.  Once the pulp made according to the instructions, I poured it into one of the fabulous templates creating each section of shade.  The shade finished  according to the directions for making a piece of paper.  I used one of my favorite dies and die cut machine to cut the pumpkin into each section and then assembled the shade.  The matching ribbon was added to finish off the edges.  I hadn't decided yet, what I would place the shade on so I played it safe and sprayed it with some of the Flame Free for Paper Crafts in

Embedded Botanicals in Handmade Paper

Image
By: Carole Lassak Papermaking at my house is a family affair. My husband is a phenomenal gardener, so he provides me with a steady supply of botanicals. Steve's Deck Garden My grand-daughter is my Number One papermaking assistant. Papermaking is such a great activity for children of all ages!! I made the paper for this project using standard pour method papermaking instructions . I poured a slightly-less-than-normal amount of pulp in the deckle, then added a fern frond from one of my husband's plants. I topped this off with a bit more pulp before lifting the deckle. As I pressed the water from the sheet of paper, the fern frond became partially encased in the pulp. You can even see the fern spores on the exposed portion of the frond. I love the deep texture the fern creates as it is encased in the paper. I found the perfect box to showcase this special handmade paper at our local thrift shop. The smaller frond on the lower right was pressed and dried using Arnold