Posts

Showing posts from November, 2014

Santa Is Coming

Image
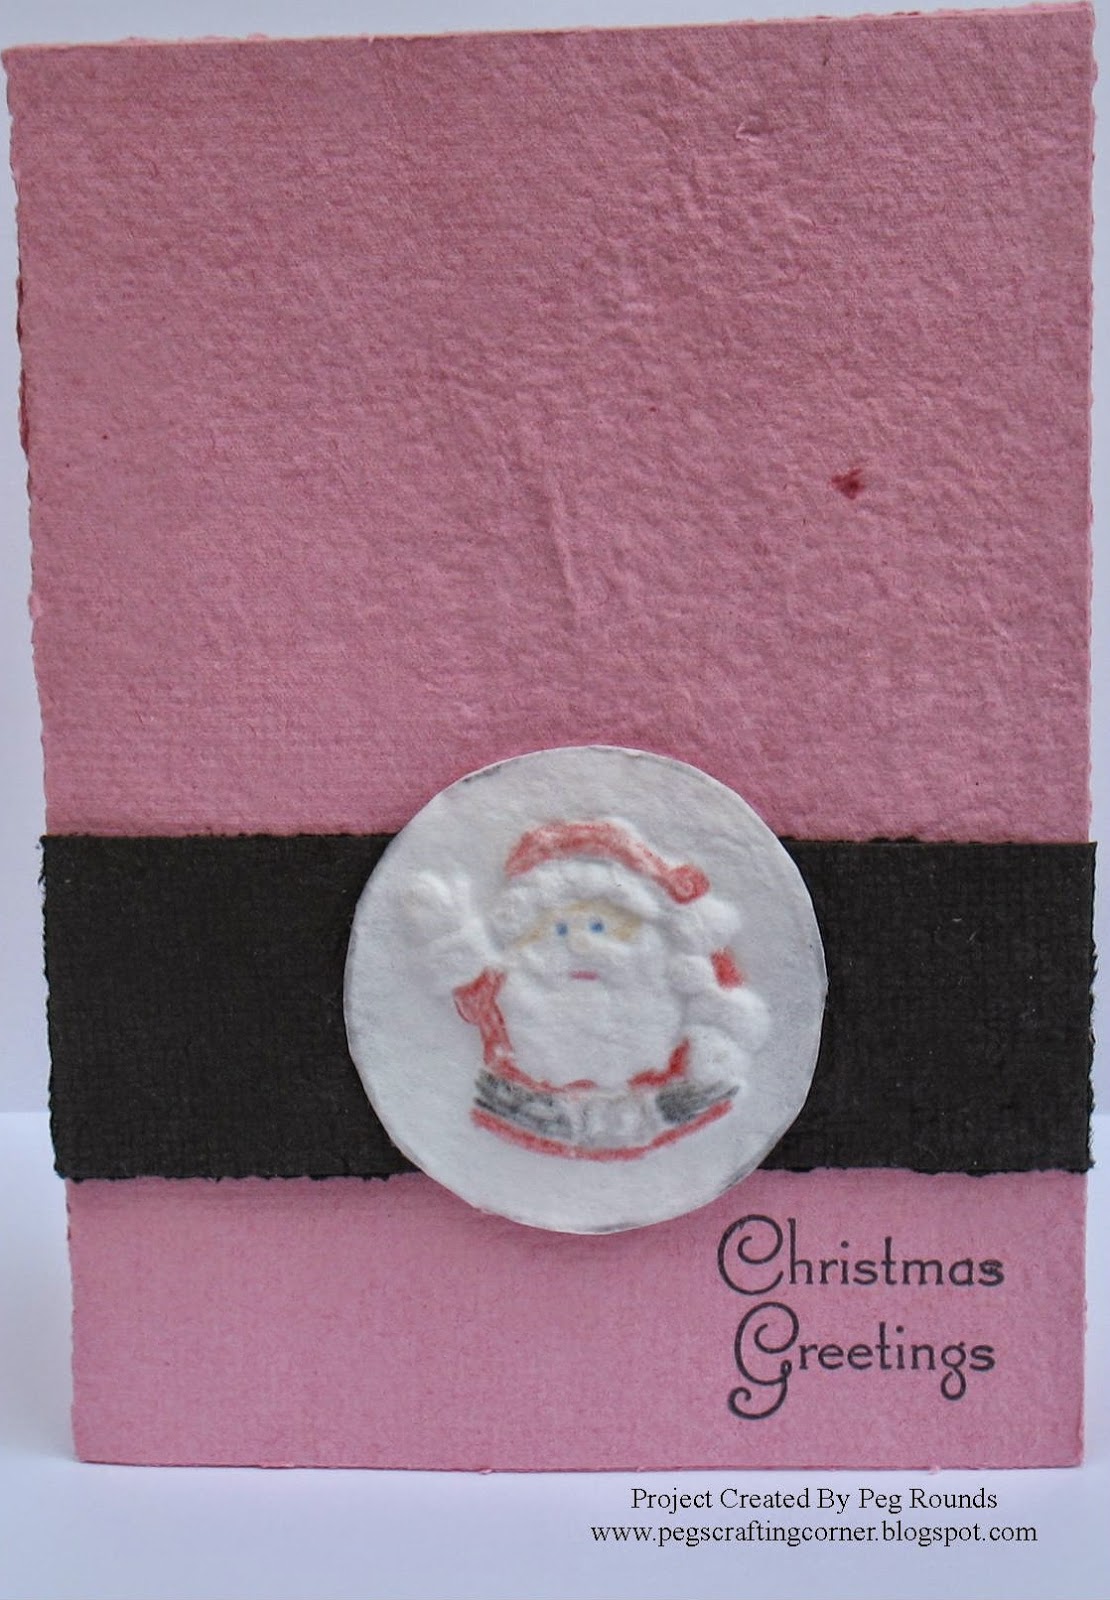
  He will be here very soon!  Now is the time to be making your lists and holiday cards.  Create this fun Santa Suit card using handmade paper for a fun new look. Start by using the Papermill Pro Kit to create a red and black sheet of paper.  Use the basic instructions to help you with those.  Once they are dry, create a 5" x 7" card base from the red sheet.  Cut a 1 3/4" x 5" strip from the black paper and attach it to the front about 1 3/4" from the bottom of the card.  Stamp your favorite sentiment in black ink. Now, use the Jolly Santa mold and some cotton linters to mold Santa.  An easy way to get a perfect round circle from any round mold is to use a small glass that fits around the design once the piece has dried and trace around the glass.  Use a pair of scissors to trim the edge where you have traced.  This will give you a clean edge and a good round circle.  Add color to the design by using your favorite colored pencils.  Who doesn'

Giving Thanks Cards II

Image
©Michele Emerson-Roberts 2014 The Grummer company and family have always promoted using “stuff” you have on hand that otherwise might just go into the trash; whether it’s using onion skins to make gorgeous paper, using those dried needles from your Christmas tree as inclusions, or just not wasting your resources. I am a firm believer in “waste not want not” and re-purpose whenever I can. Join me in this adventure - I would love to see what you come up with.   Supplies: Any of the Arnold Grummer™ paper making kits A sunny window Blender, cello sponges and soft towels Personal paper cutter, scissors Scor-Pal™ Beacon QuickGrip™ and ZipDry Adhesives, double sided foam tape or foam dots Scraps of golden toned papers (think junk mail, etc.) Dies:  Spellbinders™  - pumpkin, gourds and cornucopia, small frame           CheeryLynn™ - “Happy Thanksgiving”                         Die- Versions™ - Indian Corn     Various Autumn themed embossing

Giving Thanks Cards I

Image
©Michele Emerson-Roberts 2014 I love working ahead, and will often start creating for the next year’s holiday a day or two after this year’s holiday. Take a peek at some of my Thanksgiving cards for 2015. The Grummer company and family have always promoted using “stuff” you have on hand that otherwise might just go into the trash, whether it is using onion skins to make gorgeous paper, using those dried needles from your Christmas tree as inclusions, or just not wasting your resources. I am a firm believer in “waste not want not” and re-purpose whenever I can. Join me in this adventure - I would love to see what you come up with. Here are just a few Thanksgiving cards created with “stuff” that someone else would have thought of as “trash”. Supplies: Any of the Arnold Grummer™ paper making kits A sunny window Blender, cello sponges and soft towels Personal paper cutter, scissors Scor-Pal™ Beacon™  ZipDry™, Double sided foam tape or foam

Quick Fall/Thanksgiving envelope by Linda Hess

Image
With the holiday season upon us, A Thanksgiving piece called to me.  My brother is in Montana for the holidays and I want to send him a little treat.  What better way to send it than in a handmade envelope using my Arnold Grummer Papermill Pro! I pulled out the Large Envelope Template that I have been itching to try and added it to the normal paper set-up.  I mixed shredded paper with wax paper to create the pulp.  I wanted a bit of color, so I added a little bit of LuminArte' Pure Color in Key Lime. WRRRRRRRRRR...the color was gorgeous!  Honestly it took me a couple of tries to get the pulp poured properly into the template, but once I did the envelope quickly came together.  I began to press out the moisture, but left it quite damp so I could add a design to the face of it. I found a thanksgiving napkin and thought the design would work well.  Perfect size to stretch from one side to the other without noticeable lines showing.  I tore along the edges of the design and then

Wallpaper Cards

Image
©Michele Emerson-Roberts 2014 Recently a friend gave me several large boxes of wallpaper samples. I was in the process of sorting the samples when I remembered that I still needed some Thanksgiving cards and had just come across the perfect piece of scrap wall paper! I had enough of the wallpaper border left to also create a great birthday card.   Supplies: Any of the Arnold Grummer™ paper making kits A sunny window Blender, cello sponges and soft towels Personal paper cutter, scissors Scor-Pal™ Beacon ZipDry™ Adhesive, foam tape or foam dots Scraps of white, tan and brown paper (think junk mail, etc.) Dies:    Spellbinders™ acorns             Dreamweaver™ ovals             Sizziix™ Tim Holtz leaves and matching embossing folder             CheeryLynn™ words “Happy Birthday” Spellbinders ™ Grand Calibur™ Machine Several pieces of wallpaper border Scrap of autumn toned paper ColorBox ™ dark brown ink

Are You Ready?

Image
The holidays are upon us.  It's hard to believe isn't it?  Many are already shopping while other have yet to start.  Wherever you are at on your gift buying list don't forget one of the important things to finish it all off....wrapping paper and tags!  There's something special about receiving a gift with a handmade tag and they are simple to make using items from Arnold Grummer's Papermaking .  Let's get started.  First you will want to make some paper pulp using the basic instructions .  This tag was created using leftover scraps of kraft paper.  Once you have that made, pour the pulp into the tag template which has been placed in the deckle of one of the Papermill Kits .  Remove the piece and finish it off as you would a sheet of paper according to the instructions.  Allow it to dry or use an iron or heat tool to dry it quickly. Now, make the sheets of paper you will need for your project using the Papermill Kit.  Finish them following them directions

Surface Embedment Technique

Image
It is always a challenge to come up with something a bit different for the posts I do for the  Arnold Grummer Papermaking blog .  It seems that I have this "habit" of never wanting to just make a single sheet of paper or make a single paper casting square.  To me it's always about experimenting or trying something new or at least a new twist on an existing technique. There are a few different books on "paper making" in my craft library, but the books I refer to the most are " The Complete Guide to Easy Papermaking" , " Arnold Grummer's  Complete Guide to Paper Casting"  and  "trash-to-treasure paper making" , also by Arnold Grummer.                                             It was in "trash-to-treasure papermaking" where I found the idea for "Surface Embedment" and the term "Napkinization", so I decided to give this a try.  This is a process using an artistic paper napkin to transform a sim

Quotes Fan Book

Image
©Michele Emerson-Roberts 2014 I always need “stocking stuffer” kinds of gifts… you know the ones that are really easy to create, don’t cost an arm and a leg to make, and can be made by the dozen, but look like they took a lot of work to make! Once again I turn to my stash of Arnold Grummer’s® products to solve the problem. The books can be used for thoughts, quotes, memories etc.  You can make paper for the covers, use scraps left from other projects, or just scraps of patterned cardstock or paper. Follow along and see how easy it is to create this great quote book. Supplies: Any of the Arnold Grummer™ paper making kits A sunny window Blender, cello sponges and soft towels Personal paper cutter, scissors Beacon QuickGrab™ Adhesive, double sided foam tape or dots Scraps of black paper (think junk mail, left over cardstock scrap, etc.) One or more of AG #2718 Mini Fan Book Verbiage stamps and black ink pad or computer generated quotes o

The Seasons Are Changing

Image
 The weather has taken a big turn for many of us this past week.  It seems like the leaves were just at their most beautiful as they changed celebrating the new fall season.  This week those leaves are gone replaced for many with snow.  As this happens though, we cannot forget that Thanksgiving is quickly approaching and there are many who will not be able to be with their family, but they don't need to be left out.  Send them a card to let them know that you are thinking of them during this time of year! This card is made using left over paper scraps.  I save the small pieces that I have punched, die cut from or used in my die cut machine to turn into new paper.  I didn't want a bright white paper for it so I added some brewed tea to the white pulp and then tea died some lace to match.  The new sheets were all made using the Papermill Pro Envelope and Stationary Kit and the basic paper making instructions . I used torn edges on the new paper to make a subtle change to

Card Trio Gift Set

Image
I'm trying to get ahead on my gift giving. Usually it's a mad dash the last couple weeks before Christmas. This year I've vowed to start early so I can enjoy the holidays, too. With that in mind, I created this trio of greeting cards for gift giving. Each represents a different handmade papermaking technique. When I make my papers I follow these basic instructions . I used Arnold Grummer's trifold window cards for each of these. For the first card, I dry embossed a piece of handmade paper and inserted it into the window card following the instructions on the package. Handmade paper embosses beautifully!! The second card features a handmade paper casting using Arnold Grummer's gingko leaf mold . The third card displays a dried leaf on a background of handmade paper. I dried this coleus leaf using the garden press . The paper has botanical inclusions. I plan to make several more of these greeting cards sets for gifts for this years holiday season

Simple Casted Ornaments

Image
These little paper casted ornaments are truly easy to create.  Process  five  cotton linter   squares  for each ornament.  The art molds used were:  Snowman  #707,  Bird  #712,  Three Trees  #706, Snowflake. Check out this  link  for instructions on "how to cast paper". After casting the designs and before drying the casting completely, I used a straight pin to pull away pulp from the edges to give them a feathered look. Using balsa wood, because of its light weight and easy of cutting, make four squares that measure 3" x 3".  Sand the edges smooth and sand the four corners to make them round. Cut squares to the same size from a glitter cardstock.  Use a corner rounder punch on each corner.  Adhere the glitter cardstock to the balsa wood squares with a double sided adhesive, like Therm-o-web PeelnStick.  NOTE :  Water base glues could warp the balsawood.   Glue the paper casting onto the center of the glittered covered squares using Beacon 3-in-1 glu