Posts

Showing posts with the label dry embossing

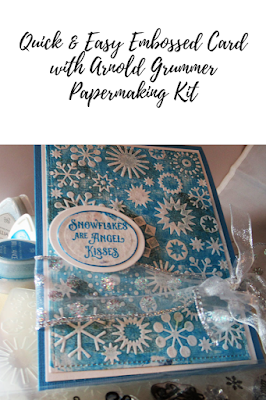
Quick and Easy Embossed Snowflake Card by Steph
Image
Quick and Easy Embossed Card Hi everyone, Steph Ackerman here today with a quick and easy Embossed Snowflake card using handmade papers created with the A rnold Grummer Papermaking Kit . How to  Tearing a sheet of 12" x 12" cardstock, place it into a blender with 2 cups of water.  Blend it until you've created slurry. Using the Large Pour Mold ,  pour the slurry into the mold.  Remove the paper and squeeze out all the excess water. Allow to dry thoroughly for a wonderful piece of paper. To create my card, I simply cut the paper to fit my embossing folder.  Using blue and black inks from ImagineCrafts ,  I inked the embossing folder, placed the panel inside and then embossed it.  Next, I die cut it so it would fit my card.  I matted the panel with white cardstock, then added it to a blue card.  Next, I wrapped the card with ribbon.  A simple die cut phrase from Joy Clair was added ...

Trio of Christmas Cards

Image
The calendar says December, so that means that I am fully involved in all things Christmas. At the top of my list is Christmas cards. I always make my own, and this year I'm adding handmade paper made with Arnold Grummer's Papermaking Kit to the mix. For the first card I embossed a piece of purple metallic cardstock and attached it to the front of a card blank. I used a liquid adhesive to attached a lavender snowflake cut with a Sizzix die. For the second card I used my Zing electronic cutter to cut a filigree Christmas tree and two tags, one slightly larger. I used a snowflake border punch along the bottom of the card. I stamped Peace in gold and heat embossed with gold embossing powder. The reindeer is handmade paper cut with a Sizzix die. I had to bling up the reindeer's nose with a tiny red pearl.  The third card is an easel card. So easy to do and really has a big impact. First, I cut a piece of midnight blue metallic cardstock the same size as the f...

Handmade Paper Table Setting

Image
It's definitely holiday season, and I'm thinking about all the great family dinners that we'll be having. I wanted to create something special for our Thanksgiving table, and handmade paper is always special. Here's what I created. I embossed a sheet of paper that I made using Arnold Grummer's Papermaking Kit and the basic directions shown in the top navigation of this blog. I embossed this with a leaves and branches embossing folder. I was amazed how well the handmade paper embossed!! I scored the sheet into thirds to make a pocket.  Next, I cut the bird and bird cage from other pieces of handmade paper using Sissix Caged Bird die. I assembled these pieces and used a liquid quick drying adhesive to glue them to the pocket. For the napkin holder, I cut two slits in the bird's body, threaded a piece of ribbon through the slits, and glued the wing on top to hide the slits. I tied the ribbon with a bow on the under side of the napkin. ...

Autumn Leaves Card

Image
I hate to see the end of summer, but our weather here in Ohio is starting to feel like fall. So, I was inspired to create this autumn greeting card. I started with a blank card, handmade paper that I made using the Arnold Grummer Papermaking kit , and an embossing folder. To get the deckled edge on the handmade paper, use water to paint a line on the paper, and then, gentle pull the paper apart along the water line. I steamed the handmade paper with my iron to make it a bit more flexible before embossing it. I gathered the leaves from my yard. Do you believe that the trees are already dropping their leaves?? I coated each side of the leaves with Perfect Paper Adhesive from USArtQuest . This will ensure that they remain flexible, and won't crumble. I used tape runner adhesive to adhere the leaves as an embellishment on the card. Here's my finished card. Be sure to check out my other projects on my Create & Craft blog .   Carole