Posts

Showing posts from July, 2015

Handmade Journals

Image
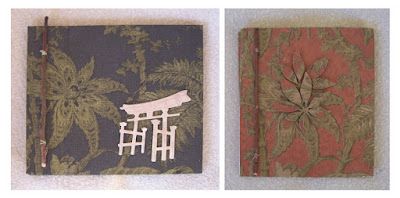
©Michele Emerson-Roberts 2015 I love journals and handmade books. The ones that will fit in your purse or tote are especially nice to have and to create. I had some scraps of wallpaper that was perfect for the covers and the right size too! The two “stick bound” journals are the same size, but orientated differently. I like to use handmade paper for the pages as it makes them even more special. You can make these any size - mine are 4 ¾ x 6”. The covers are made of mat board scrap pieces that I had on hand. The pages are ¼ sheets of handmade paper.. FYI - the stick bound book is one of the easiest books to create in multiples, and they make marvelous gifts! Supplies: Any of the Arnold Grummer paper making kits A sunny window, heat gun or microwave oven Blender, small strainer, cello sponges and soft towels Scraps of off white or cream paper (think junk mail, etc.) Spellbinders Grand Calabur II cutting and embossing machine Dies: Ch

Country Home Planter

Image
Michele Emerson-Roberts 2015 My wonderful friend GayLynn is truly a “country girl”. Her birthday is coming up and I wanted to make something special for her gift. She has a deep window sill over her sink and it will be the perfect place for this rustic “country home” planter. Follow along and create one for yourself or a gift. Supplies: Any of the Arnold Grummer paper making kits AG CP house mold A sunny window, heat gun or microwave oven Blender, small strainer, cello sponges and soft towels Scraps of white paper (think junk mail, etc.) Die:  Tiny heart Spellbinders Grand Calabur II cutting and embossing machine Westcott™ paper trimmer Tiny heart punches Beacon QuickGrip™ and ZipDry™ adhesive Tree/bush branches approx: 25 - 30 Chip board (I used cereal boxes) Scrapes of heavy weight dark brown handmade paper ColorBox Stylus™ handle and white foam tips Brown water based ink pad 4 x 4” florist foam block Instr

LOVE to READ with Tamiko

Image
Hey good people!  It's Wednesdayyyy and I am here with a cute litle set of bookmarks.  If you read even a little bit they are worth creating for yourself. or to drop in the mail.. and even to leave a bunch for the members at church or school. I made this paper with some roses that dried in a bunch hanging in the closet.  Unfortunately, I was a the victim of 10 yr old so I have no step out photos to share this time.  I plan on doing some more papers soon and I hope to have those moments captured for you. I simply added my dried roses to my torn papers in the blender,  Turned that into slurry goodness.  It even tinted my papers. Two of the book marks are from a bundle called Card and Tag MediumTemplate Collection and the hearts are are available from a bundle called Envelope and Stationary Large Template Collection .   A term I would like to introduce you to today is INCLUSIONS Inclusions are what you call the added particles to any paper pulp mixture.  As you wil

Square Zig-Zag Book™

Image
Hello, it is me, Ann, from the Arnold Grummer Design Team and the blog at http://www.annmakes.blogspot.com.  Today I want to share with you a really fun and easier than it looks project that you can make for yourself or for someone else.  This is also a great project to do in a group setting as the supplies come in a convenient kit to make 12 books! Here is one that I put together using many different techniques I have acquired while on the AG team. First I cut strips of handmade paper I  had made using the Arnold Grummer technique ( video link ).  The strips are slightly longer than the 4 1/2" covers and the widths vary.  I wove the strips of paper and glued them down to one cover with some Elmers clear paper glue.  For the other cover i used equal size squares which I also glued down. I painted the covers with some acrylic paint in an Antique White.  Once the paint was dry I painted on a coat of Crackling Medium.  After the medium was dry I painted on a coat of Wh

Last Minute Gift

Image
Have you ever needed a quick, last minute gift? And since you're a creator of beautiful things, you know that the recipient expects something handmade. Recently, I was in this very situation. Here's what I made. I used  Arnold Grummer's 52 Card Fan Deck . The fan deck comes with chipboard covers, pages, and a post to secure the pages. I decoupaged the outside of the covers with coleus leaves that I dried using Arnold Grummer's Garden Press . By the way, drying leaves and blossoms is so easy with the garden press, and I have lovely dried elements to include in projects even when the snow is flying. I used USArtQuest's Matte PPA as my decoupage medium, because, unlike other decoupage mediums, when PPA dries it forms a permanent acrylic seal over my project. Other mediums can reconstitute and become tacky or sticky when exposed to humidity or moisture—not PPA. You can see that as I was adhere the leaves, they extended beyond the edges of the cove

Truth Fan Book

Image
©Michele Emerson-Roberts 2014 How fun and easy is this! Here is another from the series of “Fan” books that I created during one session. Each book is different, but made in my signature color scheme of black and tan. Each book is full of quotes related to the title on the cover of the book. Supplies: Any of the Arnold Grummer™ paper paper making kits A sunny window Blender, cello sponges and soft towels Personal paper cutter, scissors Beacon QuickGrab™ Adhesive, double sided foam tape or dots Scraps of black paper (think junk mail, left over cardstock scrap, etc.) One or more of AG #2718 Mini Fan Book Verbiage stamps and black ink pad or computer generated quotes or sayings ColorBox ™ Stylus™ handle and soft tip Small scrap of chip board Dies: CheeryLynn™ tiny leaf strip Die cut machine: Spellbinders ’ Grand Calibur Instructions: Follow the directions found in any of the Arnold Grummer™ paper making k

Small note cards

Image
Hi everyone, today I made some petite sized note cards using the Arnold Grummer Gift Card and Envelope template , I just love how tiny they are. I am a big fan of miniature but not so much of my big fumbling fingers so I love how they give you a Fold and Score guide to help you bend those creases for perfect folds! First thing I did was to make my paper ( instructions here ) using the template and then laid out my paper to air dry. Next, I folded them using the guide and glued the edges of the envelopes together using my Helmar Craft glue . I used some small stamps and my markers to embellish them.  I'm going to be giving these away at my art show next weekend as small thank you gifts for everyone attending, so each small card is tucked into small Crystal Clear Card Protectors   along with a pressed flower sticker because we all know, presentation is everything !

A Day at the Shore

Image
©Michele Emerson-Roberts 2015 Looks like summer is really here with temperatures around 90* and rising. Just thinking about a day at the shore brings a smile to my face. Even though I don’t like to actually swim in the ocean, I do love hearing the waves, wading in the surf and sitting under a palm tree in the shade. Follow along to create this fun card! Supplies: Any of the Arnold Grummer™ paper making kits Blender, cello sponges and soft towels Scraps of white, blue and tan paper (think junk mail, etc.) Envelopes to fit cards (or make your own with the AG envelope template) Wescott™ personal paper cutter Scor-Pal™ (Love the new 1/8 ” version) Spellbinders’ Grand Calibur II Dies: Impression Obsession™ #190-C & 78-C Spellbinders™ IN-038 Paradise Palm ColorBox Stylust™ and tips or make-up sponge Med. blue, light golden tan & green water-based ink pads Thin piece of plastic with a straight edge Beacon™ Zi

Collage and Water Colour

Image
Hello, Ann here again with my handmade paper collage today.  I have a nice stash of handmade papers that I made a few weeks back using the Arnold Grummer Paper Making system.  I just love all the colours I got!..  What a fabulous way to turn trash into treasure.  Literally, I up cycled a bunch of junk mail into some great sheets. For today's project I used four of the sheets of paper I made to make a mixed-media collage.  I used to love cutting out and playing with paper dolls as a child and it seems that I still enjoy that today, but with a twist.  The twist being that I make my own now.  I hope you give this a try for yourself or maybe for a child (r the child in you).  It is fun. I used a large rubber cling stamp of a doll that I stamped onto three different colours of papers, Then with some scissors and Matte Medium I cut and assembled my doll. I used a fourth sheet as the background which I coloured up with some water colours and ink. To see more of my craft

Sea Shell Treasure Box

Image
©Michele Emerson-Roberts 2015 I have fond memories of playing on the beach as a small child when we lived in Southern California. Life was simpler back then, less stress and worry! I long to go back to those days and be able show our grandkids what life was like back then. I have created a “treasure” box for each of them as a reminder of lazy summer days spent at the beach. Supplies: Any of the Arnold Grummer™ paper making kits AG Cotton Press sea shell mold A sunny window, microwave or heat gun Blender, cello sponges and soft towels Beacon  QuickGrip™ Adhesive Scraps of white paper (think junk mail, left over cardstock scrap, etc.) Hexagon paper Mache box approx. 4 ½” Silver metallic and medium blue pearl acrylic paint Small flat paint brush, 1” foam brush Sea sponge Numerous sizes of white and blue pearl beads Wired tiny white pearl beads Instructions: Follow the directions found in any of the Arnold Gr

Flower Fairy

Image
Hi everyone, ready to have some fabulous summer fun? Well, grab your Arnold Grummer products and fun is right within your reach! I really had a great time creating this Flower Fairy out of my Sundrops and  Sea Foam Flowers . I don't know what the flower is called that I used around her waist, so if you do let me know! First I began with a  Sin City  Rubber Stamp, you can use any form that doesn't have too much detail to it and is easily cut out. Keep in mind that some flowers are transparent and you can see the stamped lines through the petals so you want to remove as much of that as you can before assembling the flowers. For the skirt, I cut a piece of yellow cardstock out and glued the petals to it. For the bodice, I took a white Signo pen and marked out the lines. Because I cut out the arm, so it could lay over the top of her dress and hold a Sea Foam flower in her hand I used some Helmar Liquid Scrap Dots to give it some strength and keep it propped up