Posts

Showing posts from January, 2016

“Grateful Heart”

Image
©Michele Emerson-Roberts 2016 Valentine’s Day is just around the corner, and love is in the air! I have so much to be grateful for, with my husband Charles is at the top of the list. I have had this set of stamps for several years and have always loved the verbiage--but one keeps calling me. I knew it would be perfect paired with the swirly heart die and a new embossing folder for his Valentine’s Day card. Supplies: ·        Any of the Arnold Grummer™ paper making kits ·        A sunny window ·        Blender, strainer, cello sponges and soft towels ·        Scraps of white or off white, light and dark pink paper (think junk mail, etc.) ·        Beacon ZipDry TM Adhesive ·        Envelopes to fit cards (or make your own with the AG envelope template) ·        Scor-pal TM ·        Scrap of tissue paper ·        Die: Impression Obsession TM DIE126-U Heart Swirl ·        Embossing Folder: Couture Creations CO724383 Hearts Ease Collection   ·      
Winter Blues

Image
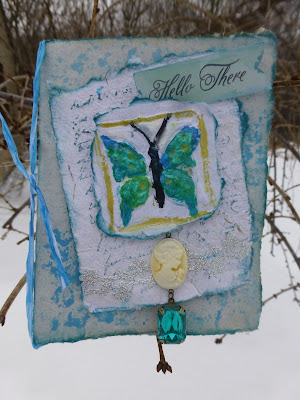
Good Morning! Have you got the Winter Blues? Snow and cold getting you down? Well, I have a project to brighten your day! I used several pieces of hand made paper as well as a paper casting to create a bright and springy card for a friend. I folded over my first piece to make the card base. The background was created using Magicals paint on bubble wrap. The paint was quickly absorbed by the paper. For the next layer I wanted a deckled edge. Want to know an easy way to achieve this? Using a paint brush add a line of water to the paper. Once it is soaked in, gently pull the paper apart at the line. I used a stamp for the script background. Create a butterfly using the casting mold. Once you have made your pulp, pour it through a strainer. Pat pulp into image and press with finger to remove water. Make sure the pulp is in every nook and cranny. Use a sponge to remove even more water and finally a paper towel.  Remove and let dry. Arnold Grummer has a wonderful variety of

"The Buddha Book”

Image
©Michele Emerson-Roberts 2016 I love journals and handmade books, and I add several new ones to my collection each year! My favorites are handmade books with "content". You may remember the “Knots Prayer” book from my Jan. 1 blog project which was filled with quotes.  This "ribbon bound" journal is one of the easiest books to create and making multiples is a breeze.  Match the quotes to the paper theme. They make marvelous gifts! I often create books a certain size because I have odd size papers etc. I had a stack of long skinny scraps of handmade paper, mat board scraps and some wallpaper pieces that were perfect for the covers. I will list the measurements for my book, but please do not be stuck with this size - make your book whatever size you want. Even though my book is "landscape" oriented, it can also be made "portrait" oriented. Remember if you don’t have handmade paper to use for your book you will need to make as many pages as you

The Match Game

Image
I have two young grandsons who like to play board games, don't get me wrong, they also like their gaming systems also. But because their dad is a hand on dad, he likes to play actual hand on games with them. I decided to pull out my cast molds and make a casting (actually two of each one) of the ones I have. I have them for the weekend every so often because the like coming to grandma's house...... hmmmm, could it be because I spoil them? LOL Here is a snapshot of a few of the molds. Here are the completed casts after painting them. I'm sure everyone knows how to play the matching game, that is why I made two of each one. If you coat them with a good varnish, they will hold up very well. Now off to make another set because I know they will want a set to take home. I think I will leave them unpainted tho and let them paint them. That way they will be so proud they made a game themselves.

artfully letting go

Image
 I purge my "important papers" every so often, probably not often enough but I'm always afraid of getting rid of something too soon. I figured my divorce papers from 1988 could finally be purged... right ? I wanted to keep the lesson I learned in my sight but also know that I am healed from that emotional wound too. So I shredded the papers and made a new sheet ( the grey large background sheet ). This became the foundation for my mixed media piece. ( Directions for making a sheet of paper can be found here .) I used a cookie cutter mold and some wet pulp made from red cardstock scraps to form the heart. I laid the cookie cutter mold onto a sheet of wax paper and then filled the mold with the wet pulp, removing moisture from the pulp with a paper towel. After the heart dried I inked the edges and then gently tore it apart and glued it to the center of the grey paper. I then sewed it with a zig zag stich to symbolize that the heart which had been torn apart

“AG Butterfly Plant Pick”

Image
©Michele Emerson-Roberts  2016 January in Southeastern Arizona sometime is a little grey and dreary. Plants are resting and dreaming of sunshine and new growth. It is a good time of year to reflect back on the past year and start making plans for the current year. Creating the paper cast butterfly and small potted silk ivy is a breeze and makes a great gift. I keep several of these on hand as “cheer up gifts. It is a perfect gift for someone who is ill or in the hospital…….. the last thing they need to worry about is watering a plant! Supplies: Any of the Arnold Grummer™ paper making kits Casting mold: CP Butterfly A sunny window, heat gun or microwave oven Blender, small strainer, cello sponges and soft towels Scraps of white paper (think junk mail, etc.) Beacon QuickGrip TM adhesive Silk Ivy plant, moss, flower foam, small terracotta pot, white plastic coffee stirrer 24 gauge green wire, Coiling Gizmo™ Two ½” flat backed white pearl

Bookmark in Faith with Tamiko

Image
I love my handmade papers.  While I don't quite make them in bulk to gift to anyone yet, I do make samples of my papers in the form of bookmarks to give people a chance to experience the varieties of papers and types of paper that can be made if you just think to not just recycle.. but recycling by colors also help.  Here is a bookmark I will be gifting a few friends for the new year. I always refer people to the Arnold Grummer YouTube Channel, where there is a plethora of video how-tos done by Arnold Grummer himself and members of our design team, don't forget to subscribe!  These papers were first created with scraps from holiday wrapping papers.  I followed the instructions shown  for the dip method, here.. for creating paper with my AG Papermill Kit . Then I traced the tags with the Medium Template:Tags for Cards and Pages , so I would have a cleaner edge. Using the template with the paper mill, creates a deckled edge to the handmade paper. After my tags were mad

Happy Valentine's Day

Image
We are fast approaching the season of love! I have a fun valentine's day project made with pressed flowers from our yard and recycled Christmas wrapping paper. I hope you saved those crumpled piles of used Christmas wrapping paper because that is what we will be using to make our paper. Luckily many of these papers and red! I also chose one that had a silver design in it. More about that later! Using the Trash to Treasure Book  Follow the directions on pages 52 - 55 for making paper with a Pour mold. Add torn pieces of paper to the blender filled with water and make the pulp.  Pour into the hand mold and then remove the water using first the screen, then the couches. The sheet can be air dried or dried using an iron.  I told you I used a paper that had a silver design. I should have known it would be a problem when I could not tear it but instead had to use scissors. The pulp was filled with pieces of foil. I did continued to finish the piece

Valentine Tag

Image
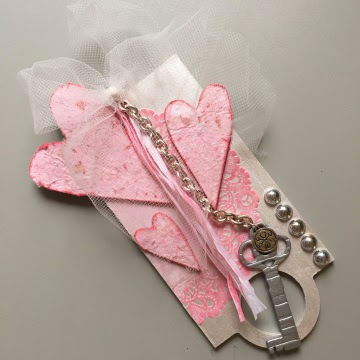
With Christmas and New Year's all but a memory, I'm getting ready for Valentine's Day. I made this Valentin'es tag for my special someone. I started with a blank tag from KaiserCraft's Antique Tag set, and painted it with a coat of gesso. When the gesso was dry, I added a coat of Perfect Pigment White Satin Pearl acrylic paint. While that was drying I dug through my stash to find the grungeboard key and heart shapes. I traced the hearts on my handmade paper (made following these basic instructions ), cut them out, and used a liquid adhesive to glue the paper to the grungeboard. While the glue was drying I painted the key with silver metallic acrylic paint. Back to the hearts. I inked the edges with a complimentary pink pigment ink. Since the hearts extended beyond the edges of the tags, I also inked the reverse side of the hearts. I used the same ink to sponge onto the white paper doily. Inked edges on hearts Sponge inked paper doily

“A Face in the Crowd”

Image
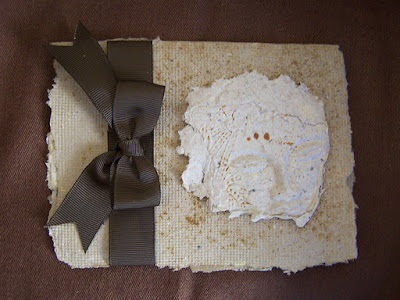
©Michele Emerson-Roberts 2016 Faces are so wonderful. Each one is different (even though they say that we all have a “doppelganger” out there). Face molds are one more thing I collect. This one is actually a metal jewelry finding. It makes a great mold for paper casting and polymer clay. She is a bit exotic, maybe from Tahiti?       Supplies: Any of the Arnold Grummer™ paper making kits Microwave , heat tool or a sunny window Blender, strainer, cello sponges and soft towels Face mold (I used a metal jewelry piece) Scraps of off white, tan & brown paper (think junk mail, etc.) Spice in a brown color (great way to use up those outdated spices and it smells good too!) Beacon QuickGrip TM Adhesive Envelopes to fit cards (or make your own with the AG envelope template) Scor-pal TM (Love the new 1/8 ” version) BowEasy™ Approx. 24” of brown 7/8” Grow Grain ribbon Craft knife and cutting surface Scissors   Ins

Tool Stache

Image
 I love the Trash-to-Treasure book cause it's just full of awesome ideas to get you jump started to your next project. The section on "Bonded for Life" p. 118 got me thinking about re-cycling a tin can into a tool holder for my desk to keep all those pesky tools contained somehow. No glue, tape or adhesive was used to hold this handmade black sheet of paper that I created using my  Papermill Kit   to the can itself. That is amazing! I removed the water from the sheet of paper per the instructions and then wrapped it around the can using my fingers to fold the top and bottom of the paper over the edges of the can. Even the ends of the paper which overlapped when wrapped around the can are simply couched together and left to dry... and it holds together beautifully.  I actually wrapped this can over a year ago and just kept my eye on it as I was using it ( because I wanted to see how well it would hold up under  use ) ...and  can   I say it was a h

“The Knot’s Prayer Book”

Image
©Michele Emerson-Roberts 2016 This is one of my all time favorite handmade books. I make a least a dozen a year to give as gifts to loved ones who need something special to remind them that they are loved. I like to use handmade paper for the pages to make them even more special. You can make these any size; mine are 4 ¾ x 6”, only because I had matboard scrap pieces that size - and so that each folded page will be ¼ of a sheet of handmade paper.     Supplies: ·         Any of the Arnold Grummer paper making kits ·         A sunny window, heat gun or microwave oven ·         Blender, small strainer, cello sponges and soft towels ·         Scraps of off white or cream paper (think junk mail, etc.) ·         Spellbinders TM Grand Calabur™ cutting and embossing machine ·         Embossing plate or folder with an abstract design ·         Merc Art TM black embossing metal: 4 ¾ x 6” ·         Mat board: 4 ¾ x 6” ·         Two scraps of black card stock 4 ¾ x