Posts

Showing posts with the label Tamiko

Altered Key with Tamiko

Image
Hello folks, Tamiko here.  For the last few weeks I have been looking at my stash of keys and I'm going to find a way to use them  or just toss them!!  Of course I found a way to use them!  How to make a paper cast:  Torn tissue papers and a few cups of water pulsed in the blender, creates a paper slurry.  I removed even more water by allowing the slurry to be processed through a strainer I found on the Arnold Grummer site. I've then prepared my mold by brushing it lightly with a release agent like olive oil. After the mold was prepped,  we place pulp in the mold very carefully pressing it deeply into all the crevices of the cast.  I removed more water by pressing sponge against the mold.  You can let the paper dry by placing it in the oven for 8 - 10 minutes on a low temperature or let it air dry, for a few hours. Once the cast is dry, you can decorate as normal. Thanks for stopping by the blog. I hope that seeing the paper casts ins...

Mixed Media Angel Canvas with Tamiko

Image
Hey people!!  First of all, it is so great to back with the design team for Arnold Grummer!!  I am looking forward to working with the new team and making more paper projects!  Let's get started!! Today's project is a mixed media canvas.  If you have ever been to the Arnold Grummer website, and I hope that you have.  The site is full of information in regards to lessons, projects and products. On the site is an awesome collection of paper casting molds.  I found this mold, called the Angel with Lute that I had to cast! I have truly being hoarding this one thing, cotton linter squares . So guess who used them for the first time! ((cheesey smile))  Anywho, I think the linters require a lil more soaking then I allowed. While they do break down, they actually bonded faster then I personally like.  Maybe my opinion will change when I am sure I am using them correctly. I didn't reference my book this time, but the AG site has a great book called ...

Bookmark in Faith with Tamiko

Image
I love my handmade papers.  While I don't quite make them in bulk to gift to anyone yet, I do make samples of my papers in the form of bookmarks to give people a chance to experience the varieties of papers and types of paper that can be made if you just think to not just recycle.. but recycling by colors also help.  Here is a bookmark I will be gifting a few friends for the new year. I always refer people to the Arnold Grummer YouTube Channel, where there is a plethora of video how-tos done by Arnold Grummer himself and members of our design team, don't forget to subscribe!  These papers were first created with scraps from holiday wrapping papers.  I followed the instructions shown  for the dip method, here.. for creating paper with my AG Papermill Kit . Then I traced the tags with the Medium Template:Tags for Cards and Pages , so I would have a cleaner edge. Using the template with the paper mill, creates a deckled edge to the handmade paper. After ...

Ornamental Paper Casts with Tamiko

Image
Hey folks! Can you believe Christmas is at the end of the week?  New Years Day is week from that? Where did the year go? ::smiles::  Now I will be the first to tell you this is not what  intended to post, but my project went missing.. I think I wrapped them or lost them.. ::grumble grumble::  Sooo it's never too late for an ornament, well it isn't at my house.  We create ornaments, and buy them all year round and even if I don't use these few for this tree, I will use them for a tree in the future or gift them to another relative that shops year round for ornaments.  Here is my project.. I had a heap of fun creating these paper cast for the ornaments.  I actually created pulp from some old purple and silver metallic wrapping paper. I collected the wrapping paper of my choice, tore into maybe 1 inch by 1 inch pieces and then tossed them in a large Ziploc, till I was ready to use them.   When I was ready to use them I took a small handful ...

Happy Veteran's Day ATC and Thanks to The Ribbon Resource

Image
Happy Veteran's Day to all of our service men and women! Not just today, but EVERY DAY, I solute YOU and YOUR FAMILIES for your service and many sacrifices.  I am thankful I live in a land where opportunities and available to me daily and I feel protected from harms way from people/nations that do not necessarily agree with our practices.  ::breaks off into song:: :Proud to be an American:: As for my project today, the images I acquired here, are from Google's  free image gallery.  I first began with creating a sheet of handmade paper with the Arnold Grummer Paper Mill Kit.  More supplies and instructions to create awesome paper can be found on the main site here . I also added some gold dust metallic inclusions that shredded quite well and distributed nicely.  Below is a picture of the paper before I turned it into an artist trading card (ATC).   I would also like to add that I did lightly coat the ATC with some matte medium ...

Pretty As A Picture by Tamiko

Image
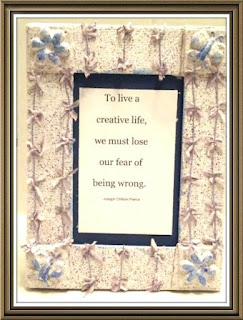
Hi Tamiko here and Happy Wednesday to you all! Can you believe that October is almost  over and that there is less than 60 days until Christmas? Wow, where has the time gone? (smiles) Today I have a frame I created using my handmade paper products and special trim. Items used from Arnold Grummer: Medium Pour Mold Photo Frame Set Casting Molds Item from the Ribbon Resource Lavender Raffia Bows Other Items: Helmar's 450 Quick Dry Helmar's Craft and Hobby PVA Twinkling H2Os Waterbrush Scissors old Christmas wrapping paper blender strainer I began by creating my handmade papers and paper castings with the instructions found here . After the paper was made, I cut it to size and adhered it with my Helmar 450 Quick Dry. I then embellished the corners with the paper casting.  I added color to the castings with a little bit of Twinkling H2O.  I then took the gorgeous bow paper raffia bow trim and added even more texture to my fram...

Travel Card with Tamiko

Image
Hey folks!  Happy Wednesday! I noticed I have quite  a few family members and friends traveling this season.  I am in awe of the stories and the pictures they all have to share.  That being said, while on pinterest, I also came across this quote:  The world is a book and those who do not travel, read only one page!  How true it is!  I personally haven't gone anywhere recently, but this is a reminder just how important it is to travel.  It doesn't matter how you get there, be it car, boat, plane or train.   I created a card today based on that quote. This card is part handmade paper and part paper pulp.  I made paper pulp in a few colors: pink, red and yellow.  Easiest way to create colored paper pulp is to tear papers up in batches of the needed colors. If you are not able to find the colors you need for your projects, you can always use additives to color your slurry. Once your paper is torn into pieces...

My Moon Book with Tamiko

Image
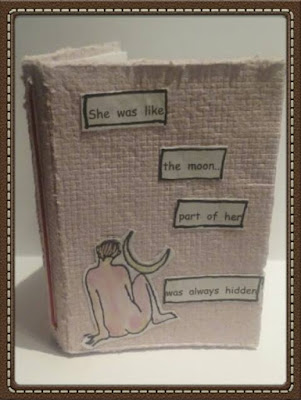
I love to create books and I don't always have a reason or content to put in them (shrugs).  Sometimes I just create to CREATE. Today I created a moon book.  While on a search for moon related quotes, I said, "I may just use this book to record some of my favorite moon inspired quotes." Here is my today's project. I created my paper first from, using the Arnold Grummer (AG) Papermill Kit.  The papers I recycled were old Christmas wrapping paper in red and white. For this batch I almost doubled my normal loose handful of torn paper bits.  To see how to create your own papers with this kit, you can check out Mr. Grummer's how to process, by  clicking here . Because this book's paper was rather thick, and not your average sheet of handmade paper, the page itself required actual scissors or a blade to shape.  I decided not to support the book with any type of book board. I was able to score my page, to include a spine with a weak paper cutter blade. ...

Paper Flowers with Tamiko

Image
I love handmade flowers.  i honestly love them more than real ones!  Weird huh?  Yet true!  With the  Arnold Grummer's (AG) Seed Paper Flowers Kit  , not only do I get to create my personally handmade paper, I also get to encourage the recycling by creating seed papers which is MORE than AWESOME! This procedure only requires the kit mentioned above, some paper you would like to recycle,  tissue tints  (for coloring the paper, if you aren't already using colored papers), a blender (preferably one you use for paper making or craft, a bowl less than six inches in diameter, some water,  a few dry rags or couch sheets and flowering seeds. you will also probably want some markers or pens to decorate your intended leaves or petals. I took some torn bits of scrap paper, about a handful, and placed them in 2.5 cups of water in the blender.  I let the paper soak for about 20 minutes while I drank a cup of coffee and read ema...

Mixed Media Canvas with Tamiko

Image
Hey folks, Happy Wednesday to you!  I am forever loving the process of learning to create my own paper.  Arnold Grummer  has laid down an awesome foundation that many have and will continue to learn from.  Check out and subscribe to the Arnold Grummer's YouTube channel by  clicking here . Today I made a canvas.  I used one of molds my friend Mitzi gifted me.  Arnold Grummer has a plethora of  casting molds  available for you on the website.  After reading  The Art of Paper Casting , a book that can be purchased on the site, I learned how to properly prepare a mold for casting paper.  Almost like baking in a pan, you usually start out brushing a little oil on the mold to assist with the release of the paper cast.  You don't have to do it every time, but if you ever have a problem removing a dry cast from the mold.. that is one sure way to resolve it. I learned after I finished my project that I could in fact spray m...

LOVE to READ with Tamiko

Image
Hey good people!  It's Wednesdayyyy and I am here with a cute litle set of bookmarks.  If you read even a little bit they are worth creating for yourself. or to drop in the mail.. and even to leave a bunch for the members at church or school. I made this paper with some roses that dried in a bunch hanging in the closet.  Unfortunately, I was a the victim of 10 yr old so I have no step out photos to share this time.  I plan on doing some more papers soon and I hope to have those moments captured for you. I simply added my dried roses to my torn papers in the blender,  Turned that into slurry goodness.  It even tinted my papers. Two of the book marks are from a bundle called Card and Tag MediumTemplate Collection and the hearts are are available from a bundle called Envelope and Stationary Large Template Collection .   A term I would like to introduce you to today is INCLUSIONS Inclusions are what you call the added particles to any p...

I Tweet You... with Tamiko

Image
Hey folks Tamiko here.. Today I am feeling a little under the weather but I was able to stamp and color an image to create a card. I have been staring at a little wooden birdie on my desk for well over a week and I vowed to also to add him, some kinda way.  The papers I recycled were brown kraft shipping paper.  Here is my card for today. As with all paper projects you can't do anything unless you start with paper.  First thing I do make sure I have what's  needed by c reating my  favorite papers with any of the  Arnold Grummer Paper Mill Kits .  The directions can be found   here .   After my paper was made I stamped the image and painted it using Colour Arte Twinkling H2Os  . I fussy cut the image and adhered it to the base of the card with Helmar's Craft & Hobby PVA glue.  I added some lace trim and hand stamped a sentiment on painted paper.. and embellished with a wooden bird. This card was simple and sho...

Collaged Beachfront Canvas with Tamiko

Image
Happy Earth Day!!  Today is the day that people all over the world collect garbage, recycle things, plant trees and flowers all in the spirit of Earth Day .  Earth Day should be practiced every day!  Every little bit counts!  Today I tried something a little different.  This is my version of a collaged canvas.  I used recycled handmade papers of different colors and textures and collaged a small beach scene.  I hope to get better with these and  add more and more organic elements.  That's just a personal artistic goal of mine.  Here is my canvas..  As Always I began with my handmade papers  by simply using one of the pour or dips methods for creating paper found  here .  I took various colors I made and tore them to create layers on the canvas.  After I layered the papers the way I wanted.. I adhered them with Helmar's Craft and Hobby PVA Glue .  After everything was set.. I  pulled out my t...

Happy Birthday Card with Tamiko

Image
One of the most awesome things about making your own paper.. Is you don't have to leave your house when your supply gets low!  You can merely look around and say.. Wonder what that would this look like as my new paper.. Then get up and make it happen. ::smiles::  Today is my daughter's birthday and while we have been celebrating almost two weeks already, TODAY is the actual day.   This is another card I made for her special day. My supplies included: To create paper: Any o f the Arnold Grummer Papermill Kits Torn papers of my choice  Blender To create card: Cardstock (to create card base) Variety of hand made papers Girlfriend Stamp- Art Impression NeoColors II Koi Water Brush Archival Ink DecoArt Gesso DecoArt Acrylic Paints Wink of Stella Glitter Pens Heidi Swaap Banner Stencil scissors Helmar Tacky Glue The papers I used today can be made by simply using pour or dips methods for creating paper found here . ...

Create Tea Notes with Tamiko

Image
Today I decided to make something a little extra to go with my international pen pal letter.  She told me she drinks tea and I had the perfect idea.  I knew I knew I could use my handmade papers, a few templates and send something truly special.  This is something I am  putting in her small package from me. Items needed to create this would include: Any of the Arnold Grummer Papermill Kits Skeleton Leaves Card and Tag Template Collection Gift Card and Envelope Template Tags for Cards and Pages Template Blender shredded papers dried roses Michael Strong Rubber Stamp Sakura Gelly Roll Pen Wink of Stella Clear Brush May Roads Purple twine Helmar Super Tac  Glue First you take a handful of shredded papers and put then in the blender with 2-3 cups of water.  Blend to create pulp.  Add some dried roses. Blend some more again.  Before pouring pulp into the deckle, make sure that you sandwich the template needed between the deckl...

DreamCatcher Card with Tamiko

Image
Hey folks.. Happy Wednesday!  I have a friend I who pops up on my screen every now and then, just to say HELLO!  She brightens my day!  Lovely lady makes me laugh almost instantly. We share a few giggles.. and then she disappears.. ::smiles:: I created a card in thought of her.  You see she loves dreamcatchers and while I haven't quite learned to do the cording of the sinew, yet ::winks::.  This is my interpretation of one.. The supplies I began with were only made possible after using any one of the   Arnold Grummer Paper Mill Kits  to create my awesome papers.  I needed 1 and 1/2 sheets for this project. Then you also need: Faber Castell- Glass Bead Glitter Gel Faber Castell- Metallic Purple Gelato Faber Castell- Big Brush Pen Purple Violet Helmar's  Super-Tac Glue Helmar's 450 Quick Dry Adhesive metal flower, beads, fiber and wooden embellishment spatula  paint brush scissors The sheets of paper I used in this c...