Posts

Showing posts with the label pour handmold

Handmade Confetti stationery

Image
Happy New Year 2019! When I think of bringing in the New Year I think of party hats, streamers and of course confetti which inspired my confetti stationery.  They are perfect for writing a letter to anyone celebrating a happy occasion or just for celebrating your friendship with them. Using a hole punch I created some confetti from random scraps of handmade paper that were lying around in my stash which is my inspiration for this project.  I love it when I am inspired by scraps; nothing goes to waste! For my photo tutorial, I am using the  Arnold Grummer  Large Envelope template  along with the  Pour Handmold .  The first step is creating your pulp and pouring it into the mold that holds the template. Once I pulled the mold out of the water and removed the deckle I set it on a dedicated for papermaking baking tray so that the excess water that drains off the wet sheet will not make a mess and run over t...

How to create watermarks in your handmade paper

Image
Today I am excited to share with you just how simple it is to create a watermark  in your handmade paper.  I have to admit, I haven't made paper in a while and I needed a fun project to jumpstart me back in action. Nothing inspires me more than watching the man himself, Arnold Grummer demonstrate how it's done by watching his  video s . You can also get his book Trash to Treasure with great photos and clear instructions! He has a way of making everything look so easy so I thought I'd give it a whirl.  WOW! I am hooked on this decorative technique!  InstaGram Begin by assembling your materials for basic papermaking: torn paper water plus a blender plastic tub  papermaking screen, screen support grid, cover screen Pour or Dip handmold -  (I'll be using the large pour Handmold ) 2-Up or Deckle Divider Large Template plastic letters A2 Envelope Large Template (Watch this  video  for how to make a basic s...

Season of Love

Image
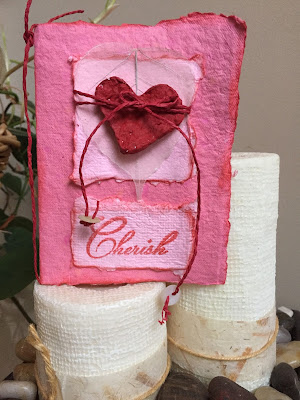
We are fast approaching February and the season of love. Why not should your love with a card made from hand made paper? Grab those red  and pink papers from the recycle bin or add red tissue paper to your slurry to create a beautiful paper. I used my Pour Handmold to create both a pink and red paper. To create the heart, I made paper pulp which I squeezed through a strainer to remove most of the water. I pressed the pulp into cookie cutters and removed as much water as possible using the sponge and wood block from my Papermaking Kit. These can be dried either in a low over (250 degrees for 15 - 20 minutes) or air dried. Once, dry, I painted the heart red. I stamped the sentiment and inked the edges of the card and the pink papers. I added a Skeleton Leaf and twine to the heart embellishment. Isn't this prettier than a store bought card? I think so. Thank you for visiting today. If you need any paper making supplies please stop by the Arnold Grummer's  we...

Tis the Season ...... for thank you notes!

Image
The gifts have been opened. Maybe even put away or being used. Now is the time to get the pen and paper out to write thank you notes! Instead of just writing them, why not also make them!! Grab that recycle bin including Christmas wrapping paper and a Hand Pourmold! Before you know it, you have pieces of paper for cards! For this card I chose a premade card base. Here is a tip for creating the torn edge look - using a paintbrush, paint a line of water. Once it is soaked through, gently pull apart.    I stamped the piece of handmade paper with a metallic paint.  I also used a printed deli type paper and nesting dies to created the sentiment medallion. I painted  one of the hand made paper layers and around the edges of the smallest medallion.  I think it looks so elegant!  And here is the card - So much prettier than a store bought one! This is a fun project for those children who are home for ...

Artist's Trading Cards

Image
Up until a year or so ago, I had no idea what an Artist Trading Card was. Do you know? These 2.5". x 3 .5" cards are miniature works of art which are shared around the world. Artists create, trade and swap them. Some swaps have themes such as this one sponsored by Grumbacher Offical  Fan Page . The theme for the current swap is Space. Each artist can interpret the theme any way they wish - paint, draw, mixed media, etc. The paper I used was made with this  Pour Handmold I started by applying a layer of gesso. I was not sure what paints I would be using and this would provide a better surface to work on.  Now for the fun!! I started with a layer of darks and then added various gold and metallics.  Just keep playing until you get the effect you want. I cut a star and the ribbon tails from another piece of paper. I painted them gold and added doodling. I finished the ATC  with a quote.  I love how this turned out and ho...

Winter Wishes

Image
It is that time of year to send greetings to family and friends, both near and far. What better way to do that with a card made from handmade paper!! Grab your bin of recycled paper including junk mail and envelopes and make paper! I used my Pour Handmold to make white and blue papers.  The blue paper was my card base. I tore strips of the white paper making snow banks. Ink the edges before adhering. I drew my snowmen and added color using Watercolor Brushes. Some simple sentiments and my cards are done!  Aren't these cute! Perfect for weather heading to Michigan soon (we had a take of it last weekend).  I hope you enjoyed my cards. Please be sure to visit the store  where you can find all the supplies needed for paper making and also this calendar which makes a wonderful gift!  Visit us on Facebook for more inspiration and to share your projects with us!!