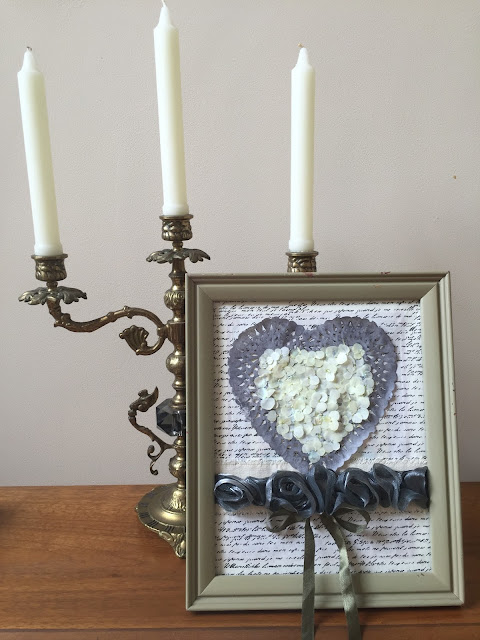
Posts

Showing posts from July, 2016

Live the Life

Image
© Michele Emerson-Robert 2016 I love creating these inspirational mixed media pieces. They go together so quickly and are always a huge hit when I give them to a friend who needs some cheering up. I create several at a time, varying the colors and subject a bit. Sheets of thin handmade paper are a must for the base layer. Remember to always make extra to have on hand. Supplies ·        Amazing™ Mold Putty ·        Any of the Arnold Grummer® paper making kits ·        Blender, cello sponges and soft towels ·        A sunny window ·        Scraps of white/off white paper (think junk mail, etc.) ·        Scraps of white chip board to die cut (I used white food packaging) ·        Matboard scrap to emboss ·        Wicker embossing folder ·        Tonic Studios™ Nuvo™ Crystal Drops 675N White Seashell ·        Polymer clay: off white/pearl, clay oven ·        Art Nuvo metal jewelry finding ·        Substrate 8 x 10” box insert from an acrylic fr

Window Zig Zag Book

Image
©Anne Rita Taylor 2016 I wanted to combine handmade paper with a Zig Zag book plus my carved images to make a gift for a friend going through health issues. I wrote some encouraging words alongside the printed images for her. Supplies: Arnold Grummer Paper Making Handmade paper - 5 pieces: 1 x 7 inches, (2) 4 x 5 inches, (2) 2 1/2 x 6 inches  Arnold Grummer Mini Zig Zag Books PVA or Mod Podge glue Bonefolder, scissors, ruler Carved images or rubber stamps The Zig Zag book has 6 sides, begin by cutting slits on the 2nd and third side, then the 4th and 5th side, cut into one and 1/8th inches, leaving a half inch on the top and bottom, as pictured: Fold in where you made the cuts to form your window, as pictured: Paint the Zig Zag inside the covers and top and bottom with Tim Holtz Distress stain: Peeled Paint. Adhere both 4 x 5 inch paper pieces to each cover. Glue two pieces of 2 1/2 inch by 6 inches handmade paper together forming a long stri

Flower Power Card and Casting with Tamiko

Image
Hi, Tamiko here.  Posting a quickie way to embellish your cards or any other paper-crafted idea with paper castings.  I found over at Arnold Grummer's site, in a book called Trash to Treasure Papermaking.   I apologize in advance if my photo is in the wrong position on the page, I am working from my cell phone and blogger app. (yikes) I can't tell you how important it is to either spray or brush some kind of release agent or oil to the molds when you first get them. It allows for a much easier/quicker way to remove casts from the molds, without breaking and/or sticking. Another thing to note when making castings and determining if they are ready to come out, when you air dry, is feeling the mold.  If the mold feels cold and even the slightest moist, it's NOT ready.  Trust ME!  ::scouts honor::  Can't tell you how many times I was in a rush to use the mold again, and it just wasn't time! They were indeed not dry!  Of course you can po

Hoppy Birthday Card

Image
Happy Monday everyone. I know, not everyone likes Mondays because it is the start of another work week (If you work outside the home). Today I made a card for my daughters upcoming birthday, her favorite color is purple but I went with whimsy. She will love it anyway LOL I first started out gathering junk mail and old receipts that I no longer need to keep and tore them up, added them to water in the blender and blended away. Now when making your own paper, you can use almost any paper you choose you can also use wrapping paper, tissue paper and just any old junk mail that has lots of color on it and you will have paper pulp with color. How cool is that! I tear up old bills and checks and such and use that to make paper, it is a great way to keep thiefs from getting personal info of yours LOL Any way, after letting the paper dry, I don't always iron my paper, I cut it to the size of a card I wanted to make and worked away. The supplies you will need are: junk mail water ble

So Glad………

Image
© Michele Emerson-Robert 2016 My friend Heidi’s birthday was celebrated in style! She is such a dear person and deserves only the best. I am truly blessed to have her as a friend. It is probably good that she lives so far away, as we’d find it easy to lose the day just visiting and creating. Supplies: ·        Any of the Arnold Grummer® paper making kits ·        Blender, cello sponges and soft towels ·        A sunny window ·        Scraps of light blue and medium green paper (think junk mail, etc.) ·         The PaperCut™ White card stock ·        Dies: Creative Expressions™   CED5420, Spellbinder s TM   S5-086 Bitty Blossoms, and CheeryLynn TM  B176 Flourish Leaf Strip ·        Spellbinder s TM Grand Calibur™ die cutting and embossing machine ·        Westcott™ paper trimmer ·        Scor-Pal™ ·        Beacon ZipDry TM adhesive Instructions: 1.      Follow the instructions found in any of the Arnold Grummer™ paper making kits to

How to add simple charm to your paper making.

Image
I love adding Arnold Grummer's botanicals in the blender. They really hold up well being shredded and don't turn to mush like fresh flowers can do if you aren't careful. You can experiment and run botanicals in the blender for different lengths of time to get varying effects. You can also use botanicals whole like I did with my Botanical Gift Card .  All my bookmarks were created today using the Medium Template: Tags for cards and pages 1. Put new pulp or paper to be recycled in the blender with water.   2. Select one or several botanicals to be added to the new sheet ( do not overload the first time) Put half in the blender. 3. Run the blender for 13 seconds  4. Add the other half of the botanicals in the blender  and run blender for 2 more seconds.  5. Do the basic hand papermaking steps as Arnold Grummer shows you HERE .   6. Embellish as little or as much as you want. The botanicals look so charming on their own that you don't need

Pressing Flowers

Image
If you were like me, you thought pressing flowers involved a large book, paper towels and weeks of time! Not any more! What if I told you that flowers can be pressed in 30 seconds? Well, it is true! Let me introduce you to the Microfleur -- With this press, flowers can go from your garden to cards and projects in seconds! All you need is this kit and a microwave! Let me show you how! I picked a large hydrangea bloom I opened the press and carefully placed the small flowers on the linen surface.  Add the top layers and use the clips to close the sandwich I pressed these in the microwave for 30 seconds. Carefully remove the flowers. They may be hot and are also fragile. It did not take long before I had a bowlful of flowers for my project! I had an old frame which I had gotten at a thrift store and this was the perfect item to repurpose - a wonderful philosophy that Mr. Grummer loved.  I covered the image with a tissue paper, sprayed th

Art Deco Quilt Square II

Image
© Michele Emerson-Robert 2016 This is the third in the series of the Quilt Squares for my quilter friend. The neutral color palette of medium blue and golden tan matches with the other projects (Art Deco Quilt Squares from April 22, and the Celtic Quilt Square from May 20). And since I will once again be using some items that would normally be tossed, I am doing my part to follow Arnold’s “R’s”: recycle, restyle, repurpose, revamp, restore, renew while creating beautiful ART!   Supplies Arnold Grummer®  paper making kits Tan &gold scrap paper (think junk mail etc. Large empty frozen Pizza box Sponges, soft towels A sunny window Medium blue text weight paper Die:   Tonic Studios™ #183E Verso Art Deco Collectable Die Set Tonic Studios™ #159 Advantage V Blade paper trimmer Scor-Pal™ Tonic Studios™ Tangerine die cutting and embossing machine Pencil, ruler Tonic Craft Tacky™ Glue Punch: Notched corner Instructions:

Envelope Accordion Book

Image
©Anne Rita Taylor 2016 I wanted to give some suggestions to my friend who was  traveling  this summer. My envelope accordion book was fun and most appreciated ! Supplies: Arnold Grummer Paper Making Handmade paper - 2 pieces 4 x 5 inches Arnold Grummer Mini Zig Zag Books Ribbon, 18 inches  PVA or Mod Podge glue, and Scotch tape Bonefolder, scissors, ruler Magazines or calendars Begin by folding the inside of the four accordion pages in half, so now you have eight sides plus the two covers which are not folded. Making the envelopes: I used flower pictures from Martha Stewart’s Living magazine. I made my template to fit the 3 1/2 inches accordion page. Before gluing up the bottom and sides, it is 4 1/4 inches tall by 5 inches wide. After you have four envelopes, place glue on half of the front of the envelope and glue each envelope to the half accordion page. Instead of writing my own travel advice, I used four of