Posts

Showing posts from January, 2019

How to use Scraps of Handmade Paper to Create Beautiful Cards

Image
Love Soars I love it when I can use all of my scraps of handmade paper….they are just too beautiful to toss. Here are two really quick cards that will put a smile on your loved one’s faces. Change the die cut word and they would be perfect as get well, happy birthday, hello or whatever. I liked these so much that I need to dig for some scraps in spring colors and make some happy Easter cards…..smile Supplies: • Any of the Arnold Grummer® paper making kits and paper press • Blender, cello sponges, and soft towels • A sunny window • Scraps of colored paper (think junk mail, etc.) • Scraps of white and colored card stock to die cut • Various colors of cardstock folded to create 5 ½ “ square cards and some to layer with…         I picked colors that go with my handmade paper “scraps” • Dies: o Quiet Fire Designs™/Elizabeth Crafts #1165 “Love” and #1444 “Soar” • Crafters Companion Gemini™ die cutting and embossing machine • Westcott™ paper trimmer • S

Handmade Confetti stationery

Image
Happy New Year 2019! When I think of bringing in the New Year I think of party hats, streamers and of course confetti which inspired my confetti stationery.  They are perfect for writing a letter to anyone celebrating a happy occasion or just for celebrating your friendship with them. Using a hole punch I created some confetti from random scraps of handmade paper that were lying around in my stash which is my inspiration for this project.  I love it when I am inspired by scraps; nothing goes to waste! For my photo tutorial, I am using the  Arnold Grummer  Large Envelope template  along with the  Pour Handmold .  The first step is creating your pulp and pouring it into the mold that holds the template. Once I pulled the mold out of the water and removed the deckle I set it on a dedicated for papermaking baking tray so that the excess water that drains off the wet sheet will not make a mess and run over the table. This is important as I wanted my paper

Using Molds with Handmade Paper Pulp

Image
The Children First  Creating paper casting with molds from Arnold Grummer is one of my favorite things to do. I always make multiples of each casting and usually make a day of it. I have to admit that I love casting mold and am blessed to own a LOT of them. “The Children First” is a retired mold but is still one of my favorites. Matted and framed it makes a beautiful gift for new parents. Supplies: • Any of the Arnold Grummer® paper making kits • Blender, strainer, cello sponges and soft towels • A sunny window • Scraps of white paper (think junk mail, etc.) • “The Children First” paper casting mold • 9 x 9” double matt and matching backing • Beacon ZipDryTM and PowerTac™ adhesives, double sided foam tape Instructions: 1. Follow the instructions found in any of the Arnold Grummer™ paper making kits to         create white slurry and cast one or more of “The  Children First” castings. 2. Allow the casting to dry. 3. Attach the Paper casting to the ce

The Empress's Screen Pendant

Image
As a mixed media artist, I love to make art that seems extremely difficult. This doesn’t mean that the effort is difficult, only that the result looks so fabulous that others would have a hard time believing that “you” made it. Comments of disbelief are actually my favorite types. They show me that I have created something wonderful. As a newbie to the papermaking world, I found myself fascinated by the process and the materials. I was even more fascinated by the potential for creating 3D art from paper. After several false starts, I walked away and thought I would turn to a different form of art for a minute. I walked into my utility room (one of the five million “arting” spots in my house) and saw a rubber stamp that I had been wanting to use. Yes, dear reader, the light turned on. I ran to the kitchen and started making pulp using about a 1 x 6-inch piece of cotton lintner in sheet form and four cups of water. After letting the cotton lintner soak a bit, I pulsed it

Easy Journal Cover & Giveaway!

Image
Arnold Grummer makes creating pretty journals a breeze.  SUPPLIES:  Arnold Grummer's Hand Made Paper Kit Arnold Grummer's pre-shredded Cotton Linter  Arnold Grummer's Paper Additive Arnold Grummer's Angel Wings Botanicals Arnold Grummer's "Make your own book" Duck Tape, Adhesive, Flourish stamp, Clear stamping pigment, gold embossing powder, ribbon, metal word, alcohol ink, metal embellishment, and brad.  INSTRUCTIONS:  1. Make sheets of hand made paper following the instructions in the Hand Made Paper Kit. I always add some additive and cotton linter for stronger sheets. The botanicals are pretty too! 2. Use the duck tape binding method on the "Make your own book" kit instructions.  3. Cut hand made paper to cover the cardstock cover provided in the book kit.  4. Cover seams in different papers with fabric ribbon, which goes all the way around the cover.  5. Stamp flourishes with clear pigment and emboss

Something to Brighten Your day

Image
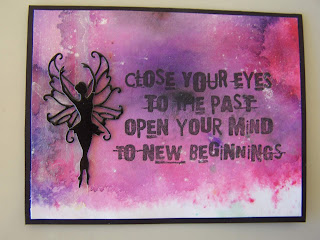
Last Friday’s project grew to be 6 books, one of which will be for encouragement cards. With that in mind I checked out my stash of handmade papers which had been previously made more beautiful with the addition on my favorite inks. You may remember that I create these papers in batches and stockpile them for future use. Supplies: • Any of the Arnold Grummer® paper making kits and paper press • Blender, cello sponges and soft towels • A sunny window • Scraps of white paper (think junk mail, etc.) • Scraps of black card stock to die cut and for layering • Black card stock for the card bases • Scraps of thin white tissue paper to stamp on • Memorybox Fairy and branch dies • Stamps::    Visible Image™ VIS-WDT-01 “Where dreams take you” and VIS-NEW-01 “New beginnings” • SpellbindersTM Plantinum™ die cutting and embossing machine • Westcott™ paper trimmer • Scor-Pal™ • Beacon ZipDryTM adhesive, double sided foam tape • ColorBox™ black pigment ink

Die Cut Valentine's Day Cards by Steph

Image
Hi everyone, Steph Ackerman here today with die cut Valentine's Day Cards using handmade papers created with the Arnold Grummer Papermaking Kit . Are you aware how easy it is to create handmade paper?  It's even easier to die cut the papers into a variety of shapes. Selecting papers from my stash of handmade papers, I couldn't find any that were pink enough for Valentine's Day.  Easy enough to remedy though - I just spritzed the paper with Imagine's Fireworks! Shimmery Craft Spray in Angel Pink.  Let the paper dry thoroughly. Create cards from brown cardstock.  Die cut 2 layers of handmade papers.  Adhere the larger layers to the cards then wrap the cards with twine.  Mat the smaller layers with brown cardstock, then add to the cards with foam adhesives for dimension. Die cut hearts from the same paper, then die cut the centers.  Adhere the large hearts to the right corners of each card.  Take the smaller hearts and add them back to the l

And a Happy New Year!

Image
What a perfect way to start the New Year! This loose leaf book will be perfect to hold handmade paper birthday cards for those special people in your life! If you are blessed with a lot of “special” people you may need to make several of these books….smile. Think of the fun ahead  in 2019 of creating the cards to fill the 12 pockets in the book. Supplies: • Any of the Arnold Grummer® paper making kits • Blender, cello sponges and soft towels • A sunny window • Scraps of white paper (think junk mail, etc.) • 6 x 6” pocket calendar book kit • Stamp: o Impression ObsessionTM  G20231 “thinking of you with love” • SpellbindersTM Platinum™ die cutting and embossing machine • Large random organic pattern embossing folder • Westcott™ paper trimmer and scissors • Beacon ZipDryTM adhesive • Old credit card to use as an adhesive spreader. • ColorBox™ Dystress Blendable ink pads: Cattail, Salmon and Palomino, Stylus handle         and white tips • Small piece of th