Something to Brighten Your day
Last Friday’s project grew to be 6 books, one of which will be for encouragement cards. With that in mind I checked out my stash of handmade papers which had been previously made more beautiful with the addition on my favorite inks. You may remember that I create these papers in batches and stockpile them for future use.


Supplies:
• Any of the Arnold Grummer® paper making kits and paper press
• Blender, cello sponges and soft towels
• A sunny window
• Scraps of white paper (think junk mail, etc.)
• Scraps of black card stock to die cut and for layering
• Black card stock for the card bases
• Scraps of thin white tissue paper to stamp on
• Memorybox Fairy and branch dies
• Stamps::
Visible Image™ VIS-WDT-01 “Where dreams take you” and VIS-NEW-01 “New beginnings”
• SpellbindersTM Plantinum™ die cutting and embossing machine
• Westcott™ paper trimmer
• Scor-Pal™
• Beacon ZipDryTM adhesive, double sided foam tape
• ColorBox™ black pigment ink pad, Dyestress Blendadble Ink pads: Pansy, Fruit Punch
and Scuba
• Tiny clear flat backed crystal
• Nonstick craft sheet
Instructions:
1. Follow the instructions found in any of the Arnold Grummer™ paper making kits to create
white slurry and create numerous sheets of light/medium weight handmade paper.
2. Allow the sheets of paper to dry.
3. When the paper is dry cut or tear it into four pieces 4 x 5 ¼”. Set the rest of the paper aside.
You will need two small pieces for layering.
4. Tap the three pads of Dyestress ink onto the nonstick craft sheet. Mist with water and lay the
small sheets of handmade paper onto the inks. Rub or pat the paper to pick up the inks. When
you are happy with the background, set the paper aside to dry.
5. Die cut the Fairies and branch from scraps of black cardstock.
6. Cut, score and fold the black card stock for create four 4 ¼ x 5 ½” cards.
7. Attach the inked backgrounds onto the folded cards with ZipDry adhesive.
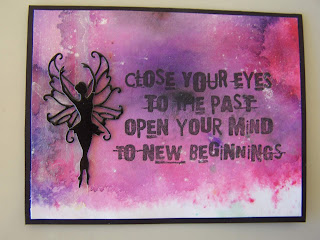
8. Stamp the verbiage “close your eyes” onto tissue paper. When the ink is dry, tear the tissue
close to the verbiage and attach the tissue to the right middle of a card with ZipDry adhesive.
Attach one small Fairy to the left side of this card with tiny pieces of double sided foam.
9. Stamp “Go where your dreams take you” onto tissue paper. When the ink is dry, tear the tissue
close to the verbiage and attach it to the right side of one of the cards with ZipDry adhesive.
Attach another small fairy to the left side with tiny pieces of double sided foam tape.
10. Stamp the eye and the verbiage onto tissue paper. When the ink is dry, tear close to the eye
and verbiage. Attach the eye tissue to the top right of one of the cards. Attach the tiny clear
flat backed crystal as a sparkle in the eye. Layer a small piece of background paper onto black
cardstock. Attack the tissue onto the layerd piece with ZipDry adhesive. Attach the layered
piece to the bottom left with double sided foam pieces.


Supplies:
• Any of the Arnold Grummer® paper making kits and paper press
• Blender, cello sponges and soft towels
• A sunny window
• Scraps of white paper (think junk mail, etc.)
• Scraps of black card stock to die cut and for layering
• Black card stock for the card bases
• Scraps of thin white tissue paper to stamp on
• Memorybox Fairy and branch dies
• Stamps::
Visible Image™ VIS-WDT-01 “Where dreams take you” and VIS-NEW-01 “New beginnings”
• SpellbindersTM Plantinum™ die cutting and embossing machine
• Westcott™ paper trimmer
• Scor-Pal™
• Beacon ZipDryTM adhesive, double sided foam tape
• ColorBox™ black pigment ink pad, Dyestress Blendadble Ink pads: Pansy, Fruit Punch
and Scuba
• Tiny clear flat backed crystal
• Nonstick craft sheet
Instructions:
1. Follow the instructions found in any of the Arnold Grummer™ paper making kits to create
white slurry and create numerous sheets of light/medium weight handmade paper.
2. Allow the sheets of paper to dry.
3. When the paper is dry cut or tear it into four pieces 4 x 5 ¼”. Set the rest of the paper aside.
You will need two small pieces for layering.
4. Tap the three pads of Dyestress ink onto the nonstick craft sheet. Mist with water and lay the
small sheets of handmade paper onto the inks. Rub or pat the paper to pick up the inks. When
you are happy with the background, set the paper aside to dry.
5. Die cut the Fairies and branch from scraps of black cardstock.
6. Cut, score and fold the black card stock for create four 4 ¼ x 5 ½” cards.
7. Attach the inked backgrounds onto the folded cards with ZipDry adhesive.
8. Stamp the verbiage “close your eyes” onto tissue paper. When the ink is dry, tear the tissue
close to the verbiage and attach the tissue to the right middle of a card with ZipDry adhesive.
Attach one small Fairy to the left side of this card with tiny pieces of double sided foam.
9. Stamp “Go where your dreams take you” onto tissue paper. When the ink is dry, tear the tissue
close to the verbiage and attach it to the right side of one of the cards with ZipDry adhesive.
Attach another small fairy to the left side with tiny pieces of double sided foam tape.
10. Stamp the eye and the verbiage onto tissue paper. When the ink is dry, tear close to the eye
and verbiage. Attach the eye tissue to the top right of one of the cards. Attach the tiny clear
flat backed crystal as a sparkle in the eye. Layer a small piece of background paper onto black
cardstock. Attack the tissue onto the layerd piece with ZipDry adhesive. Attach the layered
piece to the bottom left with double sided foam pieces.
11. Stamp some verbiage onto a small scrap and layer the stamped piece onto a scrap of black
cardstock. Attach the stamped piece to the lower left of the card with double sided foam pieces.
12. Attach the die cut branch with ZipDry adhesive. Attach the large fairy with double sided
foam pieces.
11. Stamp some verbiage onto a small scrap and layer the stamped piece onto a scrap of black
cardstock. Attach the stamped piece to the lower left of the card with double sided foam pieces.
12. Attach the die cut branch with ZipDry adhesive. Attach the large fairy with double sided foam
pieces.
TAGS: Arnold Grummer, Michele Emerson-Roberts, handmade paper, cards, encouragement, Fairies, Visible Image Stamps, MemoryBox dies, Dystress Blendable inks,


I love the added inks to the papers, very pretty!
ReplyDeleteThanks Sandee........it's one of my favorite thins to do.....just makes them more special!
DeleteYour cards are beautiful, Michele! I really like the colors you added. So pretty!
ReplyDeleteThanks Nancy.....they are ever better in person....smile. I love making the paper, adding the inks and then having the inked paper "tell me" what verbiage is needed....
DeleteMichele, your combination of colors and message on hmp highlights the sense of design you bring to all your projects. Thanks for another beautiful round.
ReplyDeleteThe 'Vision' quote caught my attention, I've never quite thought of vision as a 'vivd image'. Mine is a path, somewhat hazy, but the endpoint is clear. Food for thought!