Posts

Showing posts with the label recycling paper

Kirigami with Handmade Paper

Image
Making kirigami with handmade paper is easy and the results can be elegant or quirky depending on your choices. Whether you are using your handmade paper to make into kirigami or adding kirigami pieces into your handmade paper, the results are beautiful. "So what is kirigami?" you may ask. Kirigami is the combination of folding and cutting paper to make designs. Most of us have made paper snowflakes. That is a form of kirigami. First, you fold the paper and then you cut elements from the folds. Unfolding the piece reveals the pattern. There are two parts to this article: Part One - Making kirigami Part Two - Incorporating kirigami in your handmade paper. Materials: recycled materials to make paper Arnold Grummer's medium hand mold basin for water Couch sheets blender scissors with thin, sharp blades Video tutorials to watch: How to Make Paper: Surface Embedment How to Make Paper: Sheet Layering Instructions: Making Kirigami: Kirigami involv...
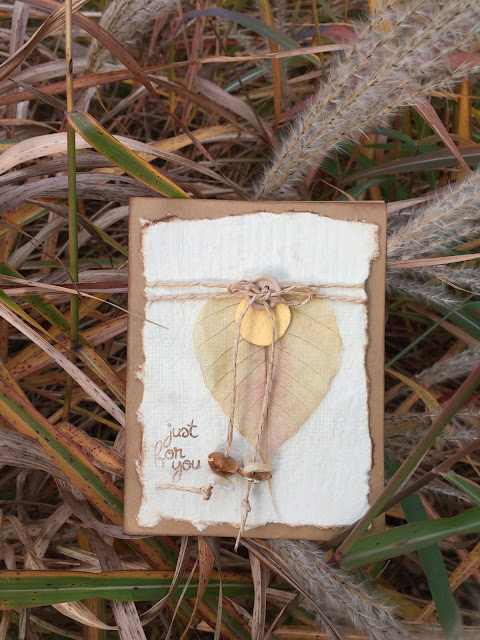
Just for you

Image
Handmade papers make the best cards! It is the perfect way to recycle and to brighten someone's day with happy mail. I started by making a sheet of paper with my Pour Handmold . For this paper I used envelopes from birthday cards. This piece happens to be a bit rough and not so smooth but that works well for this project.  I cut and embossed a piece for the front of the card. To get that deckled edge, run a paintbrush with water along the edge. Allow it to soak in and then pull along the wet part. .  This was the perfect card for a Skeleton Leaf I gently inked it before assembling the card which includes a button, a smaller piece of handmade paper from one of my scraps, twine and beads. I added a small stamped sentiment. I just love the way this came out! Don't you? I hope you get out your recycling and make cards! Thank you for visiting today. Don't forget to stop by Facebook  for more inspiration and to share what you have been makin...

Tis the Season

Image
Tis the season to start thinking of the holidays! I know it doesn't seem possible but let's get a jump on it! I am making ornaments for friends and family. My handmade paper is perfect for my snowman. I used my Pour Handmold to make white paper out of old junk mail envelopes. I cut a snowman shape which I painted with Glossy Accents. I also sprinkled with Stampin Up Dazzling Diamonds Glitter, I painted the canvas with a blue background and white dots. Once the snowman was dry, I added a scarf, heart and nose. I glued the snowman to the canvas and added a sentiment printed on the same white paper. Glue it all together and you have a fun ornament which will look adorable on anyone's tree!! So let's get out those bins with recycled papers, our Pour Handmolds , some paints and papers and let's create ornaments!!  Thank you for joining me today! Please be sure to visit our Facebook Page  for more ideas and inspiration and don...

Take Note

Image
I don't know about you, but I need a pad of paper by every phone in my house. We generally use scrap paper but had recently run out. And, it was time to upgrade. Did you know that Sticky Note Kits are available at ArnoldGrummer's website??  The kit comes complete with templates and cardboard covers and spines!  Everything you need to get started except paper! I made a couple of pieces of pretty pink paper using my Pour handmold . After making my paper, I used the templates to cut the cover and inside piece.  Once cut, I glued the covers and spine to the paper. After that dried, I  added the inside paper( a scrap of pattern paper)  to give it a finished look. The cover can be decorated and I chose to use a casting mold  I painted mine and added lace underneath to finish the top of the pad. Isn't this pretty? Looks much nicer than scrap paper! I am thinking I will more not only for me but also to give as gifts! Thank you for...

April Showers

Image
As we all know, April showers bring May flowers. Here in Michigan we have had more than our share of showers. And, it is early but I do have a few daffodils peeking out! Since it was too cold and wet to be outside, I played with paper and made a card.   I was inspired by the rain and this quote about April showers. I grabbed an old dictionary and made several pieces of paper. I was excited to be able to see words in the paper. You can achieve this result but not pulsing the pulp as much. Next I grabbed some Twinkling H2O Paints and painted one sheet pink and one green. I did not worry if the coverage was complete.  I used my Spellbinders Die D-Lites dies to cut the flower petals and leaves. The background is watercolor paper which I painted with a sky and grass. I assembled my flowers using glue. I made a progression from a leaf to a bud to a full flower. The quote was printed on the pink paper.  Here is a close up of the fun details! Don't ...

Collage the Little Bits

Image
Hello.   Ann here today with a truly recycled project to share with you.  I took all the little bits and pieces left over from previous projects I ve made for the AG Team and used them all in this collage.  I used not only the bits of handmade paper left after cutting and snipping but also those pieces that had not previously made the "Cut" into the final project.  I tend to recycle the very smallest pieces back into a pulp to make new sheets of paper, which I still did here, but I saved the larger pieces for the project. This is a great project to do with children as they can learn about using different shapes to  make a collage.  Of course I used the Arnold Grummer traditional pour method of making the original sheets of paper. The flower is a collage of left over Valentines. The butterfly was a left over from another project when I used a mould and pulp. The centre of the flower is made of woven strips of handmade paper and hole punched circl...