Posts

Showing posts from October, 2018

Costume Accessories

Image
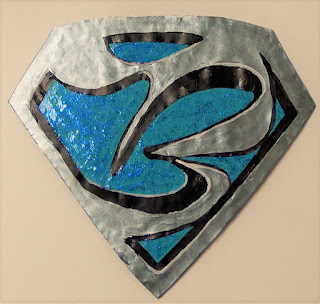
*UPDATED: COMPLETE SUPER HERO COSTUME PICTURE BELOW I'm finalizing the details for my Halloween costume! I love working with paper and paper pulp. It's so easy to work with to create your vision and the finished accessories are light-weight. Nobody wants to be weighed down by their costume :o) Yes, I "mixed metals". I just felt like the Ohm needed to be warmer toned and the mask I made previously will tie it all together.  Supply List: Arnold Grummer Hand Made Paper Kit Arnold Grummer pre-shredded Cotton Linter  Arnold Grummer Paper Additive Acrylic Paint - Black, white, turquoise, blue patina (metallic)  Glitter Glue - blue Embossing Pigment and gold embossing powder  Instructions:    1. Make one big sheet of hand made paper per the kit instructions.  2. Cut out the shape for the chest plate and a 3" circle for the belt buckle.Paint them with acrylic paint and let dry. 3. Cut out a fancy font letter for the chest plate, pai

Quick and Easy Embossed Snowflake Card by Steph

Image
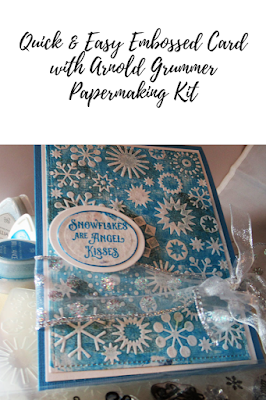
Quick and Easy Embossed Card Hi everyone, Steph Ackerman here today with a quick and easy Embossed Snowflake card using handmade papers created with the A rnold Grummer Papermaking Kit . How to  Tearing a sheet of 12" x 12" cardstock, place it into a blender with 2 cups of water.  Blend it until you've created slurry. Using the Large Pour Mold ,  pour the slurry into the mold.  Remove the paper and squeeze out all the excess water. Allow to dry thoroughly for a wonderful piece of paper. To create my card, I simply cut the paper to fit my embossing folder.  Using blue and black inks from ImagineCrafts ,  I inked the embossing folder, placed the panel inside and then embossed it.  Next, I die cut it so it would fit my card.  I matted the panel with white cardstock, then added it to a blue card.  Next, I wrapped the card with ribbon.  A simple die cut phrase from Joy Clair was added above the ribbon.  How pret

Boo....Trick or Treat

Image
I LOVE Halloween… I LOVE Halloween….it is such fun to see all the neighborhood kids in costume and try to guess who they are. I try to fill their sacks with healthy snacks but don’t always succeed….with my husband right beside me with a huge bowl of candy! He is just a big kid at heart! Smile. This pumpkin wreath was so easy to create, with one of the many paper molds from my collection, and the additions of a few stitches and some fall leaf beads. Did you know that you can use just about anything for a paper casting mold….look around your home for dishes with textures, candy molds, rubber stamps, embossing plates etc. Supplies: • Any of the Arnold Grummer® paper making kits  • Blender, strainer, cello sponges and soft towels • A sunny window • Scraps of white paper (think junk mail, etc.)  • 12–14” twig wreath • Small plastic fall colored leaves • Embroidery floss: Black and variegated (fall colors), embroidery needle, • Pencil, 1” foam brush

How to make a Zig Zag book

Image
Today I am going to be making a Zig Zag book with the    Arnold Grummer's Square Zig-Zag Book kit   I love to do Moon Rituals and I do 2 every month: New moon and full moon. These rituals are for releasing negativity, increasing your abundance,  and for making other positive changes in your life. Rituals are a beautiful way to connect to your inner being throughout life. Afterall we are  all interconnected – not only with each other, but also with nature. This includes the moon and its different phases.  And don't worry, this isn't witchcraft ( although  it is the month of  Halloween...bwahaha ). Just remember the key to trying any ritual is to show up with an open heart, an open mind and a willingness to be open to all possibilities. The first step and a very important one is making some beautiful handmade papers to adorn the book. Prepare sheets of handmade paper using the pour method and follow the instructions for completing the sheets. Refe

Altered Notebook by Steph Ackerman

Image
Hi everyone, Steph Ackerman here with an altered notebook using handmade papers created with the Arnold Grummer papermaking kit. Select a sheet of paper from any of the handmade papers already created and adhere it to a notebook.  Cut off any excess and corner round the edges. Stamp around the notebook with a wordy stamp from Just For Fun Rubber Stamps.  Picking up on the green particles in the paper, I inked the notebook with green ink. Next, I placed a stencil on the notebook and used molding paste on the design.   Once dry I repositioned the stencil so I could add color to the design. I finish off by adding additional color as needed. Thanks for stopping by.