Posts

Showing posts with the label Christmas card

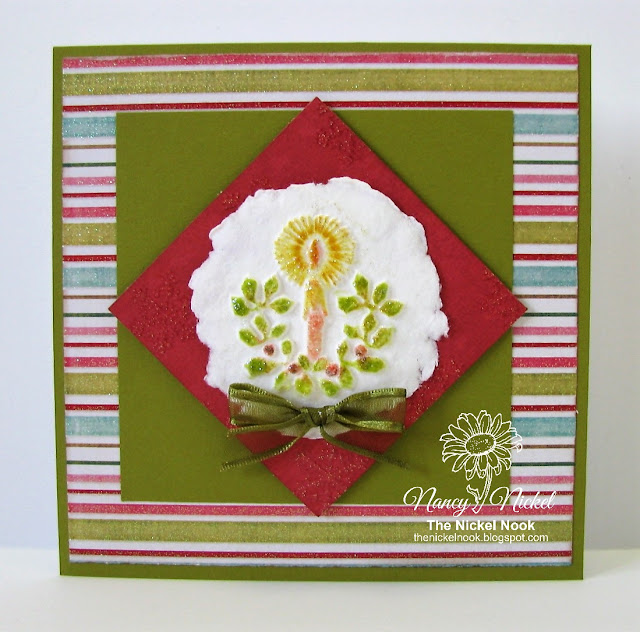
Christmas Candle Casting Card
Image
Hello, everyone! It's Nancy here with a festive new project share! I have done my first paper casting! Was it ever FUN, and I'm afraid it's just as addicting as paper making!  ;o) Here's my card for today: My friend Michele was so helpful in getting me started. She sent me some fun molds. I was also generously provided with some great Paper Casting Stamps from   Rycraft ! Look at the stash of casting pieces I made: Materials Used in My Project: Arnold Grummer -  White Cotton Linter ; Blender; Rycraft Paper Casting Stamp -  Christmas Candle ; Imagine Crafts Ink: Memento - Dandelion, Pear Tart, Red, and Fantastix; Papers: Recollections - Cardstock, My Mind's Eye - Wonderful Winter; Ribbon: Celebrate It; Stickles: Star Dust. 1. I began by doing all the fun casting. The one 8 oz bag of Cotton Linter was enough to make all of these pieces. I simply added a handful of Linter to the blender with some water, and blended. ...

Christmas Picture Frame

Image
Is everyone in the Christmas spirit? I have to say, at work they are playing Christmas music allllll day long. It wouldn't be so bad if it didn't sound like "elevator music" LOL Today, I have a picture frame to show you, I took a wooden frame and ripped up some handmade paper I had made, then glued it down onto the frame using good Helmars glue. I then made a paper flower to add to the corner. Notice the leaf at the bottom left corner? I couldn't help but keep that in tacked and stick it on. That was from the sheet where I added leaves to the slurry. I also used some of the beautiful snowflake ribbon from the The Ribbon Resource that they so kindly gave us. I just inked them up to make them blue. The Christmas tree is from a napkin.  And.....when Christmas is over, you can change out the picture to put whatever you would want in it. This on is an OLD postcard I found at a resale shop. It is from Portugal and is a picture of the first university founded in ...

Christmas Stickers

Image
©Michele Emerson-Roberts  2014 You probably get lots of mail this time of year asking for donations for this or that cause. I sure get my fair share and have to pick and choose who to support. Often the requests come with “free” cards (you already know what I do with some of those) or stickers that I don’t always want to just toss. These 4 cards are another example of what can be done with some of the “stuff” that others think of as junk or trash, in this case Christmas stickers. Supplies: Any of the Arnold Grummer™  paper making kits Microwave, heat gun or a sunny window Blender, small strainer, cello sponges Iron and pressing cloth Westcott™ personal paper cutter, scissors Scor-Pal ™ Spellbinders ™ Grand Calibur    Grand Calibur Beacon ZipDry™ Adhesive, double sided foam tape or dots Scraps of white and red paper or cardstock (think junk mail, etc.) Remember: ALWAYS...

Quick and Easy Christmas Cards by Linda Hess

Image
I can hardly believe how quickly the holiday season has come upon us this year.  Perhaps it is because I am working as an art teacher this year...or that I work PT in framing at Michaels.  Either way the holidays seems to have come up much faster than normal.  With that in mind, Christmas cards need to be made and made quickly! I pulled out my trusty tri-fold cards ( http://arnoldgrummer.com/products/cardmaking/trifold-window-cards.html ), a terra cotta Nativity mold ( http://arnoldgrummer.com/nativity.html )  and my Delight AirDry Clay ( http://www.paperclay.com/product.htm ).  I conditioned a bit of the Delight clay by squeezing it in my hands.  I then flattened it into a thin sheet (this can be done by hand or with a roller or with a pasta machine).  The clay sheet was pressed into the Nativity mold (be sure to press clay firmly into the recessed areas).  I pulled it out and placed it on my work surface, smoothing the edges flat....

Christmas Greetings Using Molds

Image
I'm getting ready for Christmas gift and card giving. I always like to give a handmade card and gift tag. And what better example of handmade than using my own handmade papers and castings. I made the paper for this card and tag using these basic instructions . For the embellishments I used Arnold Grummer's paper casting molds and UTEE (ultra thick embossing enamel). The first mold I used was the Noel mold ; the other was the Snowflake mold . By the way, molds are on sale now— 15% off holiday molds !! The first step when using UTEE is to generously coat the mold with a release agent. I brushed on embossing ink. Mold coated with release agent For the Noel casting I also colored the clear UTEE with alcohol inks to get the beautiful green shading. The best way to color the UTTE is to add alcohol ink, drops at a time, to the dry UTEE. Next, I heated the colored UTEE in my melt pot. When the UTEE was melted, I added  Gold Mica D'Lights  for a hint of sparkle. I ...

Snowflake Christmas Card

Image
There's always a flurry of activities between Thanksgiving and Christmas—shopping, parties, gift wrapping, Christmas cards. But this year I'm ahead of the game, if only on one item on that list—my Christmas cards. I've been thinking about the design for quite a while. Since this summer, actually. I live in Ohio where we have brisk autumns that move into cold  winters. I like to do my handmade paper making outside, so I try to make lots of paper during the spring and summer fair-weather months. I made the papers for this snowflake Christmas card way back in May or June using these basic papermaking instructions . Since I knew I'd be using these papers for Christmas, I was sure to include plenty of metallics and sparkles along with botanicals . I had the pastel color palette in mind when I selected my tissue tint s to color the papers. I used a variety of Sizzix snowflake dies to cut the individual snowflakes, then layered the four snowflakes on the card base. Las...