Posts

Showing posts with the label mini album

Traveling Memories Mini Scrapbook

Image
Today I have a mini Traveling Memories Scrapbook to show you. Here is a photo of the supplies I used to make it...When making handmade paper, think junk mail. I used the Arnold Grummer Papermaking Kit to make my papers. I love it and love the way no two papers turn out the same.   You will need a cereal box or cardboard of some sort. I cut mine to 8" long by 3" wide. I then scored each side at the 3" mark which made a center piece of 1" for the spine. I then reinforced the spine with another piece of cardboard cut just a smidge smaller than 1" and used my Helmar Tacky Craft Glue to glue it in the center.  I then cut two more pieces 3" by 3 1/2" and glued those to each side to reinforce them. You need a strong glue to glue these in place, that is why I chose Helmars. Then tear pretty papers into strips, this is where you can use some of your gelli prints or waste paint paper and even magazines. Glue the strips onto the c...
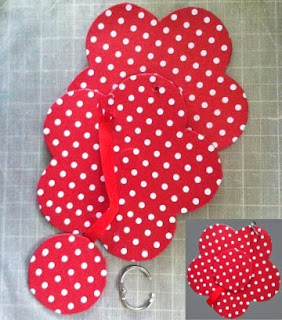
Reclaimed and Reused from My Stash

Image
If you're like me, you have a mountain of stash—stuff that has accumulated over your crafting career. I know that my style and tastes have changed over the years that I've been crafting. The other day I decided it was time to de-stash. Interestingly, I found a few items that made perfect candidates for repurposing and reclaiming. I'm going to give them a new life!! This mini album was one of the de-stash items that made it to the keep and repurpose pile. Here you can see the pieces of the album—front and back covers and a magnetized closure tab. The inset shows the closed album. The polka dots just don't do it for me any more, so I decided the cover the album pieces with handmade papers that I made following these basic instructions .  I traced the outline of the covers and closure directly onto my handmade papers, and cut them out with scissors and a craft knife. Next, I painted the originals with white acrylic paint so the design wouldn't shadow thro...

Handmade Spring Flowers Mini Album

Image
Hello, Peggy here to show you how I made this wonderful little mini album to be filled up with some pictures of spring. It's in the air isn't it? Well, OK, a little early for some but here in British Columbia on Vancouver Island we are in full bloom! List of supplies for today's tutorial:  Arnold Grummer's Paper Making Kit Magnolia Casting Mold Chipboard for the  Covers and Spine Double sided tape Liquid Glue Gelato's Envelope Punch Board White Cardstock Tags Die  Polymer Clay (White) Acrylic Paint  I made some wonder full paper again with my Arnold Grummer's Paper Making Kit.  This time I made my sheets a bit thinner to be able to manipulate the paper around my chipboard easily.  I also used an iron to dry my sheets as last time I made paper I air dried. They came out much flatter. I used my chipboard from the sticky notes kit for the front, spine and back covers. I taped my edges with double sided tape to make my handmade p...

Two Halloween Treats

Image
By: Carole Lassak This morning we had a nip of fall in the air. Just enough to make me start thinking about autumn decorations and Halloween. I decided to make a Halloween banner using Arnold Grummer's Project Squares  and a sheet of handmade paper that I made using these basic directions . I used my Zing electronic cutting machine to cut the letters and the top layer of the pumpkin motif. The font is Misfits from Dafont.com . The lower layer of the pumpkin motif is my very own handmade paper. I colored it using Arnold Grummer's Tissue Tints . These 8"x8" heavy chipboard squares are perfect for banners. Since they are pre-punched, all I had to do to complete the hanging was tie the tiles together with orange gingham ribbon. I also made a Halloween book using Arnold Grummer's Mini Fan Deck . I'll add photos and journaling about this year's Halloween to this special book. Every other page showcases a swatch of one of my handmade papers. The fan...

Fall Themed Brag Book

Image
One of my favorite things is taking pictures.  I have a box full of pictures of my friends and family that dates back well before the digital age.  I love to find new and fun ways to display them, especially the photos of my girls when they were small.  This month I used some of them to make a Fall Themed Brag Book.  Not only is this a great way to showcase old photos but it also makes a great gift for grandparents and friends.   Arnold Grummer's Papermaking makes it so easy to put together a project like this.  They have everything you need to get started. I made this paper using  Arnold Grummer Medium Pour Mold .  I recycled some scraps from previous projects and added Red Angel Wings  and OpalLITES Sparkles  into the mix.  One of the things I love about making paper using this mold is that it is so easy to control the thickness of your paper.  When I'm using the paper that I'm making to wrap around a book cover...

Matchbook Mini

Image
This mini matchbook album is the perfect project to use small pieces and scraps of your handmade paper. I started with this lightweight chipboard matchbook. Next, I covered each page and the matchbook cover with a different piece of handmade paper and inked the edges of each page. After some experimentation I discovered that the best adhesive to adhere the paper to the chipboard is  USArtQuest's Great Tape . I dug into my stash to find stamps and embellishments to decorate each page. The pink heart on the cover was made using Arnold Grummer's Three Hearts Template. Here's the finished matchbook mini album. Visit my Create & Craft blog to see more of my projects.