Posts

Showing posts with the label Valentine

Valentine Mini Zig Zag Book

Image
©Anne Rita Taylor 2016 Open Valentine Zig Zag Book I enjoy using accordions for greeting cards and was happy that Arnold Grummer sells Zig Zag books with six sides. When I fold my own accordions I fold eight sides, as I do below with the handmade paper accordion. Then I cut off two sides to use for another greeting card.  Supplies: Arnold Grummer paper making kit Blender, strainer, sponges, towels Mini Zig Zag Book with covers Books are 3 1/2 by 15 inches; Covers are 2 3/4 by 3 3/4 inches Two pieces of scrapbook paper to decorate covers, 3 1/2 by 4 1/2 inches each Scissors Two photos, 1 inch to 2 inches square Valentine Stickers Draw 2 inch heart out of pink paper and cut out 18 inch ribbon  Double sided tape PVA glue & 1/2 inch glue brush OPTIONAL: Arnold Grummer Standard Paper Press Closed Valentine Zig Zag Book - 2 3/4 by 3 3/4 inches Follow instructions in the Arnold Grummer paper making kit. Attach handmade paper to f...
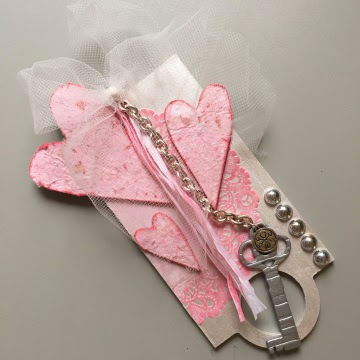
Valentine Tag

Image
With Christmas and New Year's all but a memory, I'm getting ready for Valentine's Day. I made this Valentin'es tag for my special someone. I started with a blank tag from KaiserCraft's Antique Tag set, and painted it with a coat of gesso. When the gesso was dry, I added a coat of Perfect Pigment White Satin Pearl acrylic paint. While that was drying I dug through my stash to find the grungeboard key and heart shapes. I traced the hearts on my handmade paper (made following these basic instructions ), cut them out, and used a liquid adhesive to glue the paper to the grungeboard. While the glue was drying I painted the key with silver metallic acrylic paint. Back to the hearts. I inked the edges with a complimentary pink pigment ink. Since the hearts extended beyond the edges of the tags, I also inked the reverse side of the hearts. I used the same ink to sponge onto the white paper doily. Inked edges on hearts Sponge inked paper doily ...

Valentine Popup Card

Image
I'm always excited when I can combine things I love. In this case it's a Valentine card, handmade paper and new software. The handmade paper that I used for this card was made following these basic instructions . I added pink Angel Wings , pink tinted tissue . I molded this pulp using the three hearts template . The full tempate was too large for the card that I wanted to make. So, I painted a water line around the heart shapes so I could pull them apart and maintain that beautiful deckle edging. Here are the two separated pieces. I used Popup Card Studio and a free file designed by Michele Harvey for the inside of my card. I cut Michele's Popup Card Studio file on my Zing electronic cutting machine . You can see that I added a heart cut out of a scrap of the handmade paper. I used a quick drying liquid adhesive to adhere my handmade paper hearts to the front of the card. I also added a bit of bling. Here's my completed card. Carole

Stenciled Valentine Wall Hanging

Image
Getting ready for Valentine's Day here—in the middle of Ohio's deep freeze!! I like to make my paper outside, but that's out of the question with the weather we've been having. So, when I looked for pink handmade paper in my stash for a Valentine project, I was disappointed to find that I'd used it all. But, I did find some lovely white paper, and I decided to make it make it a Valentine color with a stencil. I used my Zing electronic cutting machine to cut my stencil out of acetate. The stencil pattern was a free downloadable file from Bird's Cards . I needed my paper to be smaller than the original piece. I also wanted to retain the soft, irregular deckled edges, so I painted a line of water along what would be my cut lines, and gentle pulled the paper apart. Here's my paper and stencil in my cardboard box spray booth, ready to be misted.  I tried several colors of misting spray, but LuminArte's Ginger Flower Radiant Rain Shimmer...

Valentine's Ornament and Card

Image
My four year old grand daughter was sad to see us take down our Christmas tree and all the ornaments. Even though she help take each ornament off the tree, often she would say, "I don't see why we can't leave the ornaments on the tree. They look so pretty!" So, we decided that we'd have a special Valentine's Tree with its own ornaments. This is an easy project—perfect for involving young children. Chloe had helped make the papers this fall (we followed these basis papermaking instructions ), and was eager to get to use them in a project. Together we selected the papers that we'd use for the ornaments—mostly pink, with the odd purple sheet of paper. We used a heart punch for the shapes. Each ornament requires a minimum of three hearts. For a fuller ornament, just add more hearts. Next, we scored each heart lengthwise in the center. We glued the left half of the first heart to the right half of the second heart. Then, we laid a piece of twine along the c...