Love Is In the Air With Handmade Paper
Love Is In the Air II
Creating individual cards for those people whom are extra special in my life is such a joy. Matching each card to the personality of the recipient can sometimes be a challenge. Using handmade paper and some pre-printed card bases makes it so easy and even more fun. Today’s cards are for two friends who are shy and quiet, the cards fit them so well…smile.

Creating individual cards for those people whom are extra special in my life is such a joy. Matching each card to the personality of the recipient can sometimes be a challenge. Using handmade paper and some pre-printed card bases makes it so easy and even more fun. Today’s cards are for two friends who are shy and quiet, the cards fit them so well…smile.


I apologize for the distorted photo...will have to get my camera checked
Supplies
• Any of the Arnold Grummer® paper making kits and paper press
• Blender, cello sponges and soft towels
• A sunny window
• Scraps of white & mauve paper (think junk mail, etc.)
• Scraps of white card stock to die cut (I used white food packaging)
• Dies:
o MemoryBoxTM #99355 “Ellianna Heart”, #99925 “happy valenine’s day”,
#99339 “Devotion Heart”, #99351 Fancy “Heart Duet”, CheeryLynnTM #B227 “Love”
• Crafter’s CompanionTM Gemini Junior™ die cutting and embossing machine
• Beacon ZipDryTM adhesive, double sided foam tape
• Pre-printed and folded A2 cards and envelopes
Instructions:
1. Follow the instructions found in any of the Arnold Grummer™ paper making kits to create
pale mauve slurry and make one or more sheets of medium weight paper..
2. Allow the paper to dry.
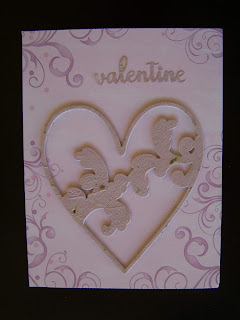
For the “valentine” (portrait oriented) card:
1. When the paper is dry, die cut three of the "Elliana Heart", two from white scraps card stock
and one from the pale mauve handmade paper. Die cut one of the word “valentine” (you will
remove the “ and s from the die cut).
2. Layer and glue the two cardstock hearts and the mauve handmade paper heart die cuts
together. (I wanted the heart to be thicker to really stand out.)
3. Attach the layered heart to the lower center of the preprinted card with ZipDry adhesive.
4. Attach the die cut word .”valentine” to the top center of the card.
For the “Love” card (landscape” oriented) card.
1. Die cut one each of the word “Love”, “Devotion Heart” and “Fancy Heart Duo”.
2. Attach to the front of the pre-printed card with ZipDry adhesive. “Devotion Heart”
on the right, Fancy Heart Duo” on the left and “Love” in the upper center of the card.
Add a personal message to the inside of the cards and send them on their way.
-------------------------------------------------------------------------------------------------------
TAGS: Arnold Grummer, Michele Emerson-Roberts, handmade paper, Hearts, Valentine’s Day, "Love”, die cuts, Beacon Adhesive


Very pretty as always
ReplyDeleteThanks Terri.....it is always easy to create pretty projects working with handmade papers and castings. I was blessed with taking some classes from Arnold years ago. He opened a whole new world for me.
ReplyDeleteThey're both beautiful, Michele!
ReplyDeleteThanks Nancy. So easy and have been a big hit with the recipients.
ReplyDelete