Posts

Showing posts from March, 2019

Frolicking Fairies

Image
The tables are set. The kettle is on. Thought you would like to see the centerpieces. With the addition of vases, silk greenery and Fairy "wands" and a few die cut Fairies and some square 9 x 9 matts, the decorations went together quickly.. Please refer to the other March projects for the supply lists and instructions. What theme will I pick for next years Tea Party? You can bet it will be with handmade paper!

Gold Gilded Butterfly Tag from Handmade Paper

Image
Hello, everyone! It's Nancy here with a fun new project, created with some great handmade paper. I'm using more of my handmade Sewing pattern paper today but I've fancied it up a little bit. To this paper I added some of the gorgeous  Gold Dust   from the Arnold Grummer Store. I also used a template to create the shape of the paper. It's the  Invitation & Thank You Card Medium Template . However, if you don't fold it, doesn't it make a great tag?  Here's my project: Materials Used: Arnold Grummer's PAPERMILL Complete Papermaking Kit ;   Arnold Grummer's - Invitation & Thank You Card Medium Template ; Arnold Grummer's - Gold Dust ; Blender; Sewing Pattern Tissue; Stampendous - Build a Wreath Die Set  - Generously provided by  Stampendous ; Stampendous - Butterflies Cutting Die Set - Generously provided by Stampendous ; Gold Ribbon; Gold Eyelet; Sentiment - Paper Wishes - Gold Dazzles; Nuvo

I Believe In Fairies

Image
What fun it has been, creating all of the “Fairy” themed invitations, thank you cards and center pieces for the “Tea Party with the Fairies”. Of course using handmade paper for most of it has made it so easy and has been a delight! I created two different "Thank You" cards that will also be used as place cards with the addition of the attendees' names. I did put a dent in my stash of handmade paper. Our weather is warming up so I will be able to make paper outside and enjoy nature while I am helping to save “nature”. It is so satisfying to use that junk mail, etc. and create something of beauty with it! Supplies: • Any of the Arnold Grummer® paper making kits & paper press • Blender, cello sponges and soft towels • A sunny window • Scraps of white paper (think junk mail, etc.)  • Scraps of colored junk mail etc. to die cut • Dies:       o Crafter’s Companion S-EF-MD-FF “Frolicking Fairies”      o Tutties™ “Believe” • Crafters’ C

A Tisket, A Tasket. . .An Egg-stra Special Basket

Image
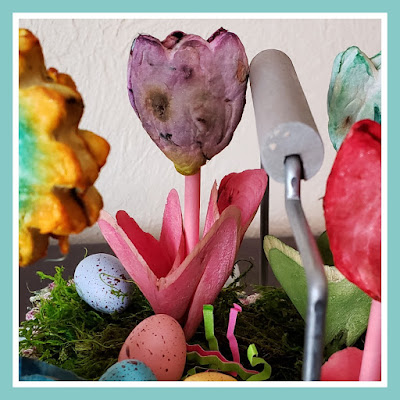
With winter really becoming an unwelcome guest, we need a little something to look forward to. In my head, I see colorful pops of flowers, juicy green grass, and a tangerine sun. Indeed, these are on the way but there is absolutely no reason we can’t egg it on a little bit now. I have created a sweet little flower planter resplendent with tulips and sunflowers and some surprising little eggs hidden in the grass beneath. Curious how to create your own? What You’ll Need: Arnold Grummer’s® Best Selling Cotton Lintner: 8 oz. Pre-Shredded https://arnoldgrummer.com/cotton-linter-pre-shredded-8-oz-package.html -or- Arnold Grummer’s® 8 oz. Cotton Lintner Sheet Pulp https://arnoldgrummer.com/8oz-cotton-linter-sheet-pulp.html   Arnold Grummer’s® 4 oz. 100% White Cotton Rag Pulp Arnold Grummer’s® Petals: Summer Gold https://arnoldgrummer.com/petals-summer-gold.html     Flower Mold Candy/Cookie Sticks in your favorite color or design Food Color (Regular and Neo

How to make botanical place cards

Image
Sharing food and drink is one of the oldest rituals in the world and what better way to celebrate my 60th birthday  than to share a cup of tea with my besties?  I set about making some place cards for my birthday tea celebration over at Southern Cup of Tea   out of the left over Botanical paper I had on hand which I had created with my  Arnold Grummer  Papermaking kit and the Angel Wings: Multi Color Mix . Using my Tea bag stencil template, I traced and cut them out. Tip: Be prepared for beautiful albeit annoying flaws when writing on botanical paper. For numbers 1 and 2 the fix is simple. You just need to cut out extra "tags" to glue on. 1. This beautiful kaleidoscope of flowers would just overwhelm the text. 2. Sometimes a deckled edge just doesn't work, even as much as I love them and in this case it ends up  looking like an corner that got torn off. 3. No going back from this one really when a dark piece lands smack in the mid

"More...Tea Time with the Fairies"

Image
The last batch of invitations for the Tea Party are finished and ready to go out. Love the vibrant colors! Since I always make more backgrounds I have lots of papers to use in creating future projects. These were such fun to create, I will be doing more! Supplies: • Any of the Arnold Grummer® paper making kits • Blender,  cello sponges and soft towels • A sunny window • Scraps of white paper (think junk mail, etc.) • Crafter’s Companion Gemini Jr. ™ die cut machine • DIES: Joy: “Fairies” # 6002/1069, Mariann: LR0513 Dandelion , “ Fabulous”,         MemoryBox: large sitting Fairy • Black cardstock: 4 ¼ x 5 ½” folded and small/medium scraps to layer and/or die cut • Stamp:  Visible Image “Make a Wish” • Scor-Pal™ • Beacon ZipDry TM adhesive • Double sided foam • ColorBox™ Dystress Blendable Ink pads: Pansy #23107, Posey #23100, Scuba #23106,         Capri #23116 & Black Pigment ink pad for stamping verbiage • Small spray/mister bottle and water

Fun Sewing Themed Card using Handmade Paper

Image
Hello, everyone! It's Nancy here with a fun new card, created with some great handmade paper. Can you tell what I used to create my paper this time? Does my card theme give you a hint? Materials Used: Arnold Grummer's PAPERMILL Complete Papermaking Kit ;   Blender; Sewing Pattern Tissue; Stampendous - Build a Wreath Die Set - Generously provided by Stampendous Black Cardstock; Sewing Themed Stamps from Stampin' Up and Close to My Heart; Memento - Tuxedo Black Ink; Piercing Tool and Mat; Sewing Needle; DMC - Black Embroidery Floss; Small Piece of Black Ribbon. How I did it: As you've probably guessed, I created my paper using sewing pattern tissue. It makes a wonderful handmade paper, with a completely different texture than the other papers I have made. It has a smoother finish, and a crisper texture.  I used a metal ruler to tear the paper down to a rectangle, sized to fit inside an A2 size card front. It left a lovely soft

Oh, Blarney!

Image
This project is a small scrapbook page for my travel journal. My trip to Ireland in 2016 was my Trip of a Lifetime! There were definitely many shades of green to take in. My most coveted place to visit was the Blarney Castle, the grounds were breath-taking and yes, I kissed the Blarney Stone :o) This project started with a very large batch of green handmade paper, I have lots of photos to scrapbook into memories. Supplies: Arnold Grummer Paper Making Kit Arnold Grummer Cotton Linter  Foliage background stamp (unknown), Green Ink-Ranger (Bottle), Brown Ink-Close to my Heart (Cocoa), Scrap brown paper, lime colored twine, photo, Computer printed title. 3 different sized circle punches. Instructions: 1. Create your hand-made paper. I used scraps of many dark green card stock, scrap computer paper (white) and cotton linter. Trim background paper to project size (5.5 x 8.5") 2. Using a simple word processing program, create a title and print on to the background paper.

Fairy Love

Image
I wanted to create several different invitations for my annual Tea Party. It was such fun working on the kids’ invitations last week but now it is time to get busy on the adult’s. Since there are multi generations that attend and most of them keep the invitations as mementos, I like to make all of them special. This one is for the “grandmas”. I will also be making extras of these and frame them as part of the Tea Party décor. Supplies: • Any of the Arnold Grummer® paper making kits & paper press • Blender, cello sponges and soft towels • A sunny window • Scraps of purple paper (think junk mail, etc.) • Arnold Grummer® Folding Heart Medium Template • Scraps of purple cardstock or heavy weight handmade paper to die cut • White card stock 5 ½ x 11” , 6” square envelopes • Embossing folder: “LOVE” • Die: Crafters Companion™ S-EF-MD-FF “Frolicking Fairies” • Crafters Companion Gemini™ die cutting and embossing machine • Scor-Pal™ • Beacon ZipDry™ & Powe

In Memorium

Image
As a design team member, I try my best to work ahead on my projects so that I am prepared to share them. However, in mid-to-late February, Life said hello with a baseball bat laden with a few ten-pound weights. What a blow! My mother, who has suffered from Alzheimer’s for probably ten years or more but for whom nursing care had only been required for the last six, died. She died not quite ten years after our father but ten years after, nonetheless. I find the numerology associated with my parents’ lives interesting. My mother was born in 29. She died at 89 in 2019. My father was born in September, the 9 th month and died in 2009. Nine is a divine number. It represents the end of cycles. And here my family resides, our parents’ physical lives complete, the cycle resolved. And yet, memory exists as a wind traveling across the moors of grief and the warm embrace of Jacob’s ladder. And, so, I found myself at home looking at my intended project and deciding that it wasn’