Posts

Showing posts from May, 2016

Grateful for My Blessings

Image
© Michele Emerson-Robert 2016 Do you ever stop and think how much you have to be grateful for? Think about all the blessings that you have in your life? Ever want to let someone know that you are grateful for them or that they are a blessing to you? Here are two really quick cards made especially for those times… You could also change the “words” to Thank You, Hello, Congrats, or whatever, and all would be beautiful! Remember that I always make extra handmade paper to have on hand when needed so these actually went together in about 10 minutes per card.                                        Supplies ·        Any of the Arnold Grummer® paper making kits ·        Blender, strainer, cello sponges and soft towels ·  ...
Folded Card Holder

Image
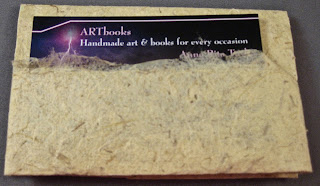
©Anne Rita Taylor 2016 When I wanted to give a few cards (Business Cards or Artist Trading Cards) to someone I wanted them in a nice holder. I made the Folder Card Holder with handmade paper and it added that special touch. Supplies: Arnold Grummer Paper Making kit Handmade paper, 8 1/2 wide x 11 inches long Ruler, bone folder Artist Trading Cards or Business Cards Fold the wide side 1 and 1/2 inches on each side. Turn over, and fold at 2 and 3/4, and 6 and 7/8 inches. At the 2 and 3/4 fold - fold in diagonally on both sides. Tuck the end into the diagonals, then fold in half. Insert your cards - inside, front, and back.

Happiness Card

Image
Good day everyone. This card was made for a friend that I work with. She was having issues with something in her life and was stressing herself out. I told her to relax, everything will work out just fine.....and it did :) I used my Paper making kit to make my background for the card. If you have never made your own paper, you just have to try it. The texture and feel of it is like no other. Every time I make paper, I think to myself, "what else can I make with this". I love coming up with different ideas (altho this is just a card today). I added a heart stamp and Happiness text stamp and them added my own handmade flowers to it. Thanks for stopping by and have a great day!

Celtic Quilt Square

Image
© Michele Emerson-Robert 2016 This is the second in the series (so far) of the Quilt Squares for my quilter friend. I know she will love them and they will be perfect to hang on her quilt studio wall. Staying with the neutral color palette of medium blue and golden tan harmonizes with the first project (Art Deco Quilt Squares from April 22), and since I will once again be using some items that would normally be tossed, I am doing my part to follow Arnold’s  “R’s”: recycle, restyle, repurpose, revamp, restore, renew! Supplies Arnold Grummer® paper making kits Tan &gold scrap paper (think junk mail etc. Large empty frozen Pizza box Sponges, soft towels A sunny window Medium blue text weight paper Die: Tonic Studios™ #184E Verso Celtic Dream Collectable Die Set Tonic Studios™ #159 Advantage V Blade paper trimmer Scor-Pal™ Tonic Studios™ Tangerine die cutting and embossing machine Pencil, ruler Tonic Craft Tacky™ ...

Adding color to the deckle

Image
Todays' post is about experimenting, having fun and just seeing what you can do! Prepare several colors of pulp by recycling colored paper in a blender and then putting each color in separate plastic bottles. I blended mine a little extra than normal, but the green kept plugging up the tip so I probably should have blended that one a bit longer. I also should have put it back in the blender, but once I get going it's hard to stop! , There are different ways to add color to your deckle using the squeeze bottles and it's fun to see how they turn out. The fun with this is trying different methods to see what results you can get. 1. First add a sheets worth of re-cycled paper pulp into the deckle of your Arnold Grummer pour hand mold. Using gentle pressure squeeze some of the prepared green pulp and the red pulp into the opposite corners. I love the way they blended and swirled together. Using this technique both the front and the back of the paper looks very...

Wedding Programs

Image
Continuing on with the wedding planning and prep! Every wedding needs a pretty program. This is the perfect place to show off your hand made papers! This one is  made using a sheet of white paper with glitter in it. I designed the wedding program in Microsoft Publisher. I was even able to scan in the invitation and use the scroll details from that. Helpful hint - make sure that several people proof read the program before printing! The nice thing about this is you can also make the program any size you want from a single piece to a folded two pager. There are two ways these can be printed. The first is to run the paper directly through the printer. Or, the second way, is to adhere the paper to a sheet of copy paper using a strip of tape runner. Because of the deckled edge of this piece, I used the second method. Another hint - if  there are smudges of black,  these can easily be erased by using a white eraser and very gentle rubbing. I wanted t...

Burgundy Flower Tags

Image
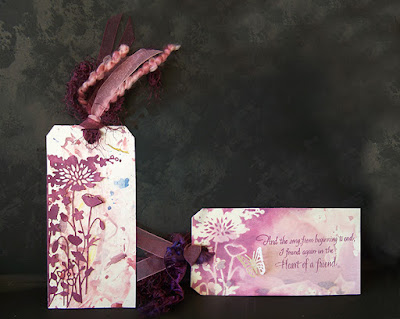
© Michele Emerson-Robert 2016 Spring has sprung! Trees are budding and the flowers are waking up from their winter’s slumber. I love this time of year when things are starting to turn green and the first blooms are opening up. With several friends birthdays this month and my not having proper cards for them….it is the perfect opportunity to use some of the wonderful handmade paper to create a pair of tags. Adding a birthday wish on the back makes them the perfect birthday card! Supplies: ·        Any of the Arnold Grummer® paper making kits ·        Blender, strainer, cello sponges and soft towels ·        A sunny window ·        Scraps of white paper (think junk mail, etc.) ·        Scraps of white card stock to die cut ·        Dies: CheeryLynn TM DL112 Exotic Butterflies mini, M...

Paper Casting Fun

Image
©Anne Rita Taylor 2016 While I was making paper, I found there are many uses for paper pulp which results from tearing up paper and putting it in the blender. Unlike paper making, the pulp goes through a strainer to get more water out of it before it is put in the mold. Supplies: Arnold Grummer Paper Making Kit Handmade paper - 4 1/2 by 3/4 inches Frame - 6 x 8 inches Green paper - 5 x 7 inches Marbled paper piece Mold for Paper Casting Wire - 2 inches, hole punch So after blending re-cycled paper in the blender during the process of making handmade paper, you have pulp.  This pulp can go in any mold: a jello mold, or even an ice cube tray. I happened to have this mold where I could cast a fish. I sprayed the mold with a little bit of cooking spray - I used Pam very sparingly. I pressed the pulp into the mold and waited for it to dry overnight. Luckily it popped out in one piece, although it can take some practice. I painted the fis...

Traveling Memories Mini Scrapbook

Image
Today I have a mini Traveling Memories Scrapbook to show you. Here is a photo of the supplies I used to make it...When making handmade paper, think junk mail. I used the Arnold Grummer Papermaking Kit to make my papers. I love it and love the way no two papers turn out the same.   You will need a cereal box or cardboard of some sort. I cut mine to 8" long by 3" wide. I then scored each side at the 3" mark which made a center piece of 1" for the spine. I then reinforced the spine with another piece of cardboard cut just a smidge smaller than 1" and used my Helmar Tacky Craft Glue to glue it in the center.  I then cut two more pieces 3" by 3 1/2" and glued those to each side to reinforce them. You need a strong glue to glue these in place, that is why I chose Helmars. Then tear pretty papers into strips, this is where you can use some of your gelli prints or waste paint paper and even magazines. Glue the strips onto the c...

Bee-lieve

Image
©Michele Emerson-Roberts 2016 A dear friend is having some health issues. I wanted to send her a small gift to cheer her up but know she is limited on space. This 4 x 6” mixed media piece will be perfect and will bring a smile to her face. Supplies: ·        Any of the Arnold Grummer™ paper making kits ·        A sunny window ·        Blender, strainer, cello sponges and soft towels ·        Scraps of white or off white (think junk mail, etc.) ·        Scraps of chip board to die cut (I used cereal boxes) ·        Die: Tonic Studios™ #172E Believe/Love Frames Topper set ·        Embossing folder: Swirl design ·        Tonic Studios™ Tangerine™ die cutting machine ·        Stencil: die cut...