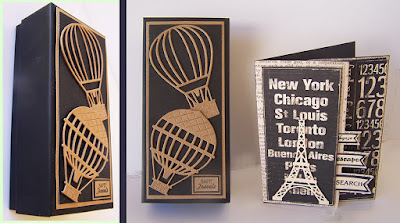
Safe Travels
©Michele Emerson-Roberts 2016
My
favorite nephew graduates this May with a double degree Geology and “land
management”. He is following his dad’s
and grandpa’s footsteps and going into the oil business. He will be working
towards an MBA next! I wanted to make something special for his graduation, and
since he’ll be taking a long trip, I think the little travel box will come in
handy for him. Following Arnold’s philosophy of “repurpose, restyle, revamp,
restore, renew and recycle is such fun!
Supplies:
- Some ivory heavy
weight handmade paper left over pieces
- Tan chipboard (I
used the back side of a cereal box)
- Black card stock
for card base (4 ¼ x 5 ½ folded) scrap for layering, envelope
- Graphic 45 Topography papers for layering
- Recycled small
rectangle black box (I used an eyeglass frame box)
- Dies: The
PaperCut™ # PCDIE019
Triple Flag (Card Making set); #PCDIE020 Triple Flag Layering set; Joy
Eiffel Tower #6002/0486; CheeryLynn #B360 Steampunk Hot Air Balloons
- Spellbinders Grand Calibur™ Die cut and embossing
machine
- Westcott™ paper trimmer & scissors
- Scor-Pal™
- ColorBox™ Chalk Charcoal ink pad
- Various small
travel word
stamps
- Beacon ZipDryTM adhesive, double sided foam tape
- Iron if you want
the ivory paper smooth
Instructions:
- Die cut the Eiffel Tower from the heavy weight ivory
handmade paper.
- Die cut one each of the hot air balloons from the tan
chip board.
- Die cut a layering panel from the newsprint cardstock
with the Paper Cuts card die.
- Die cut layering flag pieces from black and ivory
scraps. Layer and attach to the “flags”.
- Cut a G45 “numbers” scrap for the right side of the
card.
- Cut a G45 “City names” piece for the front of the card.
- Stamp the travel words onto the ivory flag shapes.
- Stamp the words Safe Travels onto a small piece of tan
chip board.
- Layer the “safe travels” stamped piece onto a black
scrap, then a tan scrap.
- Cut a piece of tan chipboard to be a bit smaller than
the box top.
- Cut a piece of black cardstock a bit smaller than the
tan piece.
Assemble the card:
- Refer to photo for placement. Use ZipDry™ adhesive to
attach the numbers piece to the right side of the card and the precut
flagged newsprint piece to the left side of the card front.
- Attach the city manes piece to the left side of the
card with small pieces of foam tape.
- Attach the Eiffel Tower to the lower center of the city
names piece with tiny pieces of foam tape.
Assemble the box:
- Layer and attach the tan and black pieces to the box
lid.
- Slightly overlap and attach the two hot air balloons to
the top of the box.
- Attach the safe Travels layer piece to the lower right corner of the box lid.


Simply amazing! He will love this!!
ReplyDeleteThanks Jean.......it is difficult to make something for a guy......and also have it a size thatwill be good to travel with.....
DeleteLove and light,
Michele
Lovely, and good for him!!
ReplyDeleteThanks a bunch.......can't wait to see his face.....smile.
DeleteLove and light,
Michele
Wonderful card Michele!
ReplyDeleteThanks..... It was a fun card to make and I know my nephew will like it and the box.
DeleteLove and light,
Michele
lovely
ReplyDeleteThanks.....I will get a lot of use out of this card making die from the Paper Cut co........it can be used in so many ways.
DeleteLove and light,
Michele