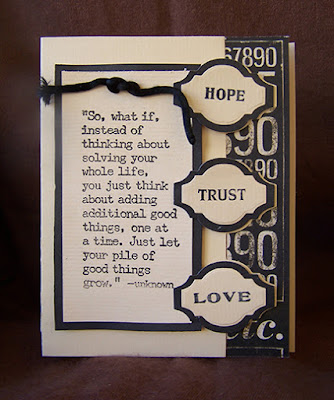
“Hope, Trust, Love”
©Michele Emerson-Roberts 2015
When I saw this Impression Obsession™ stamp
and the new dies from the Paper Cut™, I knew they would make the perfect card
for a friend who is going through a rough patch in her life.
This card was made from one of the “extra sheets” of handmade paper I always make to keep on hand, but I included the ‘from scratch’ instructions in this project.
This card was made from one of the “extra sheets” of handmade paper I always make to keep on hand, but I included the ‘from scratch’ instructions in this project.
Supplies:
- Any of the
Arnold Grummer™ paper making
kits
- A sunny window
- Blender,
strainer, cello sponges and soft towels
- Scraps of off-white,
tan & brown paper (think junk mail, etc.)
- Graphic45TM “Topography”
scrap for card front liner
- Scraps of black cardstock
or heavy weight hand made paper
- Envelopes to fit
cards (or make your own with the AG envelope template)
- Beacon QuickGripTM Adhesive,
double sided foam tape or dots
- Scor-palTM (Love the new
1/8” version)
- Dies: The Paper Cut™ PCDIE001Tripple Fancy
Tag Card making die & PCDIE002 Fancy Tag Layering die set
- Stamps: Impression ObsessionTM #
D1446 “Good things” & JustRite™
small word stamps
- ColorBoxTM Charcoal ink pad
- 1/8” round hole
punch
- Approx. 9” Black
Rattail cord
- Scissors, Iron
Instructions:
- Follow the
instructions found in any of the Arnold Grummer™ paper making kits to
create a sheet of heavy weight cream handmade paper (think cardstock
weight). Note - create more sheets if you are going to make numerous
cards….. one sheet will make one card.
- Iron the paper
to make it smooth.
- Follow the die
package instructions to create the Z fold card.
- Fold the extra
right side piece under to form the “Z”.
- Attach the piece
of G45 cardstock inside this fold.
- Stamp the
sentiment and 3 words onto scrap of handmade paper.
- Die cut the
layering background pieces with the largest die from black card stock
scrap.
- Die cut the 3
words.
- Layer the
sentiment piece onto black card stock.
- Punch two holes
at the top and tie a knot through the holes with the Rattail cord.
- Attach the
layered piece to the left side of the card.
- Layer the 3
words onto the black backing pieces and attach them to the fancy tag part
of the card.
- Hand write a
note of encouragement inside the card and send it on its way.


This is stunning!!
ReplyDeleteThanks for the compliment. I love black and cream, black and tan......it always looks great. And anything made with handmade paper is so special.
ReplyDeleteLove and light,
Michele
Looks rich.. so hard to believe its handmade papers!
ReplyDeleteLooks rich.. so hard to believe its handmade papers!
ReplyDelete