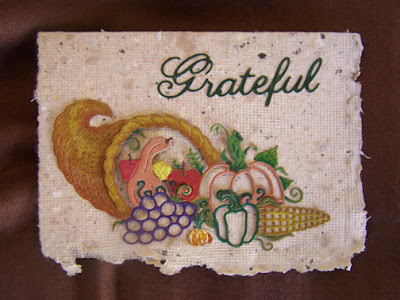
"Grateful"
©Michele
Emerson-Roberts 2015
This
is the time of year that we so often reflect back on all we have to be grateful
for - our country, our families, our friends and neighbors, our four legged
friends, our health, our lives and so
much more! I think it would be a better world if we would do this every day. I
have so much to be grateful for; I am indeed blessed.
The
card looks hard but come together in a short amount of time (I created 12 cards
in a couple of hours.)
Supplies:
- Any of the Arnold Grummer™ paper making
kits
- A sunny window
- Blender, strainer, cello sponges
and soft towels
- Scraps of off white, tan &
brown paper (think junk mail, etc.)
- Beacon QuickGrip™ Adhesive,
double sided foam tape or dots
- Envelopes to fit cards (or make
your own with the AG envelope template)
- Scor-palTM
(Love the new 1/8” version)
- Sharpie® markers (2 shades each,
red, green, yellow, purple, orange, brown)
- Scraps of tan chip board (I used
the backside of cereal boxes)
- Dies: CheeryLynnTM
- # B615 (Grateful), # B600 (Thankful Harvest)
- SpellbindersTM Grand Calibur die cutting machine
Instructions:
- Follow the instructions found in
any of the Arnold Grummer™ paper making kits to create one or more sheets
of heavy weight tan speckled paper. (Create more sheets if you are going
to make numerous cards; one sheet will make 2 cards.)
- When the paper is dry, fold and
tear it to make two pieces 5 ½ x 8 ½”.
- Score and fold to create a 4 ¼ x
5 ½” cards.
- Die cut one cornucopia and word
for each card from the tan chip board.
- Color the word with light green,
while it is still wet, color it with dark green.
- Color one item at a time (Ex: grapes).
Color with the light colored marker first, while it is still wet shade
with the darker color, color again with the lighter marker to blend. Repeat
these steps on each item. Refer to the sample for color and shading
placement. The coloring does take a few minutes but is beautiful when
finished.
- Attach the word to the top right
of the card with the QuickGrip™ adhesive.
- Add foam tape to the back of the
cornucopia basket rim and then attach it to the bottom left corner of the handmade
paper card with QuickGrip™.
NOTE: I always make extra sheets
of paper to have on hand for future projects.


Lovely and you are so right, we should express gratitude every day!
ReplyDeleteThanks Sandee......every day we get through is a plus.........we have so much to be grateful for.
DeleteLove and light,
Michele
This is absolutely beautiful!!
ReplyDeleteGreetings,
DeleteThanks Jean.......it was so easy and quick to make them.
Love and light,
Michele
You did an excellent job on this card. I love the cornucopia....Beautiful!
ReplyDeleteGreetings Donna,
DeleteThank you for the kind words. The lovely die cuts like butter. It was such fun to color it too.
Love and light,
Michele
totally beautiful!!
ReplyDelete