Falling in Love with Handmade Paper
Welcome to my stop on the Arnold Grummer & Club Scrap Falling for Handmade Paper blog hop! Today we have a dozen talented bloggers sharing projects featuring handmade paper paired with Club Scrap's Falling Leaves collection. I have three lovely cards to share with you today.


Supplies:
• Any of the Arnold Grummer® paper making kits & paper press
• Blender, cello sponges and soft towels
• A sunny window
• AG #284 “Petals for Paper”
• Dried herbs and/or spices
• Dried oak leaves
• AG # 395 Flower Press
• Scraps of off white/tan and rusty red papers (think junk mail, etc.)
• Club ScrapTM “Falling Leaves” collection (Absolutely beautiful!) ( I added cling foam to
the stamps)
• Scor-Pal™
• Tonic Studios® Tim Holtz™ 12” guillotine paper trimmer
• Stamp positioner
• Beacon® ZipDryTM adhesive,
• Double sided foam tape
• ColorBox™ Archival ink pad “Mudslide”
• Approx. 24” brown metallic thread
• Envelopes to fit cards
Instructions:
1. Follow the instructions found in any of the Arnold Grummer™ paper making kits to create off
white/tan slurry and create several sheets of medium weight handmade paper.
2. Add dried herbs or spices to some of the papers.
3. Please the papers into the paper press and allow them to dry.
4. Repeat step 1, 2 & 3 creating a sheet or two of rusty red paper with “petals for paper”.
5. Allow the papers to dry.
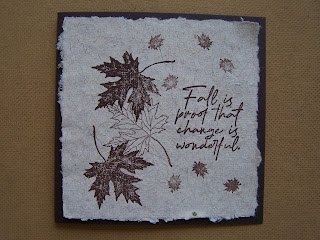
Square card: “Fall is……”
1. Cut a piece of dark brown cardstock from the Club Scrap “Falling Leaves” kit 6 x 12”.
2. Score and fold to create a 6 x 6” card
3. Tear a piece of the off white handmade paper to 5 ½ x 5 ½ “.
4. Place the torn off white handmade paper into the stamp positioner.
5 Arrange the verbiage, the solid leaf and tiny leaf stamps onto the paper.
6. Close the lid of the positioner. The stamps are now temporarily stuck to the lid.
7. Open the lid and ink the stamps with Mudslide Archival ink.
8. Close the lid. * Repeat step 7 & 8 until it is well stamped.
9. Remove the verbiage and solid leaf stamp stamps. Move the tiny leaf stamp to other
places or stamp it by hand.
10. Arrange the open leaf stamp onto the paper and repeat steps 7 & 8.
11. Remove and wash the stamps.
12. Attach the stamped handmade paper to the 6 x 6” card with ZipDry™ adhesive.
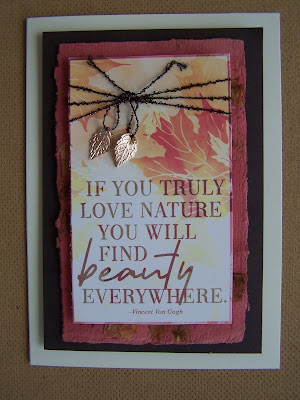
Rectangle card (lg.): “If you truly……..”
1. Cut a piece of the ivory cardstock from the “Falling Leaves” kit 7 x 10”.
2. Score and fold to create a 5 x 7” card.
3. Cut a piece of the dark brown cardstock 4 ½ x 6 ½”.
4. Tear a piece of the rusty red handmade paper 3 ½ x 5 ¾ “.
5. Cut the “If you truly” panel from the kit.
6. Add tiny pieces of double sided foam to the back of the 3 layers.
7. Wrap the piece of brown metallic thread around the top of the “If you truly…” panel and
tie it off center.
8. Tie the tiny gold leaves from the Club Scrap kit onto the ends of the threads.
9. Center, layer and attach to the front of the ivory card.
Rectangle card (sm): “You are never……”
1. Tear a piece of the tan medium weight handmade paper 5 ½ x 8 ½”
2. Score and fold to create a 4 ¼ x 5 ½” card.
3. Tear a scrap of the tan handmade paper to approx. 1 x 3”.
4. Place the scrap into the stamp positioner.
5. Place the verbiage “You are never….” Stamp onto the paper. Close the lid of the positioner.
6. Open the lid and ink the stamp with the Mudslide ink pad.
7. Close the lid to apply the ink to the paper.
8. Repeat 6 & 7 until you are happy with the stamped verbiage.
9. Remove and wash the stamp.
10. Arrange and attach the leaves with ZipDry™ adhesive.
11. Attach the stamped verbiage to the center of the card with tiny pieces of double sided foam.
.
Julie Heyer is your next stop. As you explore the hop today, we encourage you to leave each blogger a few kind words in the form of a comment. Those who leave a comment on every participating blog will be entered into a random drawing for a prize. Good luck!
-------------------------------------------------------------------------------------------
TAGS: Arnold Grummer, Club Scrap, Michele Emerson-Roberts, handmade paper, Beacon Adhesives, ClearSnap, Tonic Studio, Scor-Pal


Thanks for the very detailed instructions. I also like the idea of adding spices and herbs to the paper pulp and will use up some of my spices that I will be replacing for holiday baking.
ReplyDeleteThanks so much. Anything is handmade paper "floats my boat"...and anything from Club Scrap gets my creative juices going.
DeleteThese are beautiful cards.
ReplyDeleteThanks Steph. Have several more in the works.
DeleteStunningly beautiful cards, Michele! Thanks for rescuing my expired oregano! ;)
ReplyDeleteThanks Trish! The Club Scrap kit made it so easy.
DeleteI like the idea of adding spices. I've never tried that.
ReplyDeleteYep, spices, herbs, dried grasses, leaves etc. Also that potpourri that you forgot you had....is terrific in handmade paper.
DeleteThe texture of the handmade paper is just fabulous!
ReplyDeleteEvery sheet of handmade paper is an adventure.
DeleteI am thinking of crushed cinnamon sticks for texture and a wonderful scent when you open up the card.
ReplyDeleteYUMMMM......it would be fabulous!
DeleteSuch beautiful cards. I love the addition of the pressed leaves under the stamped sentiment in card 3.
ReplyDeleteSpices in the handmade paper? Such an amazing idea! I love the fact that you could have a scented card. So many possibilities. Thanks for sharing all your ideas and instructions.
Thanks a bunch! Most anything that is dried will work. The oak leaves are out of my yard.....everyone is different and beautiful.
DeleteThese are such pretty cards. I love the idea of up-cycling junk mail envelopes. And it's a great way to use up paper scraps. And spices or dried herbs in the paper? WOW! Love it...thanks for sharing!
ReplyDeleteThank you.....the handmade paper and the Clun Scrap kit really made it easy!
DeleteSuch pretty cards, love that idea of adding spices! I'll try that next time I make some paper.
ReplyDeleteYou will love the paper with different spices, flower petals etc...every piece is so different.
DeleteI am a fan of monochromatic color schemes that let the words pop, so I really appreciate these inspirations! Thanks for taking the time to give such clear instructions.
ReplyDeleteMe too! (Black and tan are my signature colors.) You are so welcome......
DeleteMichele, lovely cards as always - you've brought your card-making talent to the hop challenge in a most wonderful way. The middle project is my favorite. The directions are so complete, I believe I could make one that would turn out [almost] as beautiful as yours. Thank you!
ReplyDeleteThank you Kim. A whole world was opened for me all those years ago.......I love making the paper then having each piece "become" what it is supposed to be...smile.
DeleteOh my...dried herbs and spices embedded in handmade paper...I'm making notes and can't wait to try this. Your cards are outstanding!
ReplyDeleteYou will love adding the "Magic"....delighted that you like them!
DeleteI really love the cards, they are so full of life. I love the idea of the spices added to the paper. What a nice addition that I would never thought of. Now my ideas of using items from my herb garden are flowing. Thanx for the inspiration!
ReplyDeleteThank you! I bet your herb garden is wonderful....and adding them to the handmade paper is so easy. Great place to use the ones that you would normally toss.....be sure to dry them first...smile.
DeleteThank you for the detailed instructions on these gorgeous fall cards.
ReplyDeleteYou are so welcome. All so easy to create....
DeleteI love your beautiful cards that you made with the kits! The papers turned out so beautiful and I think it is awesome to add spices to spice up the paper! I have to give this a try! Thank you for the inspiration!
ReplyDeleteThanks Lori! There are so many beautiful items in the kit......I will be pairing them with more handmade paper in months to come....Check them out here on the AG blog.....I post every Friday.....yep....52 projects a year....smile.
DeletePretty work, Michelle!
ReplyDeleteThanks Ann Marie.
DeleteYour cards are all so pretty, Michele! All three are my favorite! I love the addition of the spices, and the dried leaves too! :o)
ReplyDeleteThanks a bunch Nancy. I love anything that is created with handmade paper......and it is so easy too!
DeleteI love these cards!
ReplyDeleteThanks Connie...delighted that you like them.
DeleteLove the cards and paper. Top is my fav.
ReplyDeleteThanks Jill.....I think it is my favorite too...smile.
DeleteCards are beautiful. Love the leaves on the bottom one. Thanks for sharing the detailed directions.
ReplyDeleteThank you so much Kelly. The AG flower press works so well drying the leaves etc.
DeleteI never thought of adding spices and herbs to the paper! I LOVE LOVE LOVE that idea!
ReplyDeleteYep, they add color, texture and scent too......delighted that it is a new idea for you.
DeleteDried herbs and spices?! Brilliant! What a spectacular idea for holiday cards. Those leaves on your last card are beautiful and simple embellishments.
ReplyDeleteI often put cinnamon in the holiday paper.....smells wonderful! Thank you so much.
DeleteBeautiful cards created with the Falling Leaves kit and handmade papers! Enjoying all the inspiration along the hop!
ReplyDeleteThanks Denise....the hop has been such fun....so glad you are enjoying it.
ReplyDeleteLots of great ideas. Thanks for including so many details.
ReplyDeleteThanks a bunch Barbie. Details are good....helps us be able to undersatnd how something was done....smile
ReplyDeleteThese cards are amazing. Thanks for the really detailed instructions.
ReplyDeleteThanks bunch Jeanne! You are so welcome.... hope the instructions help you re-create the cards...smile.
ReplyDeleteAll three cards are just stunning. I think my favorite is the last one...it has so much awesome texture. Thanks for your contribution to the hop!
ReplyDeleteThanks so much Karen. Loved working with the Club Scrap kit! So many items....will be using them in future AG projects soon.
DeleteHi, Michele, I love the you are "never too old to play in the leaves" card the best, but they are all gorgeous!
ReplyDeleteCathy Gray
Thanks Cathy! I am so honored to be part of the SC/AG blog hop......what wonderful products to get to play with...smile
DeleteMichele - thank you for sharing your beautiful cards - I can't wait to see them in person! Lynn B.
ReplyDeleteSmile! They will be on display at SALSA this Sat. See you then.
DeleteLove your beautiful cards Michele. TFS!
ReplyDeleteThanks so much Arlene...delighted that you like them.
ReplyDeleteThanks for all the wonderful ideas. Who knew homemade paper could be so awesome.
ReplyDeleteTish
You are so welcome Tish. Handmade paper is awesome, beautiful,inexpensive, and making it is addictive....smile
DeleteI love the idea of using real leaves-it really sets off the card!!
ReplyDeleteAnd they are free...just have to pick them up and dry them....I have been using the AG flower press for years and never get tired of what comes out of it...smile.
DeleteBeautiful Autumn projects with these fall leaves.
ReplyDeleteThanks Sue! Autumn is my favorite time of year.
DeleteBeautiful! Love looking a the ideas.
ReplyDeleteThanks a bunch! Lot's of wonderful ideas on this site....check out the older posts too.
DeleteAnother great project from a very talented lady. Wonderful as always
DeleteThanks a bunch TXLady! I love collecting and preserving the leaves and using them in my art....everyone is different and beautiful.....delighted that you like the cards!
Delete