Falling In Love Blog Hop: Page & Bookmark
I'm not a stamper or scrapbooker, but I've been a blender paper maker for nearly 40 years. Creating projects was challenging for me. What's easier for you? Making paper or whipping up a project? Let me know!
Both projects were made using one sheet of handmade paper and the Club Scrap Falling Leaves collection. Here's what I did:
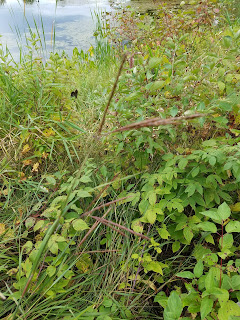
Collecting
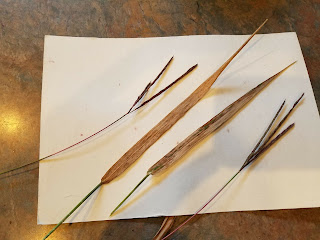
I picked pretty grasses on a walk around the pond near our home.
Pressing Botanicals
I procrastinated and had one night to press the grasses and leaves. Luckily, this is usually enough for leaves and grasses that have already begun turning in fall.
Adding Grasses to Pulp
I made a base pulp from wastepaper and cream color cardstock in the CS collection, blending it till big chunks disappeared. I added one long grass leaf to pulp in the blender and used the 'pulse' button to break it down but not blend it. I did the same with a micro-pinch of brilliant gold and copper dust.
Forming Sheet
I poured the pulp into the Papermill deckle and swished the long grass leaf and seed heads in it before forming sheets. This helps fibers lock the large pieces in place. After lifting the handmold, I pressed the leaf and stems into the pulp as it drained. You can watch the whole process here.
Pressing and Drying Handmade Paper
I covered the new sheets with a man's handkerchief instead of the cover screen to remove water with a sponge. I don't like the pattern the cover screen sometimes leaves on the paper. Except for that, I followed the Papermill kit directions to press and dry the new paper. I dried my paper slowly under pressure (stack of books or a press) instead of ironing it dry. Big botanicals generally won't do well being ironed dry. I really liked how the paper turned out.
Now, what to do with it? The Club Scrap collection offers plenty of options for inspiration!
Page and Bookmark
I trimmed the handmade paper into 2 pieces: 2 1/2" x 8" for the bookmark, 3 3/8" x 8 1/2" for the page. I used papers from the collection to mat the handmade paper, photo, sentiment and leaf image. 4 pretty copper leaves from the Club Scrap collection embellish the page, and one was sewn onto 10" of gold ribbon for the bookmark. The bookmark slides into an 8 1/4" x 2 3/4" vinyl sleeve.
Your last stop on the blog is Karen at Daydreams & Diversions.


The grasses really add a different look to the Club Scrap collection.
ReplyDeleteI thought the Falling Leaves collection was absolutely inspiring. It was hard to choose which paper to use. In the end, the handmade sheet declared where it wanted to be. Love it when that happens!
DeleteWhat I've found is that the paper is wonderfully easy to make! CS + AG = Match made in creativity heaven! I love your grassy handmade sheet. Just gorgeous!
ReplyDeleteI couldn't agree more, Tricia -- here's to a happy hop and more match-ups to come!
Deleteoh your handmade paper is just fantastic! Love the grass in there. Gorgeous layout too!
ReplyDeleteHi Nancy -- thank you. You just never know how the pulp and botanicals are going to come together til the sheet is formed and dry. Thee's a lot of serendipity in paper making. :D
DeleteI loved how your handmade papers turned out - so very natural. Just beautiful work. Thank you for sharing!
ReplyDeleteThank you, Traci. Using botanicals and bits of nature is one of my favorite things about paper making. Sometimes the projects hold up well, other times not as well. You never know til you get to the end!
DeleteVery interesting to see how you used botanical items to enhance your paper for beautiful results. I will now look at the plants along the woods during our walks in a totally new way.
ReplyDeleteHi Regina, it's a world of discovery out there. Everything to make paper is free, from the wastebasket, Mother Nature or recycling bin. Happy exploring! That's so much of the fun :D
DeleteTotally elegant. Can't wait to try adding some grasses to my handmade papers. The photo of your walking path made me smile; what a great addition to your blog. Thank you for the inspiration.
ReplyDeleteKathryn, I hope you'll share what you make! It's such an encouragement to offer ideas and see what another person does with them. We need more of that in the world!
DeleteKim, what a lovely page and bookmark. That is a great tip about foliage that has already begun the natural drying process! I have plenty of plants that are on their way to becoming inclusions in my handmade paper. :)
ReplyDeleteMe, too! This time of year is great to collect a natural stash to use all winter. Come February, it's nice to have some real nature to play with!
DeleteSo exciting to use nature. Thank you for ideas.
ReplyDeleteThank you for stopping by, Tish! Hoppy to share :D
DeleteNow that I've watched all the fabulous tutorials on the AG YouTube channel, making paper is a new favorite technique. I can't say whether making paper or creating a project is easier because the processes were the perfect combo! I have so many new ideas rolling around in my head. The Garden Press is my new friend and I can't wait for some fall hiking to add to my collection of dried foliage. Your projects are absolutely fabulous Kim. Thank you for sharing your tips for natural drying! I am so glad to have been invited to participate with such a talented group of crafters and papermakers!
ReplyDeleteWendy, please keep us posted on what you're making and discovering. We have a 'Paper Chat' forum on our website. I need to be more active in it, but I've been inspired by the hop to make and post more of the projects I'm working on. It would be lovely to keep up with you there. Thank you!
DeleteWoops, the Paper Chat is on our facebook page
DeleteI love how your paper turned out and I have got to try to make some paper of my own to use for making cards! I find it easier, at this point since I have made my own paper yet, to put together a project! But once I try making my own paper I may find that is easier! Thanks for the inspiration!
ReplyDeleteWell, be careful Lori! Paper making can be addictive. I believe there's a gene for it :D Let me know how you first sheet(s) turn out. It's always excited to see what a new papermaker makes. Most of all, have fun!
DeleteI love the addition of the paper you made to the kit papers. I looks so clean and fresh. Thanx.
ReplyDeleteThanks, Roni -- I know what you mean. That just kind of happened. Once you fire up that blender, you just never know exactly what you're going to get! I have noticed over time, tho, that I respond best to botanicals in light colored pulps. So that part was intentional.
DeleteWell done, Kim! This is such a great idea and I love the paper that you made. It gave me ideas. . .
ReplyDeleteThanks, Anne Marie, and thanks for participating in the hop. Open carefully, the 'idea' door can cascade on you ;-) Can't wait to see what you discover in the process!
DeleteI love the natural look of the page you made. It is simple and elegant.
ReplyDeleteThanks, Vanessa - I like that, too. I started with a lot more on the page and kept taking things off. It finally looked right even tho I loved the other elements in the collection. And I must learn to use the stamps. That's definitely on the list. Thanks for hopping by!
DeleteOooo... very cool effect. Thanks for the idea
ReplyDeleteThanks, Connie, it's been a terrific hop! I've gotten so many cool ideas, too. :D
DeleteThose are fabulous and creative projects, Kim! You're much more than a blender paper maker, as if that wasn't enough! It's so fun to have you play with us! :o)
ReplyDeleteThanks, Nancy, very kind. Same for you!
DeleteVery pretty
ReplyDeleteGlad you hopped by!
DeleteBeautiful! Thanks for the instructions .
ReplyDeleteYou're welcome, Irene. It helps to have an inkling on how something is done. I've loved that about this hop. Everyone shared 'how-to's' generously.
DeleteThe grasses look great in the handmade paper. Really nice projects! Thanks for the details about the papermaking process you use.
ReplyDeleteGlad you came through the hop, Pam. There are so many different approaches to paper making. In the end it comes down to water, pulp and a screen. The rest is up to the paper maker!
DeleteI love the addition of the grasses to the paper! Awesome project! Beautiful bookmark and page!
ReplyDeleteHi Denise, thank you. It was very fun to make a project to share. The Club Scrap papers and embellishments brought out the best in the grass paper, I must say. What a fun discovery!
DeleteThat bookmark is fabulous! I love the long reedy grass embedding in your papers. I find the paper making process so therapeutic.
ReplyDeleteThanks, Lisa! I agree. Time stops when the blender comes out and even tho limited, that half sheet deckle becomes a limitless pallet. No two sheets are ever the same, even if you want them to be :D Happy papermaking!
DeleteVery helpful to read how you incorporated the leaves and weeds into your homemade paper. I really loved the book mark!
ReplyDeleteThanks, Kelly. So glad you hopped by!
DeleteLove your grassy paper. Neat ideas to try!
ReplyDeleteAlways something new on the horizon ;-) Thanks!
DeleteGreat paper samples. Love the addition of botanicals from nearby.
ReplyDeleteThank you, Barbie. Happy hopping!
DeleteI just love those grasses embedded into the handmade paper...so beautiful! Who wouldn't want to receive that bookmark? And the layout is lovely as well!
ReplyDeleteSo pretty and the natural elements you add as really pretty!
ReplyDeleteCathy Gray
Your paper is stunning! I love the idea of thinking outside of the box for natural additions to our papers! Lynn B
ReplyDeleteThe grasses in your handmade paper make it look so elegant! I love both your projects.
ReplyDeleteEven as a nonscrapper, you have done beautiful work.
ReplyDeleteThank you.
Tish
Wow your paper turned out beautifully! Club Scrap had a kit a LONG LONG time ago with reeds similar to your paper and I loved it!
ReplyDeleteSo pretty. Love the botanicals you used.
ReplyDeleteYour work is beautiful.
ReplyDelete