WHO! WHO!
©Michele
Emerson-Roberts 2014
I
don’t usually do “cute” but fell in love with this owl from Dream Weaver and
knew it would make a great “guy” card. I am also an avid “saying” collector and
have pages and pages of saying that resonated with me… someday they will get
sorted and put in a book, but that’s a project for another day - smile.
Supplies:
- Any of the Arnold Grummer™ paper making
kits
- A sunny window
- Blender, cello sponges and soft
towels
- Personal paper cutter, scissors
- Scor-Pal™
- Beacon ZipDry™ Adhesive, and foam
tape or foam dots, double sided tape
- Scraps of tan paper and black
paper (think brown paper bag, junk mail, etc.)
- Two envelopes (or make matching
envelopes with the AG envelope template)
- Black frame shape left over from
another project
- Embossing folder or vegetable net
bag or other texture plate
- Dies: Spellbinders’
“Branching Out” S6-006, Memory Box “Woodland Branch #98187 and Dream Weaver “Nested Owls”
DG751
- Spellbinders Grand Calibur™
Machine
- “Who do you see……” computer
generated verbiage (or your choice of other message)
- ColorBox Stylus™ Handle and white foam tip, Honey colored Distress™ Ink pad
Directions:
- Follow the directions found in any of the Arnold Grummer™ paper making kits to create one sheet of tan heavy weight paper and one sheet of heavy weight black paper.
- When the sheets of paper are dry cut the papers to 81/2” x 5 ½”.
- Score one of each color at 4 ¼” and fold in half to create a tan card and a black card.
- Cut one of each left over piece to slightly smaller than 4 ¼ x 5 ½” to line the inside front of the cards. (Always save the scraps)
- Computer generate and print the saying. (Note - I will often do many different saying at a time and save them for later projects.)
- Die cut the saying.
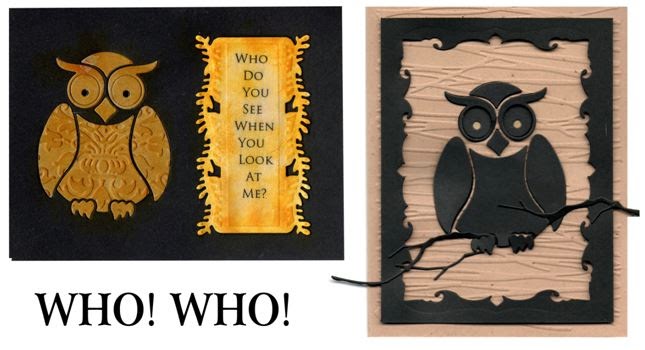
- Die cut the owl shape from the front of each of the two cards (refer to photo for placement). Then die cuts out the “parts” and leaves the outline. Note - the “fall outs” will be used on the opposite cards (black owl on tan card, and tan owl on black card).
- Die cut the branch from the black handmade paper scrap.
- Emboss the tan owl fall out pieces.
- Emboss the front of the tan card. Note - to bring out the texture and design of the embossing on the owl pieces, use the ColorBox™ Stylus™ handle with the white foam tip to lightly apply the Honey ink to the embossed paper.
- Tint the die cut saying.
- Attach the lining paper (black inside the tan card, tan on the inside of the black card) to the inside of the cards with ZipDry™ adhesive or double sided tape.
- Attach the die cut verbiage to the right side of the black card with foam tape or dots.
- Attach the embossed tan owl pieces to the left side of the card.
- Use tiny pieces of foam tape to attach the black owl (except the feet) pieces to the tan card.
- Place the branch at the owls’ feet, and place and attach the feet on top of the branch.
- Attach the frame to the front of the tan card.
- Add a personal message.


Comments
Post a Comment