The Pollinators: Butterflies' & Dragonflies' Meadows
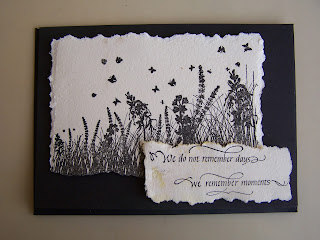
I loved the look of black ink on ivory handmade paper so much that I wanted to continue with the theme and the look! I needed some cards to cheer up two friends and had extra sheets of the medium to heavy weight handmade paper “planned” over from the last two paper making sessions. These two meadow stamps are perfect for the job and the “Moments” sentiment stamp from Quietfire Design was the perfect message.

Supplies:
• Any of the Arnold Grummer® paper making kits and paper press
• Blender, cello sponges and soft towels
• A sunny window
• Scraps of white paper (think junk mail, etc.)
• 5 x 7” black cards and envelopes
• Stamps: Quietfire “Moments” #6444, Meadows & “Dream” unknown
• double sided foam tape, scissors
• ColorBox™ Archival black ink pad
• Marvy 1.0 Reminisce white pen
• Iron
• Stamp positioner
Instructions:
1. Follow the instructions found in any of the Arnold Grummer™ paper making kits to
create white slurry and create several sheets of medium to heavy weight handmade paper.
2. Place the sheets of paper into the paper press.
3. Allow the paper to dry.
4. Iron the paper when it is dry to make it smoother.
5. Rough tear the paper to approx. 3 ¾ x 5 ¾” pieces for each card.
6. Follow the directions on the stamp positioner.
7. NOTE: You may have to re-stamp the meadow images several times to achieve the results.
8. Stamp the sayings onto scraps of ivory handmade paper.
9. Rough tear around the stamped sayings. NOTE: you could change the message to say
“Happy Birthday”, “Get Well”, “Thinking of You” etc.
10. Attach the stamped “meadow” pieces to the upper left of the folded card with small
pieces of double sided foam.
11. Attach the sayings to the lower right of the folded cards.
12. Write your message inside the card with the Marvy white pen.
-------------------------------------------------------------------------------------------
TAGS: Arnold Grummer, Michele Emerson-Roberts, handmade paper, Quietfire Designs, ColorBox. Marvy


Interesting pieces, Michele. Beautifully timeless.
ReplyDeleteThanks Patt...delighted that you like them.
DeleteSo lovely! Michele comes up with the most beautiful projects!
ReplyDeleteThanks LB......the handmade paper makes it all so easy!
ReplyDelete