Posts

Showing posts from September, 2015

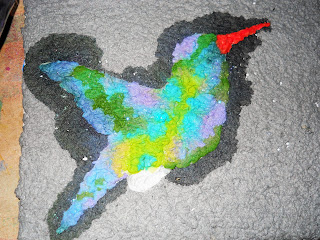
Hummingbird on Canvas
Image
Hi all, I am so excited to share my 2nd project with all of you. This one is done on a canvas using paper pulp. I first found junk mail and blended the paper to smithereens then poured the slurry into different containters to add color to them using the ones I knew I would need. I first covered the whole canvas with black slurry, even the sides and let that dry. Then started on my hummingbird as you can see below.  Here is a close up of the hummingbird. I didn't flatten it because I wanted the texture of the slurry. After filling in my hummingbird, I sprinkled glitter on top, you can just barely see it, the photo doesn't show it too well. I then started making the flower that the hummingbird is getting his necter from. I also added leaves and again did not press on the paper so I could have that texture I was looking for. Here is a picture of the flowers pretty much completed. And a close up of it... I then added some flowers I had on hand from my stash...

The Gift of Autumn Leaves

Image
©Michele Emerson-Roberts 2014     Fall is in the air! It is a perfect time for me to start on the many “Fall” projects I have planned to do. This piece is one of my favorites and will make a perfect gift for a dear friend who loves Fall as much as I do. Supplies: Any of the Arnold Grummer™ paper making kits A sunny window Blender, cello sponges and soft towels Scraps of beige, tan, ivory paper (think junk mail, etc.) Dried/pressed oak leaves on a stem (I used the AG flower press) Tiny bit of dried spices (I used nutmeg) Spellbinders TM Grand Calibur machine Die: Quiet Fire TM /Elizabeth Crafts Designs™  “Believe” Scraps of Kraft colored heavy weight handmade paper or card stock for the die cut word Beacon ZipDry™ Adhesive, double sided foam tape Matt board Instructions: Follow the directions found in any of the Arnold Grummer™ paper making kits to create light tan slurry. C...

Travel Card with Tamiko

Image
Hey folks!  Happy Wednesday! I noticed I have quite  a few family members and friends traveling this season.  I am in awe of the stories and the pictures they all have to share.  That being said, while on pinterest, I also came across this quote:  The world is a book and those who do not travel, read only one page!  How true it is!  I personally haven't gone anywhere recently, but this is a reminder just how important it is to travel.  It doesn't matter how you get there, be it car, boat, plane or train.   I created a card today based on that quote. This card is part handmade paper and part paper pulp.  I made paper pulp in a few colors: pink, red and yellow.  Easiest way to create colored paper pulp is to tear papers up in batches of the needed colors. If you are not able to find the colors you need for your projects, you can always use additives to color your slurry. Once your paper is torn into pieces...

Pretty Paper Posies

Image
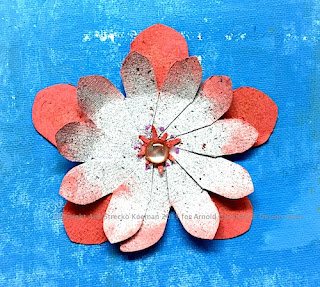
Hello, Ann here today from the AG Blog Design Team and the blog: Annmakes.blogspot.com .  I have more flower power love to share with you today!  Here is my latest project: To make this I used two sheets and a scrap (I keep the little bits left over)  of some handmade paper I made.  Of course these were made following the Original Arnold Grummer Pour Mould method ( link to video).  I like to use my handmade papers just like any store bought paper, and I dare to treat it the same way in the art making process.  For this project I wanted to play with some new tools I got. 1.  I cut strips of paper according to the measurements as suggested by the makers of the "Flower Punch Board" and then I proceeded to punch and score according to that manufacturer's instructions.  It was easy and quick to do. 2,  Once I had the strips prepared I then folded, accordion style, the flowers.  I used some double sided adhesive to keep the...

Autumn Canvas

Image
I find that I have a few favorite paper making accessories that I am repeatedly turning to. This Maple Leaf Casting Mold is one of them. I've used it for jewelry  and  framed art  projects as well as a greeting card embellishment. Maple Leaf Casting Mold I followed these basic instructions to make my paper casting. When it was dry, I painted the leaf with a mixture of clear acrylic glaze and mica powders thinned with a bit of water. I painted the veins first, using a coppery mica powder. Then, I painted the entire leaf, even going over the just-painted veins with a blend of green shades. When that was dry, I painted the entire piece—leaf and background—with a glaze and wheat colored acrylic paint mixture. I just wanted to take the edge off the stark white of the paper casting. The last step before mounting was to ink the edges of the casting with walnut stain distress ink. I mounted the finished casting onto a wax encaustic. I did this by gently heating...

BEAUTIFUL

Image
©Michele Emerson-Roberts  2015 I just had to share one more summer card with you. This is another of the motifs from the CP Nature’s Miniatures molds. Remember that I always make extras to have for later projects. A friend who loves sea shells will receive this card for her birthday…..it would also be wonderful matted and framed. I think I will offer to do that after her birthday as an extra gift.   Supplies: Any of the Arnold Grummer paper making kits CP Nature’s Minitures Sea Shell (or mold of your choice) Scraps of blue and white paper (think junk mail) Blender, sponges & soft towels Microwave, heat gun or sunny window Scor-pal (LOVE the new 1/8” version) Scissors Die: CheeryLynn #B630  “Beautiful” Spellbinders ’ Grande Calibur II™ machine Beacon QuickGrip™ and  ZipDry™ adhesive Small eyed needle and metallic variegated embroidery floss Scrap of white handmade paper Instructi...

Scrapbooking With Home Made Papers

Image
Hooray - you made it to Friday and the end of the week! Today I want to share with you a quick video showing my first go at paper making! I am happy to report that it is easy and fun! Before I tried this, I read the Trash to Treasure Book from cover to cover! This is a valuable resource and will  be used whenever I get my paper making supplies out. The supplies you will need are: Trash to Treasure  Papermaking Book Any of the Arnold Grummer Paper Making Kits Recycled paper including junk mail, envelopes, fliers, can labels, etc.  A blender If you want to make the paper acid free, you will need to add calcium carbonate. EK Success Scallop Circle Punch  It is a tradition for my sisters and I to get a photo with my mom every time we are together. We took this one a few weeks ago and I anted to get it scrapped. Once my paper was dry, I punched out the scallop circles which I like to use for flowers. I did fold and bend them a bit and inked the edges ...

Feeling Squirrelly

Image
nutty ; resembling a squirrel looking for nuts It comes as no surprise to my friends that I would make "squirrel  art" since a lot of my pictures I post on Face Book are of my squirrel buddies that come to my back door looking for a handout. They give me so much pleasure and I enjoy watching them so much that they inspired this piece... Here is one of my regulars, some of them are very tame and rather sweet. Although sometimes they look rather frantic when I dare to leave the house, and I come back to this... I made a short video making the wall art using a Chipboard Photo Frame set and the Microfleur Flower Press from Arnold Grummer.  I hope you enjoy watching it and please subscribe to the Arnold Grummer Youtube channel for more inspiration! Life is about creating yourself.

Always Give Her Roses

Image
©Michele Emerson-Roberts  2015 Roses are one of the most beloved flowers in the world. They are not always available to give as a bouquet, but can always be created in any color you want as a paper casting. This little box is perfect for a gift for any occasion. I think it will make a great jewelry container for one of my sisters who loves roses!   Supplies: Any of the Arnold Grummer paper making kits CP Nature’s Miniatures Rose stem (or mold of your choice) Scraps of white paper (think junk mail) Blender, sponges & soft towels Microwave, heat gun or sunny window Scissors, BowEasy™ ColorBox ™ Stylus  handle & tips, and light pink and light green Chalk ink pads Beacon QuickGrip™ adhesive 3 ¼” round container 9” of pale green ½’ wide organdy ribbon. Instruction: Follow the instructions found in any of the AG paper making kits or books to create white slurry. Create ...

From Paper Pulp to Jewelry

Image
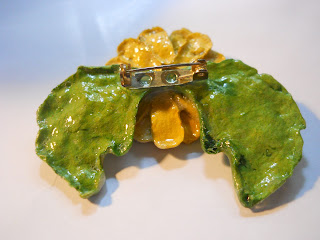
Here are a couple things I had been working on before I received my goodies from Arnold Grummer Paper Making . I used paper pulp, which I had been playing with for a while now but not being able to make paper, I went for the jewelry making with it. This first piece is a pin I made from molds. I can't show the mold because I packed it up to go out to my new shed I just had build and delivered. I haven't come across it yet to unpack. I used paper pulp in the mold, painted it when dry, I then put Glossy Accents on it to protect it and make it stronger and then added the pin to the back with a good strong glue. Here are the earrings I made also. This one I still had the mold out so you can see what I used. Again I used paper pulp, painted them and then adhered them to each other with a strong glue. This time I used a wood hardener and dipped them a few times, let them dry between dippings and then used a lacquer on them to protect them even more.  Sinc...

My Moon Book with Tamiko

Image
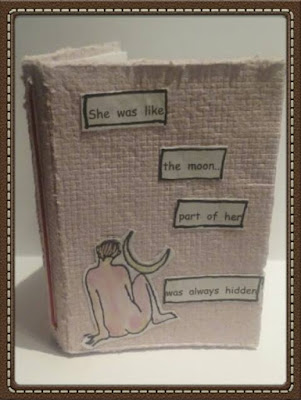
I love to create books and I don't always have a reason or content to put in them (shrugs).  Sometimes I just create to CREATE. Today I created a moon book.  While on a search for moon related quotes, I said, "I may just use this book to record some of my favorite moon inspired quotes." Here is my today's project. I created my paper first from, using the Arnold Grummer (AG) Papermill Kit.  The papers I recycled were old Christmas wrapping paper in red and white. For this batch I almost doubled my normal loose handful of torn paper bits.  To see how to create your own papers with this kit, you can check out Mr. Grummer's how to process, by  clicking here . Because this book's paper was rather thick, and not your average sheet of handmade paper, the page itself required actual scissors or a blade to shape.  I decided not to support the book with any type of book board. I was able to score my page, to include a spine with a weak paper cutter blade. ...

Easy to Make Book Marks

Image
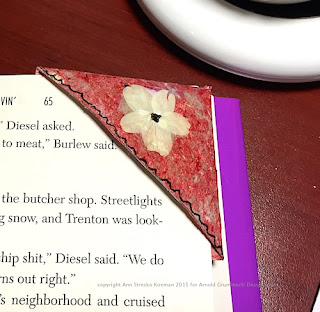
Hi, it's Ann here today with a simple project for you.  For those of us who still enjoy reading paper versions of books, we never seem to have too many book marks.  Today I am sharing with you how you can make these Page Corner type Bookmarks to use or give as a small gift. First, start off with a sheet of handmade paper.  Of course the best way to recycle some junk mail is to use the Arnold Grummer way of making handmade paper with the pour and mould method.  Recycle some more by using a piece of thick paper or cardboard and make yourself a handy little template that you can use over and over again. You will need a five inch square to begin.  Section off into four equal squares, and section two squares into triangles. (see picture) Cut out the remaining piece and you have a template to make the bookmark Place the template over the sheet of handmade paper, trace, and cut. Using a bone folder or the back of a spoon score and fold the pape...

EXPLORE

Image
©Michele Emerson-Roberts   2015 As summer is winding down in many places, it is still warm here in Southern Arizona. I have had such fun with the wonderful paper casting molds from AG that I just had to make a new card for a friend who loves everything “fishy”. The castings are quick to create and it just takes a few extra minutes to make extras to use for later projects.   Supplies: Any of the Arnold Grummer paper making kits CP Nature’s Miniatures “Fish” (or mold of your choice) Scraps of blue and white paper (think junk mail) Blender, sponges & soft towels Microwave, heat gun or sunny window Scor-pal (LOVE the new 1/8” version) Scissors Die: CheeryLynn #B616 “Explore” Spellbinders ’ Grande Calibur II™ machine Beacon QuickGrip™ and  ZipDry™ adhesive Small eyed needle and variegated embroidery floss, one clear seed bead Scrap of white handmade paper Instructions: Follow the...

Nature wall hanging

Image
I admit it, I do. I love walking through the woods, smelling the pine needles, listening to the birds.... yes, I am a nature lover. So I knew I wanted to make some nature themed wall art with Fall leaves with the Paper Quilt from Arnold Grummer , but Fall is not getting here fast enough for me so I made this wall hanging from a white Mulberry tree instead. I did cut the squares from the kit down into a rectangle shape just slightly smaller than the sheets of paper that you create by using the medium Dip Handmold , that way the deckled edges would have plenty of room to hang off the edge without the sturdy white chipboard backing showing. Each sheet of handmade Mulberry paper was attached to the chipboard with Helmars Craft & Hobby PVA glue , which is a great glue for adhering delicate paper because it doesn't seep through the paper. The entire wall hanging ( excluding the beads, grommets and the velvet thread ) came from a white Mulberry tree. The hanger...