Posts

Showing posts from 2015

Bleeding Hearts Card Front

Image
Hello everyone, Christmas is over and the New Year is starting soon. This year went by so fast, I think or maybe I am just that busy, LOL. For todays post I tried something I have done in the past just not on handmade paper. I wasn't sure how it would turn out, but it worked great. The card fronts are called Stitching Cards and that was the very first thing I started making before getting into all the other crafts I am into now. Here are the basic things you need to begin. If you enlarge the photo, you can see the holes already put into the paper.  This one may show it better if you enlarge it. Here is a picture of the flowers done. There is a pattern you have to follow. With the handmade paper, some of the holes (because they are so close together) did rip some, but I made due. And here is the completed card front. What you do is adhere this to the front of a cardstock to make a card and then you can add any stamped phrase you would like. This is just many of the hundr...

It is Over

Image
Whew - you made it through  the holiday week! Now it is time to recoup and if you are like me, you pledge to get started earlier next year. So why not start now!! Grab that leftover wrapping paper, recycled paper and other scraps you have been saving. Time to start on ornaments for next year!! Make some paper! I used my handmold and made a couple of sheets of paper. My pieces had flowers in it. For this project I glued them to a piece of cardboard. A cereal or cracker box is the perfect weight and again, you are recycling!! Cut into squares of different sizes - 1 inch, 1 1/5 inch and 2 inches. You will need about 4 -  6 of each. Brush the edges with glue and sprinkle with glitter.   Punch a hole in the center of each using a small hole punch.  I added beads to the bottom of the wire then started threading the squares largest to smallest. I added a star bead to the top. And here is my finished ornament . It looks just like a little t...

“Nativity Wreath”

Image
©Michele Emerson-Roberts 2015 This is one of my favorite Christmas wreaths created this year. I have made over a dozen of them to give as gifts. Each one is a bit different shape or size. The recipients will be delighted to display them. They are just a small reminder of what the season is about.   Supplies: Any of the Arnold Grummer™ paper making kits A sunny window Blender, strainer, cello sponges and soft towels Scraps of white paper (think junk mail, etc.) Cotton Press Nativity casting mold Beacon QuickGrip TM Adhesive One 10” rustic twig wreath Several 6-9” twigs Cinnamon sticks Tiny bit of moss Small metallic star Approx. 1 yard of wired star garland Approx. 8 “of wire for a hanger Instructions: Follow the instructions found in any of the Arnold Grummer™ paper making kits to create one of the Nativity paper casting. When the casting is dry attach the star to the peak below the rook and the cinnamon ...

Hand made flowers on barrettes

Image
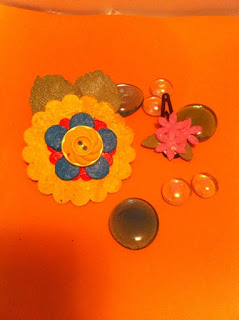
Hello everyone! Is everyone ready for Christmas? I always seem to wait til the last minute......LOL I have been working on making paper flowers with my handmade paper using Arnold Grummers paper making kit. Today I decided to try them on barrettes that you wear in your hair. If you make your own paper slurry, don't you ever just feel like sticking your hands in a huge bowl of it and playing in it? I do....maybe that's just me..... OK, back to the barrettes. Here is a pic of them done, I used paper punches to punch out the forms.  This is a pic of the clips open in the back.  This one is with them closed. This is the back side of them with the clip closed.   Thanks for stopping by and Hope for all of you and your family to have a wonderful and safe Holiday.

Ornamental Paper Casts with Tamiko

Image
Hey folks! Can you believe Christmas is at the end of the week?  New Years Day is week from that? Where did the year go? ::smiles::  Now I will be the first to tell you this is not what  intended to post, but my project went missing.. I think I wrapped them or lost them.. ::grumble grumble::  Sooo it's never too late for an ornament, well it isn't at my house.  We create ornaments, and buy them all year round and even if I don't use these few for this tree, I will use them for a tree in the future or gift them to another relative that shops year round for ornaments.  Here is my project.. I had a heap of fun creating these paper cast for the ornaments.  I actually created pulp from some old purple and silver metallic wrapping paper. I collected the wrapping paper of my choice, tore into maybe 1 inch by 1 inch pieces and then tossed them in a large Ziploc, till I was ready to use them.   When I was ready to use them I took a small handful ...

Join Our Design Team

Image
Arnold Grummer is looking for a few awesome Mixed Media Artists to showcase Arnold Grummer's papermaking kits and new (!) bookmaking products!! If you LOVE paper crafts and find the idea of making your own papers to use on layouts, cards & projects inspiring, show us what you can do!! We're looking for talented artists and designers who know how to inspire others to create. For those that also seek opportunities to have their papercraft work prominently featured, Arnold Grummer's Design Team is a great fit! What’s expected of an Arnold Grummer Design Team Member? * Ability to create compelling projects that showcase Arnold Grummer products * Experience taking good photos or scans of projects * Active interaction with members of Arnold Grummer's facebook and blog as they discover YOUR WONDERFUL DESIGNS!! What are the responsibilities of an Arnold Grummer Design Team Member? * The Arnold Grummer Design Team is a 6 month hitch, from Feb 1, 2016 – July ...

Save the Wrapping!

Image
Hi, it's Ann here today with a quick tip about making your own very special handmade paper.  SAVE those wrapping papers, cards, envelopes, gift bags, etc. that you may be getting during the Holidays.   For those of us who celebrate at this time of year and give or receive gifts we are often left to deal with extra gift wrap and more.  Recycling all these paper goods is better than throwing them away for sure.  However, it is even better to save some of those luscious pieces of gift wrapping and make your own pretty papers! That's right, last year I saved most of the gift wrapping and extras that came through our house and I even got to save some from our visits to family!  So, by removing all pieces of sticky tapes, and staples I gathered a lot of materials.  I filled a big storage tub with shiny papers, ribbons, cards and so much more.  I still have a lot left in that bin by the way.  The fun came when I started ripping and shredding my stash ...

Pretty in Pink Thank You Card

Image
I've been a very good girl this year, so I'm anticipating lots of goodies from Santa. So, in preparation I've made this Pretty in Pink thank you card using papers that I made following these basic instructions . Here's how I created this card: Sponge Vintage Photo and Barn Door distress inks on the front of a blank card. Cut a piece of old sheet music with deckle-edge scissors about 1/2" shorter and narrower than your card. This piece was already aged, but if you're using a new piece you can give it an aged look by lightly sponging with Vintage Photo distress ink.  Deckle the edges of your handmade by painting a line of water where you want the edges of the paper to be. Gently pull the paper apart along the water line. Cut your handmade paper with your selected die. I used the bubbles from Sizzix Tim Holtz Alterations Collection. This is a small die, so I cut it twice. Emboss your handmade, die cut paper. I used a thank you sentiment. Mount the...

“Saint Nickolas Wreath”

Image
©Michele Emerson-Roberts 2015 I enjoy creating small Christmas wreaths and hang them on my inside doors during the Christmas holidays, and once again I used one of my favorite Arnold Grummer/Cotton Press paper casting molds; Victorian Saint Nickolas. There are so many beautiful paper casting mold to choose from (yep, I have to admit I collect the molds and way too many other things too - smile). Follow along and see how easy it is to create a wreath for yourself or as a special gift. Supplies: Any of the Arnold Grummer™ paper making kits A sunny window Blender, strainer, cello sponges and soft towels Scraps of white (think junk mail, etc.) Cotton Press Victorian Saint Nickolas casting mold Beacon QuickGrip TM Adhesive Double sided foam tape Pastels, Chalks or powered eye shadow in red and brown, applicators DecoArt TM Americana Line Dark Green paint, “Snow” paint &paint brush Several yards of dark green /white dot 1 ¼...

bookmarks and pressed flowers

Image
I am a literary creature, I just love the feel of a book in my hands. If you are like me then you will want the perfect page-saver for your favorite novels or your much-loved Trash to Treasure book !  I had made this simple bookmark out of my mulberry paper that I made this past summer ( you can go here to revisit that post and how I made the paper )...it's functional, but I could embellish it some. Thankfully I used my Arnold Grummer Microfleur press a LOT this past summer so I have lots of pressed flowers and yes, weeds to choose from on a dreary rainy day to use. So after choosing something, in this case, I think it's a random weed ( but with lots if fun texture ) I took my Helmar Decoupage & Craft Paste and first coated the paper, then laid the stem on top of it. Next I cut a piece of tissue paper the size of the bookmark and pressed it gently over the stem and then coated it again with the Decoupage paste. I left the tissue paper hanging over the e...

A Card and More

Image
Struggling with gift ideas for neighbors, teachers, bus drivers, etc.? I might have a solution. I made two different papers. I added glitter to the first one and the other was made with gold metallic paper. You can see specks of the glitter and pieces of the gold in each paper. Glitter Gold I really love the different textures and colors I got! I used the glittery paper and the Ribbon Resource  Gold Metallic Bow Ribbon for the design of the card. From the gold paper I made a star ornament which can be removed from the card and hung on the tree. The star is adorned with Ribbon Resource  Silver Adhesive Floral Design Ribbon and attached to the card using a pop dot. I cut out the title using my die cut machine and painted it gold. This is a perfect way to gift something which is both handmade and helps the earth by recycling.  .  Here is the ornament. These could be personalized with names and dates as well Products used: Arnold G...

“Victorian Saint Nickolas”

Image
©Michele Emerson-Roberts 2015 I always make extra special Christmas cards for those extra special friends. The Cotton Press Victorian Saint Nickolas mold has been one of my favorites for years and gets used many times during the Christmas holidays. Coloring him is not difficult but looks like it. Using G45 Christmas cardstock for the card base and one of the versatile Tonic dies made the project go together in a jiffy.  I love these kinds of projects and think you will too. Supplies: ·         Any of the Arnold Grummer™ paper making kits ·         A sunny window ·         Blender, strainer, cello sponges and soft towels ·         Scraps of white (think junk mail, etc.) ·         Cotton Press Victorian Saint Nickolas casting mold ·         Beacon Qui...

Christmas Picture Frame

Image
Is everyone in the Christmas spirit? I have to say, at work they are playing Christmas music allllll day long. It wouldn't be so bad if it didn't sound like "elevator music" LOL Today, I have a picture frame to show you, I took a wooden frame and ripped up some handmade paper I had made, then glued it down onto the frame using good Helmars glue. I then made a paper flower to add to the corner. Notice the leaf at the bottom left corner? I couldn't help but keep that in tacked and stick it on. That was from the sheet where I added leaves to the slurry. I also used some of the beautiful snowflake ribbon from the The Ribbon Resource that they so kindly gave us. I just inked them up to make them blue. The Christmas tree is from a napkin.  And.....when Christmas is over, you can change out the picture to put whatever you would want in it. This on is an OLD postcard I found at a resale shop. It is from Portugal and is a picture of the first university founded in ...

Gifting Cards and Envelopes with Tamiko

Image
Having a good time creating these small note cards and envies as a gift for a friend. Sometimes less is MORE, so I decided to keep my decor down to a minimum, so the eye could focus more on the paper itself. On this project I began with  here  making three individual sheets of paper. No dyes were used, but i did use various scraps of the shown color to achieve the final look.  The white paper has bits of my painted papers  that you can actually see in the paper.  That's something I will try again!! I made the papers using the  The Complete Papermill Kit . Before the sheets were made I knew I wanted to use my Arnold Grummer  Gift Tag Template .  I decided I did not want the appearance of the deckled edge on my papers, so I chose to trace my items for a cleaner edge, I would achieve using my scissors.  After scoring and folding my cards and envies,  my project was done. To embellish it, I used a few stamps from my Creating in ...

Handmade Paper Christmas Poinsettia

Image
Hi, Ann here today, with a paper poinsettia that you can make for your Holiday Decorations.  Here it is: To begin make several sheets of handmade paper in the Arnold Grummer Paper Making Method using the Arno;ld Grummer Paper Making system.  To make these sheets I used recycled wrapping papers, some tinsel, and some envelopes. To make the petals and centre of the flower a steel metal die was used to speed up the process. Following the cutting of the flower parts, cut a big circle out of some cardboard. Add some glue to the circle.  Begin laying the larger petals around the circle.  For the next layer add some more glue and repeat.  The centre is made by layering two different coloured enters over one another.  The stamens are represented with some clear dimensional glue and glass beads. Finally to use this poinsettia as a tree ornament, glue to the back of a large clothes pin. I hope that you enjoy recycling papers ...