Posts

Showing posts from November, 2015

Thanksgiving is over.....

Image
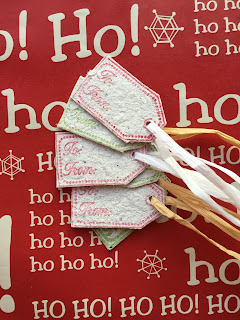
By now you have cleaned up the turkey, put away the extra folding chairs and eaten all the pie. What is next on the to do list?? Shop and wrap. I have a quick and easy gift tag project using a piece of handmade paper. I have a To/From stamp that I do not use nearly enough. So instead of buying more gift tags this year, I am going to make them. You can use different colors of hand made papers and inks to coordinate with your gift wrap. I just stamped and cut out. Thank you Ribbon Resource  for the White Paper Raffia  Ribbon and the Champagne Two Tone Paper Raffia Ribbon. Supplies from the Arnold Grummer Website   - Medium Pour Hand Mold I hope you give this project a try! Don't forget to share with us on   Facebook .

Gratitude

Image
©Michele Emerson-Roberts 2015 I practice four “Rs”: Recycle, Restyle, Revamp and Repurpose every chance I can. Making handmade paper the Arnold Grummer way is one of the best ways to do it. Most people throw away a ton of paper every year - not this gal! Look what can be created in a few minutes! As always, with “gratitude” to Arnold and his family. Supplies: Any of the Arnold Grummer™ paper making kits A sunny window Blender, strainer, cello sponges and soft towels Scraps of off white, tan & brown paper (think junk mail, etc.) Beacon ZipDry TM Adhesive, double sided foam tape or dots Envelopes to fit cards (or make your own with the AG envelope template) Scor-pal TM Scraps of ivory, light & dark olive green handmade paper, junk mail or cardstock 4 x 5” scrap of tissue paper Dies: CheeryLynn TM # B118 Pair of Ferns Spellbinders TM Grand Calibur die cutting machine Stamp: Impression Obsession TM 1444

Christmas is almost here...

Image
Hello everyone and Happy Thanksgiving, I hope you all are having a wonderful time with family and friends on this great holiday. I can almost smell the turkey cooking now. I love Thanksgiving it is my favorite holiday. Just good food with great people, no hassles of buying gifts or any of that. Just great conversation with the people you love. Oh by the way, this is Donna..... Today I have a Christmas  picture I made for my younger brother and his wife. She was born and raised in Germany and my brother met her there when he was stationed in the army. They married over there and the ceremony was beautiful, but boy can those people party!!! Any hoot, the background is made from hand made paper and then painted then I attached a painting I did to the front and wrote Merry Christmas in German on it. I also used some LOVELY ribbon around the outside that was so thoughtfully given to us by  The Ribbon Resource , it is just lovely and fit this picture perfectly. Thank you so much Ribbon

Happy Birthday

Image
My daughter's birthday is in December so I thought I would make a little gift bag for her. I started with a sheet of very pretty blue paper I made from a piece of junk mail. Once dry I cut out two stars. Mine are about 5 inches across. I took a piece of pattern scrapbooking paper to make a bag to hold the gift. Each scored square is 2 inches by 2 inches. I have two flaps that will form the base.  Fold to make a cube. I used washi tape to secure the side together and the bottom edges. Secure the handles also using washi tape.  Glue the stars to side with the handles.  Add ribbon and a tag.  Here is a view from above. As you can see, this is the perfect size for a jewelry box or a gift card. You can stamp and decorate if desired. I also added a tag made from another piece of handmade paper.  Supplies: Medium Pour Hand Mold - Arnold Grummer's Many thanks to the Ribbon Resource for the White Paper Rafia Ribbon!  They have

“Hope, Trust, Love”

Image
©Michele Emerson-Roberts 2015 When I saw this Impression Obsession™ stamp and the new dies from the Paper Cut™, I knew they would make the perfect card for a friend who is going through a rough patch in her life. This card was made from one of the “extra sheets” of handmade paper I always make to keep on hand, but I included the ‘from scratch’ instructions in this project. Supplies: Any of the Arnold Grummer™ paper making kits A sunny window Blender, strainer, cello sponges and soft towels Scraps of off-white, tan & brown paper (think junk mail, etc.) Graphic45 TM “Topography” scrap for card front liner Scraps of black cardstock or heavy weight hand made paper Envelopes to fit cards (or make your own with the AG envelope template) Beacon QuickGrip TM Adhesive, double sided foam tape or dots Scor-pal TM (Love the new 1/8 ” version) Dies: The Paper Cut™ PCDIE001Tripple Fancy Tag Card making die & P

Handmade papers

Image
How is the weather in your area? We have had nothing but rain the last few days. But I would rather have that than what my brother is getting in Colorado. Mean while, I have been making handmade paper with my paper making kit found here  Arnold Grummer's Paper making shop.  Basically, you just take your junk mail to the blender and whip it good!! LOL I then added some things to my mixture. This one I blended the paper and then threw in a handfull of leaves from my yard and blended it a little bit then added a couple whole ones. Can you see the leaf at the bottom? This one I added some dried flowers from my yard and it turned the paper purple but the flower bits stayed pink. I love this one. This one I just blended colored junk mail and it turned orange. I also tried one using spices from my cupboard. I used dill seed, it worked great but for some reason the photo would not download......Maybe my camera didn't like it.....I did, LOL Thanks for stopping by a

Paper Clay gift tag

Image
Bring on the holidays, I'm ready, are you? I'm stepping outside my box today and made a gift tag out of Creative Paper Clay ! It was fun and easy to work with too. I was pleasently surprised at how well it accepted the ink too when I stamped my Susan K. Weckesser stamp, from the Garden What Not Collection . After that was done, all I need to add were some ribbons from The Ribbon Resource and a few little rhinestones. I made a very short video of the process for the Paper Clay creation of the tag, hope you enjoy it and try making one too.

To Paris With Love

Image
Hello, Ann here today with  my small tribute to the people of Paris, France.  A few days ago the world was shocked to see and hear of the sad events that took place there.  My intended project and post was very different, but on Friday evening when I saw on television what was happening in my cousins' homeland I was compelled to make this: It is a small piece that I will insert into my art journal in the next coming days, but for now it is a small vigil to remind us of the fragility of life. To make this project I used one sheet of handmade paper I made using the Arnold Grummer Paper Making Method.  The actual pulp comes from some international (Europe) packaging I had in the recycling bin and I thought it befitting the situation. With a stamp of the Eiffel Tower and inks I stamped the image onto the paper.  I let it dry thoroughly. Then I cut out the image leaving a frame around it which I inked in Black.  Because I already had the Red, White, and blue wash tape I c

"Let It Snow" Frame

Image
Truth be told, I'm not a fan of wintertime. But, I do love the beauty that a fresh snowfall creates. When I made this winter decor piece, I was thinking about branches laden with twinkling snow, and how pristine the landscape looks right after a snowfall . I found the frame at a thrift shop, and it was in sad need of paint. I used a dull gold multi-colored textured spray paint to give the frame a new life. For the background, I selected a white piece of my handmade paper that had tiny flecks of sparkle in it. (I followed these directions to make my handmade paper.) I used my Zing electronic cutter to cut the lettering out of light chipboard. I used another sheet of handmade paper to cut a duplicate set of lettering. I glued the handmade paper letters to the chipboard letters. The chipboard gave the lettering just the right amount of height to add dimension to the frame. The stylized snowflake was cut out of double sided adhesive. One side was coated with gold dus

"Grateful"

Image
©Michele Emerson-Roberts 2015 This is the time of year that we so often reflect back on all we have to be grateful for - our country, our families, our friends and neighbors, our four legged friends, our health, our lives  and so much more! I think it would be a better world if we would do this every day. I have so much to be grateful for; I am indeed blessed. The card looks hard but come together in a short amount of time (I created 12 cards in a couple of hours.) Supplies: Any of the Arnold Grummer™ paper making kits A sunny window Blender, strainer, cello sponges and soft towels Scraps of off white, tan & brown paper (think junk mail, etc.) Beacon QuickGrip™ Adhesive, double sided foam tape or dots Envelopes to fit cards (or make your own with the AG envelope template) Scor-pal TM (Love the new 1/8 ” version) Sharpie® markers (2 shades each, red, green, yellow, purple, orange, brown) Scraps of tan chip board (I

Happy Veteran's Day ATC and Thanks to The Ribbon Resource

Image
Happy Veteran's Day to all of our service men and women! Not just today, but EVERY DAY, I solute YOU and YOUR FAMILIES for your service and many sacrifices.  I am thankful I live in a land where opportunities and available to me daily and I feel protected from harms way from people/nations that do not necessarily agree with our practices.  ::breaks off into song:: :Proud to be an American:: As for my project today, the images I acquired here, are from Google's  free image gallery.  I first began with creating a sheet of handmade paper with the Arnold Grummer Paper Mill Kit.  More supplies and instructions to create awesome paper can be found on the main site here . I also added some gold dust metallic inclusions that shredded quite well and distributed nicely.  Below is a picture of the paper before I turned it into an artist trading card (ATC).   I would also like to add that I did lightly coat the ATC with some matte medium to kind of treat the paper to a

It's Beginning to Look A Lot Like Christmas

Image
Yes my friends - it is beginning to look a lot like Christmas! But, don't worry - today I have a fun craft for you and your family! I am going to tie a craft in with reading a book.  Do you remember the story of the Gingerbread Man? My children loved this book.  And, we would often make Gingerbread cookies but today we are going to do something a little different.  After you read the book, make a brown piece of paper out of recycled brown lunch bags, grocery bags, etc.  Draw or trace a gingerbread man. I used a cookie cutter.  Cut out two shapes.                                Carefully punch holes all around the shape. Begin lacing with White Paper Raffia.                              Before it is  totally sewn shut, fill with Poly fil, cotton or even tissue paper.                                     Add trim such a ric rac, a scarf, eyes and buttons. Now you have a new ornament for your tree!  You could make these in other shapes and colors a

Elk casting

Image
©Michele Emerson-Roberts 2015 I love this time of year. Things start to slow down and become more peaceful with the cooler weather and the shortening of days. It is never too early to start on the Christmas and other gifts that are needed. This project will be a birthday gift for my favorite brother-in-law. Supplies: Any of the Arnold Grummer™ paper making kits A sunny window Blender, strainer, cello sponges and soft towels Scraps of beige, tan, ivory paper (think junk mail, etc.) Elk mold (I used the back side of an antique pewter plate) Beacon ZipDry TM Adhesive Matboard with round whole cute into it, and frame with glass (deep enough frame to allow for spacers) Instructions: 1.     Follow the directions found in any of the Arnold Grummer™ paper making kits to create light tan slurry.  2.     Follow the instructions for paper casting. 3.     When you have removed all of the water from the mold, allow the casting to dry

Using hand made paper as a canvas

Image
Hello all, Donna here with a piece I made from handmade paper. I made a thick piece of paper and added leaves from my yard to the slurry and then blended that into the pulp. When it dried you could see and feel the leaf stems in the paper. I then thought what can I do with this thick piece of handmade paper. The more I looked at it, the more it looked like a piece of canvas. Hmmmmm Soooooo, I used it as a canvas and painted on it. you would have to see it in person to know what I mean when it has the texture and look of a plain canvas. I just followed the rules on how to make handmade paper that you can find here  https://www.youtube.com/watch?v=ySFfdsgNyaI   you can find lots of videos on making your own paper watching his videos. I use all the junk mail I get in the mail (believe me, I get a LOT lol) I then just used heavy body paints on my "canvas" and then wrote my quote. Thank you so much for stopping by to take a look.

Bring on da'snow!

Image
I love snow!  Now that Halloween is over I can begin my snow mantra.. .let it snow, let it snow ! I live in North Carolina and we don't get much of the white stuff here and when we do it's usually gone in a couple of days so I cherish the little bit that we get.  I also love making paper casts; I think it's because the molds are re-usable and like stamps, ( Susan K. Weckessers Love Ya Whole Bunches ) they just keep on being a viable source for years. I would rather make my own embellishments than to keep buying things. In this day and age of a throw away society it's so much better for the earth to shred and re-cycle papers and to make something new from them! I used the Three Trees   and Frosty  molds to create the embellishments for this card. Shredding your own paper and making a paper cast is snow easy, just follow these steps . A couple of tips: When coloring anything on handmade paper don't go overboard, it's better to tap the colo

We Remember...

Image
Next week Let's Remember all the men and women who have fought , and fight for our freedom.  This is my very small gesture to show my appreciation.  It is a small mixed media canvas with the Poem In Flander's Field with a paper poppy. This project is being shared on the Arnold Grummer Paper Making Blog and on my blog at : http//annmakes.blogspot.com, here . The instructions : 1.  Using a handmade sheet of red paper (made per the Arnold Grummer method of paper making).  Make a template of a petal from any paper or cardboard. 2. Trace the petal about seven times, and cut out. 3.  Fold each petal and glue to a small circle like shape that you cut out from some scrap of paper. 4. Create the centre by making two small green hearts.  Overlap and glue them. 5.Make the stamens with a black coloured piece of handmade paper.  Fringe the strip, roll it and glue to the centre of the poppy. 6.Paint a small canvas with acrylic paint, let dry. 7.