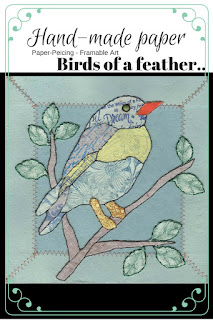
Paper-Piecing Framed Art

Hello Crafters!
This project was the most fun I've had in a long time!
Paper Piecing is a fantastic way to use up scraps of gorgeous paper, as well as create different textures, patterns and colors for your project. There's a lot going on here, but it was quite easy.
The finished size is 7x7".
SUPPLIES:
Paper Quilt Project Square - Arnold Grummer
All-Purpose Ink (blue, green)-Tsukineko, Inc.
recycled shredded paper
Paper Punches - (2) leaves
A variety of background, texture, and design stamps. (Cherry Blossoms-Hero Arts, Butterfly, Iron Fence-Hearts In Touch, Font Collage-The Art Bar, Bird Collage-Stampin Up!, Crackle, Canvas and Leaf-The Angel Company)
A Variety of different colored, but coordinating stamping ink pads (Bottle, Stonewashed, Denim and Caramel-Adirondack by Ranger Ink, Ultramarine and Cerulean Blue-VersaCraft, Burnt Umber-Pallette by The Angel Company)
Metallic Braid Thread, browns, green and blue-Kreinik
Misc: orange marker (Fabrico), black marker, mini brad, sewing machine/thread, cutting tools, paper piercer, embroidery needle, any piece of scrap hand made paper 7x7"
INSTRUCTIONS:
1. Begin the background with two full sheets of 5x8" hand made paper with added Cotton Rag Fiber.
2. Cut a 6x6" square from one sheet and four 1x7" strips from the other sheet.
3. Cut a mitered corner on both ends (but opposite directions) of two of the 1x7" strips.
4. Using minimal adhesive, assemble and adhere background pieces to a scrap piece of hand made paper 7x7". Hand made paper with cotton fibers sews like a dream!


5. Sew the background along the seams with a zig zag stitch. I used beige thread that was already in my machine :o)
6. Make a few copies of the pattern, it makes the process easier.
7. Cut out each section of the pattern using different colors, or alternating colors of previously hand made scraps of paper. I got lazy and opted to punch out the leaves instead of the hand cutting process. It was helpful to have a clean copy of the pattern for placement so I didn't forget any pieces.


8. Rubber stamp on each piece. Use a different texture/pattern stamp and a different color ink for each section of the bird. My branches are done with Canvas Texture and Burnt Umber colored ink. The legs were stamped in Caramel. The leaves were stamped with a leaf shaped stamp that was much larger, but if you center the stamp, the veins really add a nice touch.
9. Color the beak piece with orange marker.

10. Carefully assemble and adhere the paper piecing to the background.

11. Back stitch (hand work) around the entire project with metallic braid thread. 1 blue shade for the bird, 1 green shade for the leaves and 3 different brown shades for branches (darkest), feet and beak.
It may be necessary to pre-poke holes 1/4" apart before sewing by hand. My embroidery needle was not pointy. When back-stitching, small eruptions in the paper may form, an easy fix to smooth down with a small stylus when you're done sewing.
12. Attach a mini brad in place for the eye. Outline around the mini brad with thin black marker.
13. Mount the finished project on one 8x8"(centered) Quilt Square for easy framing.

Thanks so much for visiting the blog today, craft on!
Becky
 |
| Follow me on Instagram |
 |
| Follow me on Pinterest |


So pretty, I just love both paper piecing and stitching!
ReplyDeleteThis is adorable, Becky! Very sweet.
ReplyDeleteBecky, are you saying every piece of paper in the design is handmade paper? I read it thru twice but I think that's what you're saying. Wow! So fun that you discovered how nice handmade paper with cotton is for sewing. I've always felt that was true for ironing dry, too. I don't mention it much, but I often add a pinch of cotton rag or cotton linter to pulp in the blender for just those reasons. Rag adds a thready texture which I can was a plus to your design. Thank you for your project! Kim
ReplyDeleteGotta check my scraps........really fun project!
ReplyDelete