Posts

Showing posts from October, 2016

Fall Leaves

Image
© Michele Emerson-Robert 2016 Leaves are turning to all the glorious colors of yellow, orange, rust and reds! There are no two alike, and they are all beautiful! Perfect time to get out those scraps of handmade paper that I am always telling you to save, along with some of the half sheets of handmade paper that were left from other projects, and start creating the many fall and Thanksgiving cards that I send out. I send about 50 cards a month – I’d better get busy! Even though I am using “planned overs” (not left overs), I included the full directions for making the paper. Supplies Any of the Arnold Grummer® paper making kits Blender, strainer, cello sponges and soft towels A sunny window Scraps of off white, tan, olive green, rust paper (think junk mail, etc.) Dies:   Sizzix™ Tim Holtz™  656927 Tattered Leaves die and embossing folder , Spellbinder s TM   S4011 Harvest Leaves and S4076 Assorted Leaves, CheeryLynn TM B573 Fall, Quiet Fire Designs™ EC1197 “

SUN

Image
© Michele Emerson-Robert 2016 This is my favorite time of year! The days and nights are getting cooler, but the sun is still out in all its glory. When I saw this stamp from Impression Obsession, I knew of several friends who would love the message. Follow along with the instructions below as I created two very different cards     Supplies ·        Any of the Arnold Grummer® paper making kits ·        Blender, strainer, cello sponges and soft towels ·        A sunny window ·        Scraps of white and off white paper (think junk mail, etc.) ·        Dried botanicals ·        Scraps of tan chip board to die cut ·        Scrap of copy paper for mask ·        The PaperCut™ ¼ sheet autumn/gold colored card stock and ½ sheet of rust colored cardstock for one card base ·        Clear envelopes to fit cards ·        Die: Tessler Ellentina™ DCM147 Southwest set ·        Spellbinder s TM Grand Calibur™ die cutting and embossing machine ·        Westcot

Love

Image
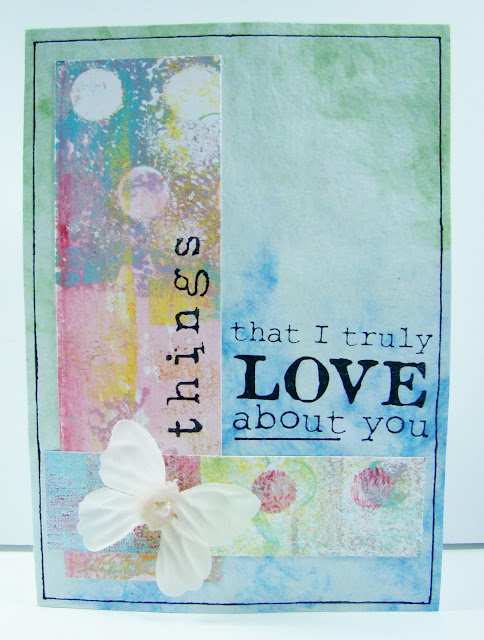
Hi everyone, today I made a card using some handmade paper created with my Arnold Grummer Papermill kit  and my Gel Press® mono-printing plate.  The handmade paper was my go to inspiration for this card, I love the subtle texture and the soft color. I used my mono-plate to create a complementary color palatte which I think really rocks the base paper. A little stamping and a butterfly embellishment from Ribbon Resource and it's done!  And check out this awesome calendar with 12 Months of Paper ideas! What a great gift for the holidays for your handmade paper enthusiast in your life! More than a calendar - here's a how-to guide for classic forms and trend projects you can create throughout 2017. Every month features a complete supply list, step-by-step photos and simple instructions to complete the featured project. From paper author and designer, Helen Hiebert. 9" x 12" wall calendar, full color and photos throughout. Oh and did I menti

Just for you

Image
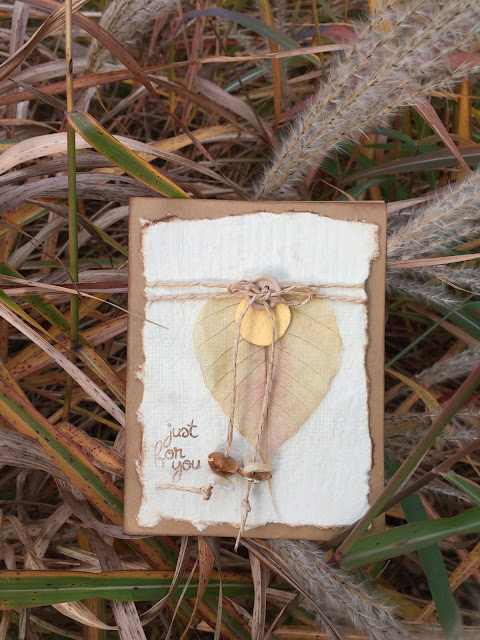
Handmade papers make the best cards! It is the perfect way to recycle and to brighten someone's day with happy mail. I started by making a sheet of paper with my Pour Handmold . For this paper I used envelopes from birthday cards. This piece happens to be a bit rough and not so smooth but that works well for this project.  I cut and embossed a piece for the front of the card. To get that deckled edge, run a paintbrush with water along the edge. Allow it to soak in and then pull along the wet part. .  This was the perfect card for a Skeleton Leaf I gently inked it before assembling the card which includes a button, a smaller piece of handmade paper from one of my scraps, twine and beads. I added a small stamped sentiment. I just love the way this came out! Don't you? I hope you get out your recycling and make cards! Thank you for visiting today. Don't forget to stop by Facebook  for more inspiration and to share what you have been making!

Happy Halloween RIP

Image
© Michele Emerson-Robert 2016 The Halloween holiday is always such fun! I love seeing the kids in costume, and handing out the candy while wearing my “good” witch costume. It bring back memories of my kids when they were little, and one time my son dressed as “Karlif the Mummy,” and lost the wrappings as he went from house to house. Lucky he had long johns on underneath!     Supplies ·        Any of the Arnold Grummer® paper making kits ·        Blender, strainer, cello sponges and soft towels ·        A sunny window ·        Scraps of white and off white paper (think junk mail, etc.) ·        Scraps of black card stock to die cut and for mouse card layer and base ·        Dies: Die-Versions™ Sweet Petites Mouse and Bird, MemoryBox TM   “Haunted Web” 99007, and CheeryLynn TM “RIP” B637, “Happy Halloween” B469, Spider web corner B117 ·        Stamps: Impression Obsession TM IOD7839 Crows, and Stampscapes™ Moon and clouds ·        Tonic St

Hand Made Tags

Image
Hello there, Donna here with a very easy post today. I have some friends at work that have ordered some salt scrubs and sugar scrubs from me and I need some tags to put on them saying how to use them and what the names are. I also have a batch of cold process soap (all natural) curing that I am giving as Christmas gifts this year and I will need tags for those also. It made it VERY easy to make the tags using the Arnold Grummer tag templates . After drying, I painted them in my two favorite colors, green and orange after all it is close to Halloween LOL. Here is what you will need: Blender Arnold Grummer hand mold Tag template junk mail water iron (optional) paint (optional) I will be adding ribbon to a hole in the top and attaching it to the container the scrubs go in. The scrubs are not yet made because I don't like to make them to early before I give them to the ladies. Told you, very easy post but something I needed to make. You can find anything you need o

Fall Cards

Image
© Michele Emerson-Robert 2016 The last day of summer has come and gone, the nights are cool, and fall is officially here. I enjoyed the blue leaf card so much that I had to make one in traditional autumn tones to finish out the cards needed for October birthdays. Supplies Any of the Arnold Grummer® paper making kits Blender, cello sponges and soft towels A sunny window Scraps of white paper (think junk mail, etc.) Scrap of matboard to die cut the leaf shape The PaperCut™ card bases dark green and black, envelopes Dies: Sizzix™ Tim Holtz   #660039 Layered Leaf and matching embossing folder Spellbinder s TM WIZARD™ die cutting and embossing machine (still the best machine to cut and emboss matboard!!!!) Westcott™ paper trimmer Scor-Pal™ Beacon ZipDry TM adhesive, double sided foam tape Ken Oliver Color Burst™ paints Fine mister bottle and water ColorBox®   Black pigment ink pad and ColorBo

Tis the Season

Image
Tis the season to start thinking of the holidays! I know it doesn't seem possible but let's get a jump on it! I am making ornaments for friends and family. My handmade paper is perfect for my snowman. I used my Pour Handmold to make white paper out of old junk mail envelopes. I cut a snowman shape which I painted with Glossy Accents. I also sprinkled with Stampin Up Dazzling Diamonds Glitter, I painted the canvas with a blue background and white dots. Once the snowman was dry, I added a scarf, heart and nose. I glued the snowman to the canvas and added a sentiment printed on the same white paper. Glue it all together and you have a fun ornament which will look adorable on anyone's tree!! So let's get out those bins with recycled papers, our Pour Handmolds , some paints and papers and let's create ornaments!!  Thank you for joining me today! Please be sure to visit our Facebook Page  for more ideas and inspiration and don&