Posts

Showing posts from May, 2015

Books For All Occasions

Image
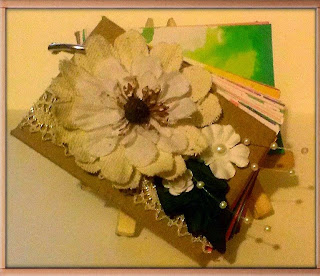
 What is more fun than reading a book?  How about creating one using handmade paper?  This book is perfect to keep your memories or ideas in.  Want a little book for some fun art journaling?  This is the one for you! This book began with the creation of 2 handmade sheets of paper using the Papermill Pro Kit  and the basic papermaking instructions .  The first sheet of paper was done in a solid orange color which then was used for the back of the book.  The second sheet of paper was for the front cover so it needed to have a lot of color.  I used 3 papers pulps which were all created using some leftover construction paper which I poured into the deckle using a ladle in a random pattern.      The first thing I did was to paint both end pieces for the book and laid them aside to dry.     After both sheets were dried,  I  traced the covers from the Make Your Own Book ...

Dragonflies Kaleidoscope

Image
©Michele Emerson-Roberts 2015 As you may know I love dragonflies! I use dragonfly images in a lot of my creative endeavors. I also love kaleidoscopes and wanted to combine the two things to create this project. It will have a special place in my art room, and will serve as a reminder to me to slow down, savor and enjoy a few peaceful minutes.   Supplies: Any of the Arnold Grummer™ paper making kits A sunny window Blender, cello sponges and soft towels Scraps of white (think junk mail, etc.) Iridescent paper scrap Westcott™ personal paper cutter, scissors Scor-Tape™, foam tape or foam dots, Beacon QuickGrip™ adhesive 12”  each of narrow picot & ½” sheer white ribbon Several dragonfly stamps Beige ink pad Clear embossing powder Heat gun Iron Purchased (child’s) paper kaleidoscope 6” of gold colored thin wire, round tooth pick BowEasy™ Instructions: Follow the directions found in any of t...

Embedded In Pulp

Image
The blender came out again to work on some papermaking ideas.  After making a couple batches of paper pulp for more experimenting, I created two interesting "organic" sheets. The first was made by placing a number of  skeleton leaves  onto the  papermaking screen . This is layered on top of the  white support grid  that is sitting on a pan with a lip to catch the water from pressing.   After they were in position I took small clumps of the pulp and placed it over each of the leaves.    NOTE:  The weight of the pulp helps hold the leaves in place.   Continue to cover the entire leaf pattern with pulp, going beyond the edges of the pattern.  Place enough pulp to cover but not too thick.  Experiment with the thickness and placement of the pulp.  Place the mesh cover screen on top of the pulp and begin removing water with sponges.  Remove as much of the water as possible and flip the screen over, pressing a...

Memorial Day Flag by Linda Hess & her 1st graders

Image
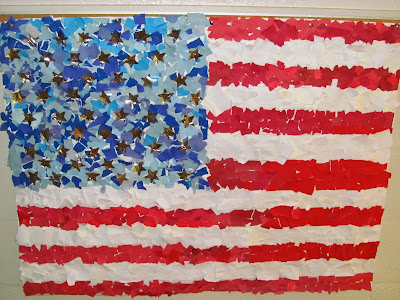
Ever wonder what to do with all of those bit and pieces of paper??  I think I have the perfect project for you!  Now granted, I teach art so I have multiple hands to do the work for me, but you could scale down the project and still have fantastic results.   With Memorial Day upon us, I created a project with my 1st grade students.  Our school is next door to Quantico Marine Base, so many students have family ties to the military.  We spoke about what Memorial Day is and the meaning of the stripes & stars in the flag.  They were all very excited to work on this collaborative project! Materials are simple: Scraps and pieces of paper in desired colors (I had an assortment for my students including handmade scraps, construction paper scraps, and magazine scraps) Sheet of backing paper (ours was very large ~ 30"x36") Ruler & pencil Glue (any type will do...at school we used Elmer's School Glue) Optional: sequined stars Use th...

Pheasant Fathers Day Card

Image
  ©Michele Emerson-Roberts  2015 I have the best “dad” in the world!  I wanted to make a special card for him for father’s day to remind him how special he is to me. He and mom have always liked to go for walks and watch the birds they would see along the way. I remembered a story of them seeing a beautiful pheasant many years ago and knew this mold would be perfect. Supplies: Any of the Arnold Grummer’s paper making kits Pheasant acrylic paper weight (look around….you might be surprised at how many “molds” you already have!) A sunny window, heat gun or microwave oven Blender, small strainer, cello sponges and soft towels Scraps of white paper (think junk mail, etc.) Dies: Happy Father’s Day from CheeryLynn Spellbinders Grand Calibur™ Machine Westcott™ paper trimmer Scor-Pal™ (LOVE the new 1/8 th version!) Scor-Tape™ Envelope to fit card Beacon QuickGrip™ and ZipDry™ adhesive 6 x 5 ½” mediu...

Sympathy Card

Image
Hi everyone, today I made a card using both the Papermill Kit and the Garden Press  to create my Sympathy Card. (Please go here for the steps to make your paper.) The first thing you want to do is choose the flowers that you are going to use as a decorative element for your card. The best flowers to use are ones that are freshly opened which is when the colors are the best. Flowers are fragile ( you can see where I tore one of my Climbing Black Eyed Susan flowers when I was laying it in the press ) Although you can carry the press out into a flower garden and gather your flowers there, I simply stepped out onto my balcony and gathered some from a potted plant. Here is a great site on pressing flowers. When my flowers were ready, I removed them from the press and using Deco Art's Soft Varnish, I adhered it to the front of a piece of handmade paper. After it had dried I stitched French Knots in the center of the flowers and a running stitch for the stems. ...

Reclaimed and Reused from My Stash

Image
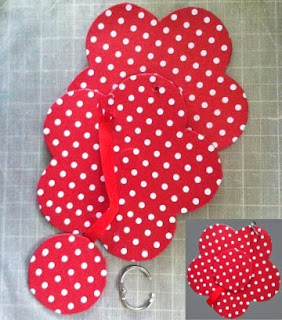
If you're like me, you have a mountain of stash—stuff that has accumulated over your crafting career. I know that my style and tastes have changed over the years that I've been crafting. The other day I decided it was time to de-stash. Interestingly, I found a few items that made perfect candidates for repurposing and reclaiming. I'm going to give them a new life!! This mini album was one of the de-stash items that made it to the keep and repurpose pile. Here you can see the pieces of the album—front and back covers and a magnetized closure tab. The inset shows the closed album. The polka dots just don't do it for me any more, so I decided the cover the album pieces with handmade papers that I made following these basic instructions .  I traced the outline of the covers and closure directly onto my handmade papers, and cut them out with scissors and a craft knife. Next, I painted the originals with white acrylic paint so the design wouldn't shadow thro...

Floral Greeting Card

Image
We're had several 80° days here, so I think it's safe to say that spring is leaving us and summer is here!! Our flowers are just beginning to bloom, and so is the greeting card that I made using my own handmade papers and dried botanicals. The paper was made following the basic instructions for making handmade papers. I used tissue tints  and red angel wing dried botanicals  to achieve the coloring in the pink mat. Before adding the angel wings to the pulp, I crumbled two petals into very fine pieces—almost dust. I dry embossed the paper for added texture. Next, I used a die to cut white blossoms and green stems from scraps of handmade paper that I had left from other projects. I never toss even the tiniest scrap of handmade paper. Even if the piece is too small to use in a project, it can always be recycled into paper pulp. Then, I die cut a flower from a dried leaf to layer on top of paper die cut flower. This is the darker flower. The lighter flowers are dried blosso...

Rustic Card Trio

Image
©Michele Emerson-Roberts  2015 I have never been a “glitzy” person…. no “BLING” for me! I am understated with what I create, what I wear and how I decorate. I needed cards for two friends who are moving into retirement centers and another friend who is getting married. Follow along to see how I created the three cards for them. ­ Supplies: Any of the Arnold Grummer paper making kits A sunny window or traditional oven Blender, small strainer, cello sponges and soft towels Scraps of ivory & brown paper (think junk mail, etc.) Dies:  3 different types of “label dies” to layer Spellbinders Grand Calibur™ Machine Westcott™ paper trimmer & scissors Scor-Pal™ (LOVE the new 1/8 th version!) Envelopes to fit cards Beacon QuickGrip™ and ZipDry™ adhesive, double sided foam tape or dots Verbiage stamps (or computer generate the message) ColorBox chalk to correspond with the paper colors...

52 Acts of Kindness...with Tamiko

Image
Hi there folks.  Tamiko here with my Deck 52 album.   I have been wanting to use this album ever since I got it.  As a mixed media artist I have seen people do 52 prompts to motivate them create.  One prompt per card or you can add your favorite quotes on the cards.  I would use mine to list 52 Acts of Kindness.  Everyday I look, listen and read at an abundance of things that capture my heart and make me feel warm and fuzzy.  While I am not an actually memory keeper by way of scrapbooking.  I do collect my own versions of things that make people smile that I choose to remember.   When I am able I CHOOSE to be KIND and redeliver those warm and fuzzy moments.  This mini fan book is perfect for recording those precious memories in for me.. and maybe for you.. ::smiles:: Directions: Create your favorite papers with any of the Arnold Grummer Paper Mill Kits with the directions found here .  You will need 2 sheets of paper. to ...

Raining Cats & Dogs Fan Book

Image
©Michele Emerson-Roberts 2015 This is another in the series of the AG “52 Card Fan” books. This will make the perfect gift for a girlfriend who will someday be known as the "Crazy Cat Lady". This little book will be filled with "kitty/cat" quotes and cartoons. I know, only those of us who love cats will understand..... smile. I will be using scraps of handmade paper saved from previous projects, whoever you follow along with the instructions below on how to make your own paper in the event you don't have scraps. Supplies: Any of the Arnold Grummer™ paper making kits A sunny window Blender, cello sponges and soft towels Westcott™ Personal paper cutter, scissors Beacon QuickGrip™ Adhesive Scor-Tape™ Scraps of ivory and rust colored paper (think junk mail, left over cardstock scrap, etc.) One  AG 3 1/2" square Mini Fan Book Verbiage stamps, and rusty orange ink pad or computer generated quotes or sayings, cartoons Dies: Cat...

Tea Cup box

Image
I was watching a video on how to make paper tea cups so I decided to make one myself out of some of my handmade paper. Please go HERE to see the steps in making your own paper. The site, Red Ted Art has a template and instructions to follow to make your own tea cup. I traced the pattern onto my paper, it took 2 sheets made from the medium pour handmold  for my box size.  I tweaked it a little bit by adding some stamping and water coloring to the paper before assembling it. Hand made paper is extremely absorbent so you need to keep that in mind when coloring in your image. I wet the entire pieces after I cut them out and then dabbed my watercolors in the stamped areas and let the colors bleed out. Set it on a paper towel in the sun to dry. Next, I took a small box and covered it to look like a book. I added some white handmade paper to the edges, yellow handmade paper to the spine and to the cover. It took 1 sheet of white and 2 sheets of yellow to cove...

Noteworthy

Image
Hello, it is I Ann from AnnMakes and the Arnold Grummer Paper Making Design Team.  I am a lover of the handmade and all things paper.  I am also a cat lover.  Well, I have managed to make , what I think is the cutest pocket size note booklet (new word :)). By recycling some of my county's notices about Spring Street cleaning and new bylaws I made this sweet little booklet that can be easily slipped into one's pocket, one's pocket book, and even into a pocket of a Pocket Letter! ( Here is a link to what PL's are ) These are fun, fast, and free to make.  Here is how I make mine. 1. View and follow instructions on how to make handmade paper the Arnold Grummer, tried and tested way. ( Click here for link ) 2.  Gather some junk mail and make two sheets of paper. 3.  Cut one sheet in half to make the cover.  If you want to make a notebook that will fit into a pocket letter page protector you will need to make sure that your finished notebook...