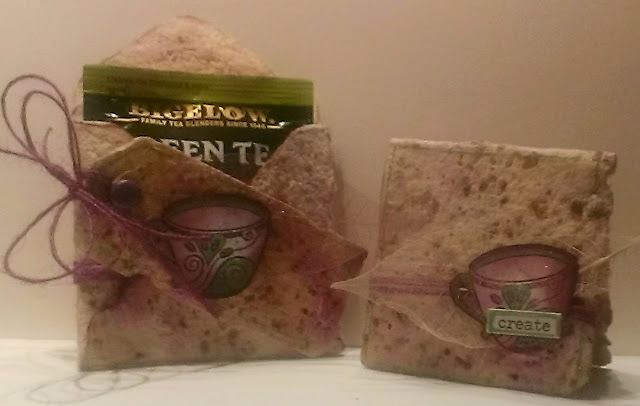
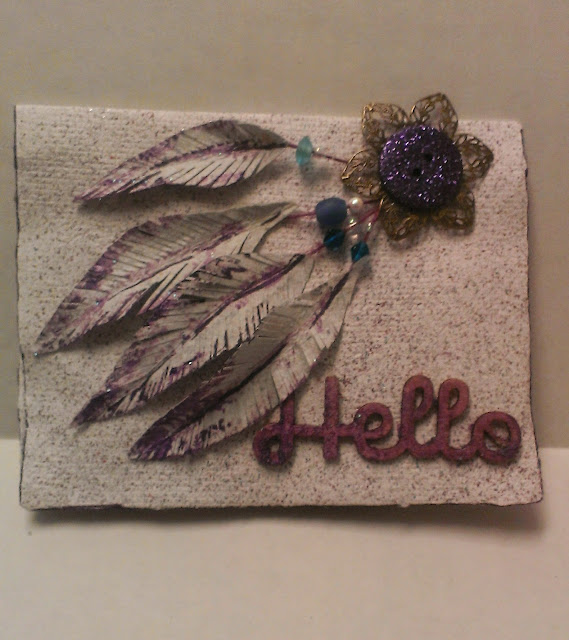
Posts

Showing posts from March, 2015

Inspirational Cards

Image
©Michele Emerson-Roberts   2015 I mail about 50 inspirational handmade cards a month and like to make them in batches. I will often gather up scraps left over from other handmade paper projects and use them in the creation of the new cards. If I am short on time I will use card stock as the card base and use the handmade papers as the accents. If you have been following the blog, you know that I always save my scraps….but in case you don’t have any handmade paper scraps, the instructions below will walk you through the process. I ran across these sentiment stamps from JustRite™ stamps and think they will be perfect for March’s batch of cards.   Supplies: Any of the Arnold Grummer™ paper making kits Scraps of dark gold, tan, burgundy and olive green paper (think junk mail, etc.) Blender, small strainer, cello sponges and soft towels Westcott® paper cutter & scissors, X-acto knife and cutting mat Score-Pal™ Dies:  Spellbinders™ various decre

Create Tea Notes with Tamiko

Image
Today I decided to make something a little extra to go with my international pen pal letter.  She told me she drinks tea and I had the perfect idea.  I knew I knew I could use my handmade papers, a few templates and send something truly special.  This is something I am  putting in her small package from me. Items needed to create this would include: Any of the Arnold Grummer Papermill Kits Skeleton Leaves Card and Tag Template Collection Gift Card and Envelope Template Tags for Cards and Pages Template Blender shredded papers dried roses Michael Strong Rubber Stamp Sakura Gelly Roll Pen Wink of Stella Clear Brush May Roads Purple twine Helmar Super Tac  Glue First you take a handful of shredded papers and put then in the blender with 2-3 cups of water.  Blend to create pulp.  Add some dried roses. Blend some more again.  Before pouring pulp into the deckle, make sure that you sandwich the template needed between the deckle and the paper screen, before you add

Springtime Decorations

Image
Not only at Christmas time has there been a tree used as part of holiday decorations in my house. Growing up I remember several things about all the holidays and wanted to share my version of one of them.  Each Easter my mother would bake and decorate an Easter lamb cake, there would be bowls of dyed eggs to display in baskets or bowls.  The one idea I remember most and continued to use in my own Spring decorations was an Easter Tree.  It would be fashioned from a large or small branch from a tree or a bush and normally decorated with colored, blown out eggs. So I had a "brain storm" to try another version of an Easter tree and incorporate Easter ornaments made from paper pulp.  This little tree, constructed from a small branch cut from a dormant hydrangea bush, becomes a  sweet decoration for spring or Easter. Paper pulp egg, bunny and chick shapes were made into ornaments to hang from the branches.  For casting  the eggs I used a plastic candy mold.  T

Experimenting with Dryer Sheets & Paper Creations

Image
Hi all!  Never underestimate the effects of down time on a mind that tends to wander.  We had a snow day a couple of weeks ago during which I caught up on laundry.  As I started throwing away the used dryer sheets I was hit by a thought...what would happen if I used the dryer sheets with paper pulp??  Would it bond with the paper?  Would it peel away??  Would it give the paper more strength?  Only one way to find out...start experimenting. The first thing that flashed in my mind was a comic strip bowl.  I had to wait for the Sunday funnies to try it.  I cut out one of the comic strips to be used whole.  The rest of the comics were shredded to be turned into pulp. Following the instructions with the Papermill Pro, I assembled the deckle box with the support grid and Papermaking screen.  On top of the papermaking screen I laid 2 used dryer sheets side by side.  Then I placed the cut out comic face down on the dryer sheets.  Holding it in place, the paper pulp was poured slowly unti

Giving Dimension to Handmade Paper Embellishments

Image
I have been eagerly counting the days until spring arrived and it finally did yesterday.  Unfortunately, we still have some snow in our forecast the next few days, but I've decided to welcome spring anyways by creating some beautiful tulips from handmade paper.  These flowers can be used for window decorations or for magnets to brighten up your office space and bring a little touch of the season indoors.     I wanted the paper to be a really pale pastel color so I decided to mix things a little differently than I normally do.  I first placed 2 pieces of Tissue Tints into the blender with 2 cups of water and blended it on high speed.  See how rich the color is after it being blended?  I love it, but it was too bright for what I had in mind so I used 8 strips of leftover white cardstock instead of colored cardstock to create the paper which gave me just the right hue for that.    I created 3 sheets  of paper (1 pink, 1 yellow and 1 green) with this method usin

Happy Birthday Medallion Card

Image
©Michele Emerson-Roberts   2014 I have a close friend who is simply elegant in all that she does. Perhaps “classy” is a better word to describe her. I needed to create a special birthday card for her that would be elegant and classy. Her favorite colors are peach and burgundy. I hope you will like the card as much as she did. Supplies: Any of the Arnold Grummer paper making kits Mold: the bottom of a glass bowl (secretly barrowed from her china cabinet)  Heat gun or a sunny window Blender, small strainer, cello sponges and soft towels, scissors, bone folder Beacon Quick Grip™ Adhesive, double sided foam tape or foam dots Scraps of peach and white paper (think colored junk mail, etc.) One 6 x12” Burgundy  90# card stock folded in half (I used World Win) Envelope for a 6 x 6” card Dies: Spellbinders™ Circles, CherryLynn Doily Spellbinders Grand Calibur™ Machine ColorBox ™ Chalk Ink pads in Peach and Stylist h

Wabi-Sabi bowl

Image
Let's embrace the imperfect, and find beauty in the cracks and crevices. ( At the age of 56 I am learning to embrace a lot of imperfections, lol )  Let's celebrate the Wabi-Sabi in our life that patiently waits to be discovered. I have enjoyed for many years the Japanese philosophies of accepting what we call flaws as something valuable instead. When I made my paper casted bowl I could only see opportunity and not disaster in the tear along the side of the bowl. I am a firm believer in Wabi-Sabi which then gave me the chance to experience the art of kintsugi . I "repaired" the tear with gold leaf. I painted a line of Helmar Super Tack glue along the crack and then used 14 karat gold leaf to cover the "flaw" to simulate the kintsugi method. The art of kintsugi "The Japanese have a long tradition of repairing pots with gold; it’s called “kintsugi” or “kintsukuroi”. “The term “kintsugi” means ‘golden joinery’ in Japanese and refers to th

Recycling and Upcycling

Image
Handmade paper making involves the benefits of recycling discarded papers into new paper, and it also involves including other materials as well as what I like to call up cycling.  It is a win win situation for the creator and the environment. Hi, I m Ann from AnnMakes (http://annmakes.blogspot.com) and the Design Team here At the Arnold Grummer Paper Making Design Team.  Today I am sharing with you a card that is a recycled and an up cycled project.  The up cycling is the original blue card base that was once made from recycled papers and used in a print shop.  It did not make it to the retail market because of some mis folding mishap.  I still found a use for a batch of these misfit cards, I just trimmed the blue cards back to a regular rectangular and even shape, I don't mind that they are not exactly a commercial measurement.  Then I reused a used dryer sheet that I dyed in some strong left over coffee over night.  No waste here.  The twine and raffia are also bits lef

Handmade Paper Bookmarks

Image
Even though we're still in the deep freeze with inches of snow still covering the ground, I'm looking forward to summer, warm breezes, and curling up with a good book. Since I can't bear to throw away even the smallest scrap of my handmade paper, I've made several bookmarks—all made from leftovers from other projects. For this button bookmark I punched a circle from a piece of dry embossed paper. For added strength I glued the handmade paper to a chipboard button. The large paperclip is attached to the chipboard button with E6000 adhesive. The second bookmark is made from a paper casting using Arnold Grummer's oak leaf mold . I used an ink pad and a paint brush dipped in water to add the color. Work slowly with just a little water. The paper casting is very porous, and really sucks up the color. The next bookmark is a simple strip of handmade paper that I punched on one end. I found that thinner papers work best, as a punch isn't strong enoug

Angel Baby Card

Image
©Michele Emerson-Roberts 2015 A close neighbor friend is expecting a new addition to their family. Knowing it will be a little girl gave me the perfect opportunity to use one of the Arnold Grummer’s Cotton Press Angel molds for a “welcome to the world little one” card to include with the baby gift. I will be framing the card for them later as an extra bonus. It will be a beautiful addition to her room. Supplies: Any of the Arnold Grummer™ paper making kits AG Cotton Press Angel casting mold Scraps of white and pale grey blue paper (think junk mail, etc.)  Note - I matched the paint color they used in the baby’s room for the card background layer. Microwave, heat tool or a sunny window Blender, cello sponges and soft towels Westcott® Personal paper cutter, scissors Scor-Pal™ Spellbinders Grand Calibur™ Machine Die: Spellbinders S5-198 Tapestry Beacon QuickGrip™ & ZipDry™ Adhesive, & double sided tape, fo

DreamCatcher Card with Tamiko

Image
Hey folks.. Happy Wednesday!  I have a friend I who pops up on my screen every now and then, just to say HELLO!  She brightens my day!  Lovely lady makes me laugh almost instantly. We share a few giggles.. and then she disappears.. ::smiles:: I created a card in thought of her.  You see she loves dreamcatchers and while I haven't quite learned to do the cording of the sinew, yet ::winks::.  This is my interpretation of one.. The supplies I began with were only made possible after using any one of the   Arnold Grummer Paper Mill Kits  to create my awesome papers.  I needed 1 and 1/2 sheets for this project. Then you also need: Faber Castell- Glass Bead Glitter Gel Faber Castell- Metallic Purple Gelato Faber Castell- Big Brush Pen Purple Violet Helmar's  Super-Tac Glue Helmar's 450 Quick Dry Adhesive metal flower, beads, fiber and wooden embellishment spatula  paint brush scissors The sheets of paper I used in this card actually came from my favorite Ch

Sweet and Simple Paper Castings

Image
These little basket boxes would be a sweet addition on a Easter table setting.  Each is made using a die-cut box as the base.  What makes them become special are "extras" added to the surface, mainly the casted images. Paper castings are so easy to make using any of the  Arnold Grummer  casting molds or any variety of molds that may be available.  Use this link to find a pamphlet that you can download filled with information about creating casting  here. After the paper castings are complete, the coloring can begin.  For the images on boxes I chose to use both chalks and  Ranger Perfect Pearl powders .  The castings were trimmed of the paper around them to make them smaller and allow the papers used on the boxes to frame them.  One set was trimmed straight, the other with deckle designed decorative scissors. Box Of Chicks Die-cut the box from white mat board.  Form the box using redline tape.    NOTE:  One side of the box is folded to the inside of the b